ZIPPER INSERTING (CENTER AND SIDE APPLICATIONS) | I |
|
1Straight (Mid) [straight stitch (center needle position)]
1
Inserting a centered zipper
|
|
|
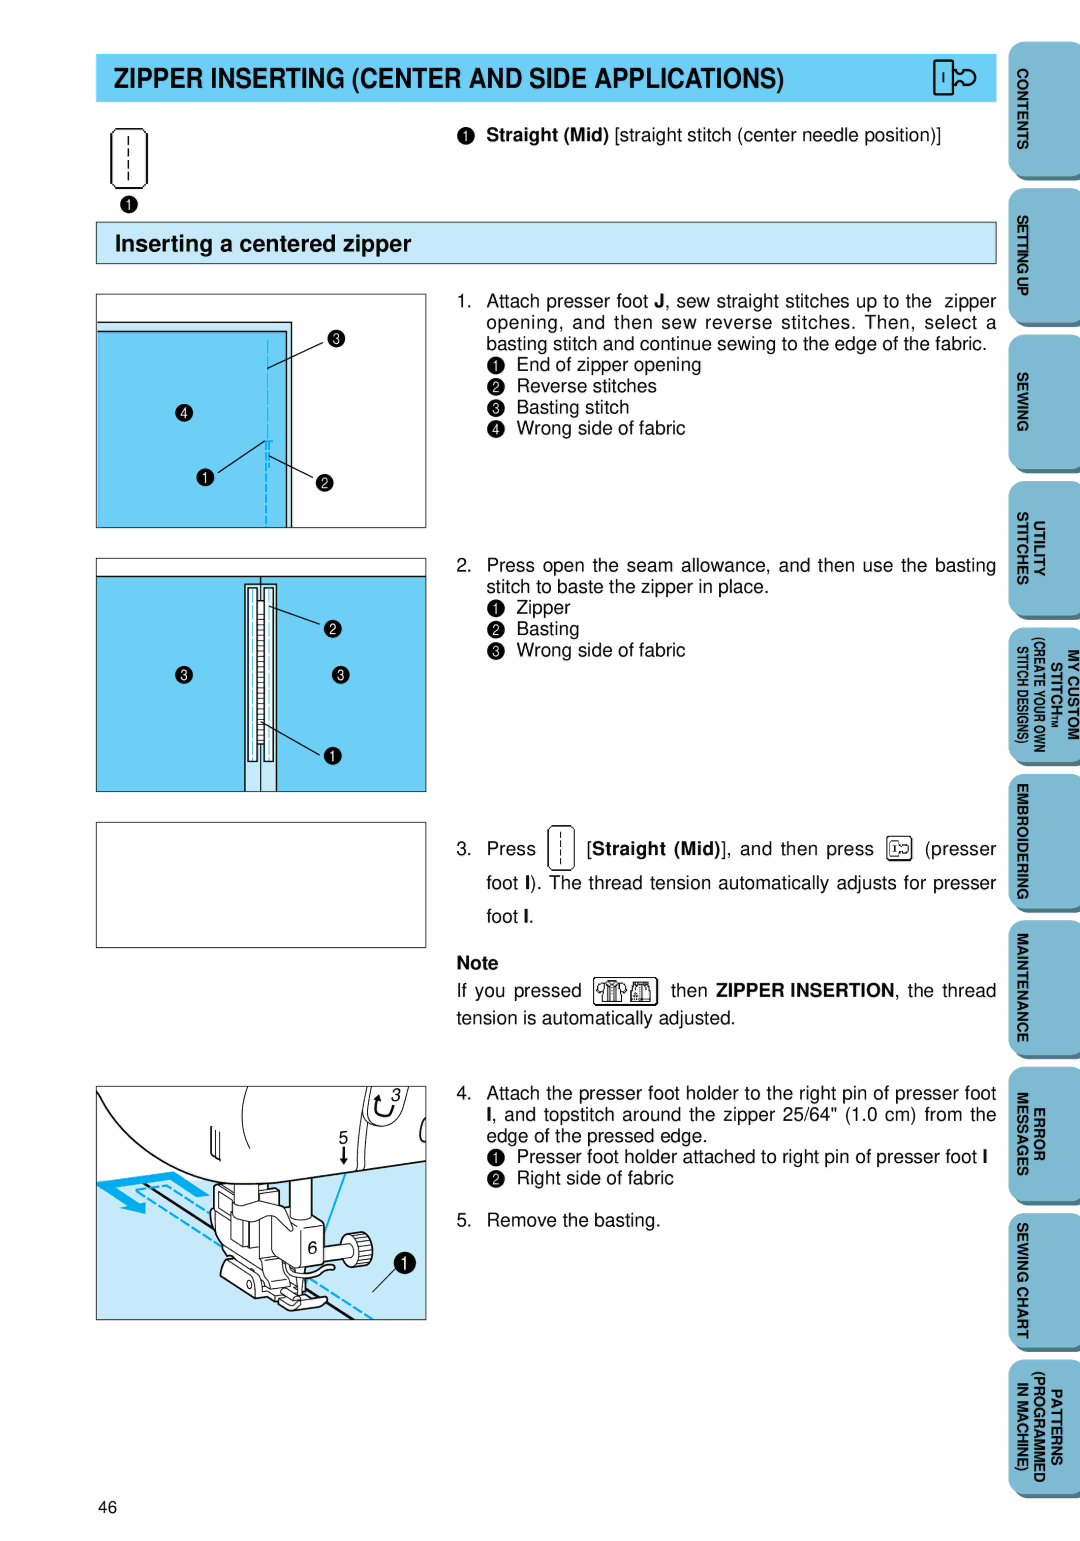
| 1. | Attach presser foot J, sew straight stitches up to the zipper | |
|
|
| 3 |
| opening, and then sew reverse stitches. Then, select a | |
|
|
|
| |||
|
|
|
| basting stitch and continue sewing to the edge of the fabric. | ||
|
|
|
|
| 1 | End of zipper opening |
|
|
|
|
| 2 | Reverse stitches |
|
|
|
|
| 3 | Basting stitch |
|
|
|
|
| 4 | Wrong side of fabric |
|
|
| 2 |
|
|
|
|
|
|
| 2. Press open the seam allowance, and then use the basting | ||
|
|
|
| |||
|
|
|
| |||
|
|
|
|
| stitch to baste the zipper in place. | |
|
|
|
|
| ||
|
|
|
|
| 1 | Zipper |
|
|
|
|
| 2 | Basting |
|
|
|
|
| ||
|
|
|
|
| ||
|
|
|
|
| ||
|
|
|
|
| 3 | Wrong side of fabric |
|
|
|
|
| ||
|
|
|
|
| ||
|
|
|
|
| ||
|
|
|
|
|
|
|
|
|
|
|
|
|
|
|
|
|
|
|
|
|
|
|
|
|
|
|
|
|
|
|
|
|
|
|
|
|
|
|
|
|
|
|
|
|
|
|
|
|
|
|
|
|
|
|
|
|
|
|
|
|
|
|
|
|
|
|
|
|
|
|
|
|
|
|
|
|
|
|
|
|
|
|
|
|
|
|
|
|
|
|
|
|
|
|
|
|
|
|
|
|
|
|
|
|
|
|
|
|
|
|
|
|
|
|
|
|
|
|
|
|
|
|
|
|
|
3. Press | [Straight (Mid)], and then press | (presser |
foot I). The thread tension automatically adjusts for presser
foot I.
Note
If you pressed ![]() then ZIPPER INSERTION, the thread tension is automatically adjusted.
then ZIPPER INSERTION, the thread tension is automatically adjusted.
CONTENTS |
|
|
SETTING UP |
|
|
SEWING |
|
|
STITCHES | UTILITY |
|
STITCH DESIGNS) | STITCHTM (CREATE YOUR OWN | MY CUSTOM |
EMBROIDERING |
|
|
MAINTENANCE |
|
|
3 |
4.Attach the presser foot holder to the right pin of presser foot I, and topstitch around the zipper 25/64" (1.0 cm) from the edge of the pressed edge.
1 Presser foot holder attached to right pin of presser foot I 2 Right side of fabric
5.Remove the basting.
MESSAGES | ERROR |
|
SEWING CHART |
|
|
IN MACHINE) | (PROGRAMMED | PATTERNS |
46
