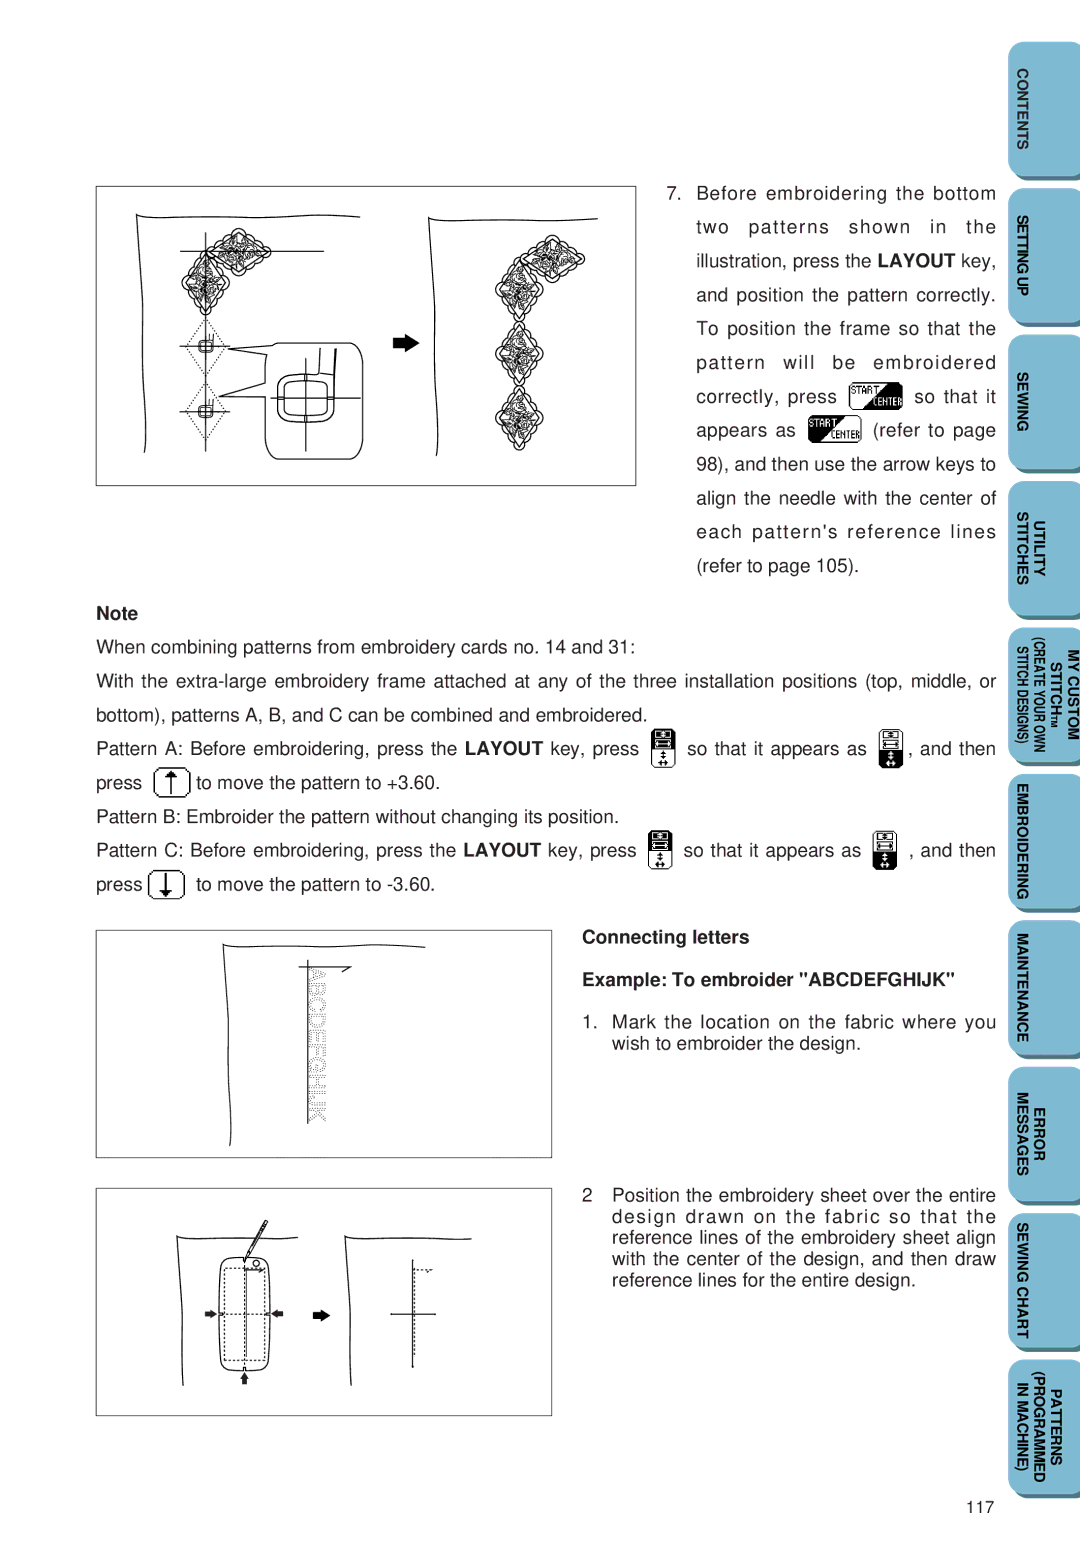
SEWING MACHINE
OPERATION MANUAL
IMPORTANT SAFETY INSTRUCTIONS
SAVE THESE INSTRUCTIONS
This machine is intended for household use only
THE LETTER ‘E’, BY THE EARTH SYMBOL OR COLOURED GREEN OR YELLOW
FOR USERS IN THE UK, EIRE, MALTA AND CYPRUS ONLY
PLEASE READ BEFORE USING THIS MACHINE
For a longer service life
For repair or adjustment
THANK YOU FOR PURCHASING THE PC-6500 COMPUTERIZED SEWING MACHINE
CONTENTS
CHAPTER SETTING UP
CHAPTER
SEWING
MAINTENANCE
ERROR MESSAGES
SEWING CHART
EMBROIDERING
SETTING UP
CHAPTER
PRINCIPAL PARTS
Accessory compartment
FLAT-BED ATTACHMENT
Removing the flat-bed attachment
Page
OPTIONAL ACCESSORIES
c When using the walking foot, refer to page
a This unit cannot be used together with memory card S1
POWER SUPPLY
For U.S.A. only
CONTROLS
Selection keys
Operation buttons
1 SEWING key
LCD screen
Other basic LCD keys END key
CHECK key
Adjusting the density with the main power switch
LCD DENSITY
Light →
Dark →
Adjusting the density with the Operation Guide
3. Press the BRIGHTNESS OF LCD key
DISPLAY LANGUAGE
3. Press the LANGUAGE SELECTION key
This function should not be used as a translation function
PRESSER FEET / FEED DOGS
Changing the presser foot
Installing the presser foot adapter & the walking foot
Adapter
Screw for securing adapter
Installing the optional side cutter
Page
Installing the presser foot holder
Raising/lowering the feed dogs
FABRIC/THREAD/NEEDLE COMBINATIONS
Thread
Application
Size of needle
NEEDLE
Checking the needle
Changing the needle
BOBBIN WINDING / LOWER THREADING
Winding the bobbin
4. Place the bobbin on the bobbin winder shaft so that the
Installing the bobbin
UPPER THREADING
Threading the upper thread
Page
Needle threader
Pulling up the bobbin thread
Extra spool pin
Spool
Spool pin
FOOT CONTROLLER
SEWING
STITCH SELECTION
Selecting a utility stitch
Selecting a stitch with the stitch guide
6. Follow the instructions, and then press the NEXT key
Stitch width and length reference chart
Non-adjustable
SETTINGUP
UTILITY
STITCHES
MYCUSTOM
Adjusting the needle position stitch width
Adjusting the stitch length
STITCH WIDTH & LENGTH
Adjusting the upper thread tension
THREAD TENSION
Correct tension
Upper thread is too tight
Example To display the instructions for installing the
Press the SETTING BOBBIN key
OPERATION GUIDE
bobbin
AUTOMATIC REVERSE/REINFORCEMENT STITCHING
AUTOMATIC THREAD CUTTING
Sewing using the straight stitch left needle position
BASIC SEWING
Be aware of the needle location
at all times while sewing, and
4. Lower the presser foot lever
USEFUL SEWING SKILLS
Sewing corners
Sewing thick seams
Sewing curves
Sewing thick fabric
Sewing thin fabric
Sewing a curve with a zigzag stitch
Using the needle plate
UTILITY STITCHES
BASIC STITCHING
Reinforced stitching of stretch fabric
1 2 3
DART SEWING
GATHERING
ZIPPER INSERTING CENTER AND SIDE APPLICATIONS
Inserting a centered zipper
Inserting a side zipper
5. Close the zipper, turn over the fabric, and then sew the
PINTUCK SEWING
FLAT-FELL SEAM SEWING
BASTING
1 Basting stitch
ZIGZAG STITCHING
Overcasting with a zigzag stitch
Appliqué sewing with a zigzag stitch
Patchwork crazy quilt stitching
1 for sewing thin and medium weight fabrics
3 for sewing thick and medium weight stretch
OVERCASTING
Sewing with , or
BLIND HEM STITCHING
Blind hem stitch
Adjusting the needle position
MAINTENANCE
BUTTONHOLE STITCHING
Buttonhole
For normal buttonholes and rounded buttonholes
For keyhole buttonholes
Sewing order of buttonholes
Sewing stretch fabrics
Adjusting the buttonhole width
Odd-shaped buttons that do not fit into the button guide plate
BAR TACK STITCHING
1 Bar tack
5. Lower the buttonhole lever so that it is positioned behind the
metal bracket on the buttonhole foot
Adjusting the bar tack width
Adjusting the stitch length of the bar tack
Sewing bar tacks on thick fabrics
WIDTH keys and to adjust the width of the bar tack
DARNING
Darning
Adjusting the darning width
Adjusting the stitch length of the darning
Darning stitch cycle
TAPE ATTACHING
1 Tape attaching 2 Elastic zigzag
Straight Left , set the
EYELET STITCHING
1 Eyelet
1 Button sewing SETTINGUP
BUTTON SEWING
Attaching two-hole buttons
Attaching four-hole buttons
Attaching a shank to the button
APPLIQUÉ STITCHING
Sewing around corners of the appliqué
1 Zigzag stitch 2 Appliqué
APPLIQUÉ QUILT STITCHING
Sample patterns for appliqué quilts
1 Appliqué
SCALLOP STITCHING
Scallop stitch
SMOCKING STITCHING
1 Smocking stitch
PATCHWORK STITCHING
1 Patchwork stitch
FAGOTING
1 Fagoting
DECORATIVE STITCHING
Shell tuck stitching
1 Decorative 2 Satin stitch
HEIRLOOM STITCHING
Hemstitching with
1 Heirloom
Hemstitching with
1 Approx. 5/32 4.0 mm or less 2 Sections of four threads pulled out
DESIGNING THE STITCH
MY CUSTOM STITCHTM CREATE YOUR OWN STITCH DESIGNS CHAPTER
Stitch
Stitch
Stitch
Stitch
ENTERING STITCH DATA
1. Press the MY CUSTOM STITCH key. 1 MY CUSTOM STITCH key
A screen that allows you to see the entered stitch design appears
EDITING STITCH DATA
Moving a point
position
2. Use the four arrow keys to move the point to the desired
Moving part or all of the design
Inserting new points
SETTINGUP
2. Press . A new point is inserted and moves to it
3. Use the four arrow keys to move the point to the desired position
STORING A STITCH DESIGN THAT YOU HAVE CREATED
Example To save the entered stitch design in memory address
1 MEMORY key
RETRIEVING A STITCH DESIGN THAT HAS BEEN SAVED
1 MEMORY key
SETUP
Installing embroidery foot Q
EMBROIDERING
CHAPTER
Installing the embroidery unit
Do not touch the connector on the embroidery unit
Initializing the embroidery unit
Do not carry the machine with the embroidery unit connected
Make sure that the power is turned off, otherwise damage may result
Embroidering screen
Removing the embroidery unit
Creating beautiful embroidery
Attaching stabilizer material
Inserting the fabric in the embroidery frame
6. Insert the fabric and inner frame back into the outer frame
Attaching the embroidery frame to the embroidery arm
Removing the embroidery frame from the embroidery arm
EMBROIDERING
Simple embroidering Embroidering multi-color patterns
1 2 3
Example To embroider the floral pattern of the letter “B”
2 3 4 3 4 5
2. Replace the upper thread with the next color
EMBROIDERY PATTERNS
Creating text patterns
Example To select characters to create the word “BUS”
1. Press 2. Press the B key 3. Press the NEXT key 4. Press the U key
5. Press the S key
Typing uppercase & lowercase characters
Changing the character size
Example To type in “Aa”
LM S
Example When “abcdefghijk” have been
Checking the text
typed in small-sized lowercase
characters
Example When “Giel” has been entered instead of “Girl”
Editing text
Changing the color of each character in the text
Creating frame patterns
Selecting one-point patterns
Displaying the thread color names
Selecting patterns from a memory card
Always keep the memory card in its case when it is not being used
CHANGING THE PATTERN SETTINGS
Editing the layout of the pattern
Character patterns
Frame patterns One-point patterns
Changing the embroidering position
Character & frame patterns
One-point patterns
Changing the pattern direction
Mirror imaging patterns
flips the pattern back to a normal
Embroidering from a specific starting point
Checking the embroidery area
Changing the size of patterns
Character patterns
Frame patterns One-point patterns
Changing the thread density
MEMORY
Saving character combinations in the memory
Example To save the character pattern “Girl” in memory address
1 MEMORY button
Retrieving a pattern which has been saved
1 MEMORY button
ADJUSTMENTS WHILE EMBROIDERING
Continuing embroidering
1 2 3 4 5
Embroidering again from the beginning
EMBROIDERY APPLICATIONS
Linking characters
Example To embroider “ABC”, then link “DE”
Using the extra-large embroidery frame optional
EMBROIDERY SHEET
Connecting patterns
Example To embroider connecting patterns
Connecting letters Example To embroider ABCDEFGHIJK
appears as refer to page 98, and then use the arrow keys to
1 Top installation position
Combining a frame pattern with a design
Making badges or decorative patches
Embroidering appliqués using a frame pattern
Embroidering onto small pieces of fabric or in corners
Case A
Case B
Case C
MAINTENANCE
CLEANING
Cleaning the screen
Cleaning the machine surface
3. Remove the needle plate. 1 Needle plate
CHANGING THE LIGHT BULB
ERROR MESSAGES
Warning messages
Page
This message appears when the STITCH ADJUST key is pressed before selecting a pattern
Operation messages
machine is turned on
This message appears while the bobbin is winding
Troubleshooting
Thread and stitch problems
Mechanical problems
MYCUSTOM STITCHTM
SEWING CHART
sleeves, reinforcing
Overcasting medium
attaching, darning
STITCH
SEWING
Adjustable Non-adjustable L, M, S or L, S
PATTERNS PROGRAMMED IN MACHINE
Utility stitches Character embroidering
Frame pattern embroidering
Floral alphabet
Frames Stitches
CONTENTS