“NETWORK” Menu
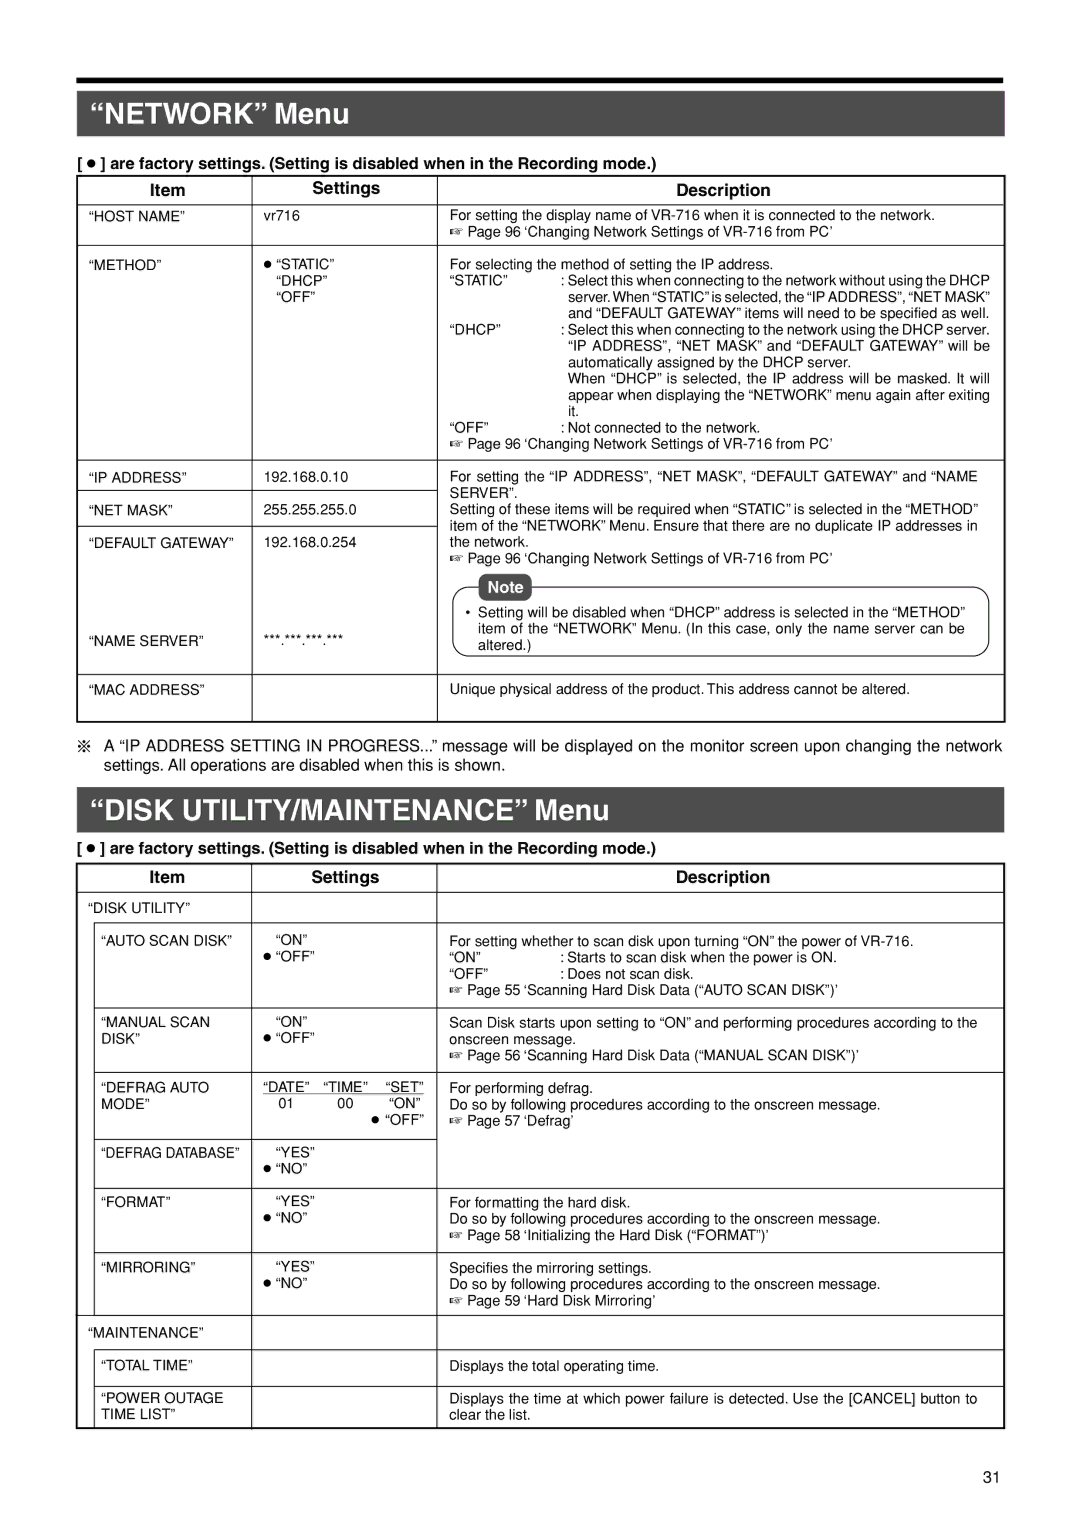
[ ● ] are factory settings. (Setting is disabled when in the Recording mode.)
Item | Settings | Description |
|
|
|
“HOST NAME” | vr716 | For setting the display name of |
|
| ☞ Page 96 ‘Changing Network Settings of |
“METHOD” | ● “STATIC” | For selecting the method of setting the IP address. | |
| “DHCP” | “STATIC” | : Select this when connecting to the network without using the DHCP |
| “OFF” |
| server. When “STATIC” is selected, the “IP ADDRESS”, “NET MASK” |
|
|
| and “DEFAULT GATEWAY” items will need to be specified as well. |
|
| “DHCP” | : Select this when connecting to the network using the DHCP server. |
|
|
| “IP ADDRESS”, “NET MASK” and “DEFAULT GATEWAY” will be |
|
|
| automatically assigned by the DHCP server. |
|
|
| When “DHCP” is selected, the IP address will be masked. It will |
|
|
| appear when displaying the “NETWORK” menu again after exiting |
|
|
| it. |
|
| “OFF” | : Not connected to the network. |
☞Page 96 ‘Changing Network Settings of
“IP ADDRESS” | 192.168.0.10 | For setting the “IP ADDRESS”, “NET MASK”, “DEFAULT GATEWAY” and “NAME |
|
| SERVER”. |
|
| |
“NET MASK” | 255.255.255.0 | Setting of these items will be required when “STATIC” is selected in the “METHOD” |
|
| item of the “NETWORK” Menu. Ensure that there are no duplicate IP addresses in |
|
| |
“DEFAULT GATEWAY” | 192.168.0.254 | the network. |
|
| ☞ Page 96 ‘Changing Network Settings of |
|
| Note |
•Setting will be disabled when “DHCP” address is selected in the “METHOD” item of the “NETWORK” Menu. (In this case, only the name server can be
“NAME SERVER” | ***.***.***.*** | altered.) |
“MAC ADDRESS”
Unique physical address of the product. This address cannot be altered.
A “IP ADDRESS SETTING IN PROGRESS...” message will be displayed on the monitor screen upon changing the network settings. All operations are disabled when this is shown.
“DISK UTILITY/MAINTENANCE” Menu
[ ● ] are factory settings. (Setting is disabled when in the Recording mode.)
| Item | Settings |
| Description | ||
|
|
|
|
|
|
|
“DISK UTILITY” |
|
|
|
|
| |
|
|
|
|
|
| |
| “AUTO SCAN DISK” | “ON” |
|
| For setting whether to scan disk upon turning “ON” the power of | |
|
| ● “OFF” |
|
| “ON” | : Starts to scan disk when the power is ON. |
|
|
|
|
| “OFF” | : Does not scan disk. |
|
|
|
|
| ☞ Page 55 ‘Scanning Hard Disk Data (“AUTO SCAN DISK”)’ | |
|
|
|
|
|
| |
| “MANUAL SCAN | “ON” |
|
| Scan Disk starts upon setting to “ON” and performing procedures according to the | |
| DISK” | ● “OFF” |
|
| onscreen message. | |
|
|
|
|
| ☞ Page 56 ‘Scanning Hard Disk Data (“MANUAL SCAN DISK”)’ | |
|
|
|
|
|
| |
| “DEFRAG AUTO | “DATE” | “TIME” | “SET” | For performing defrag. | |
| MODE” | 01 | 00 | “ON” | Do so by following procedures according to the onscreen message. | |
|
|
|
| ● “OFF” | ☞ Page 57 ‘Defrag’ | |
|
|
|
|
|
|
|
| “DEFRAG DATABASE” | “YES” |
|
|
|
|
|
| ● “NO” |
|
|
|
|
|
|
|
|
|
| |
| “FORMAT” | “YES” |
|
| For formatting the hard disk. | |
|
| ● “NO” |
|
| Do so by following procedures according to the onscreen message. | |
|
|
|
|
| ☞ Page 58 ‘Initializing the Hard Disk (“FORMAT”)’ | |
|
|
|
|
|
| |
| “MIRRORING” | “YES” |
|
| Specifies the mirroring settings. | |
|
| ● “NO” |
|
| Do so by following procedures according to the onscreen message. | |
|
|
|
|
| ☞ Page 59 ‘Hard Disk Mirroring’ | |
|
|
|
|
|
|
|
“MAINTENANCE” |
|
|
|
|
| |
|
|
|
|
|
| |
| “TOTAL TIME” |
|
|
| Displays the total operating time. | |
|
|
|
|
|
| |
| “POWER OUTAGE |
|
|
| Displays the time at which power failure is detected. Use the [CANCEL] button to | |
| TIME LIST” |
|
|
| clear the list. |
|
|
|
|
|
|
|
|
31