10.10.
CANCEL | SEARCH | MENU |
|
| REV |
TIMER |
|
|
DISPLAY |
| EXECUTE |
STILL
HDD OPERA
FWD
LOCK
OUT
VIDEO
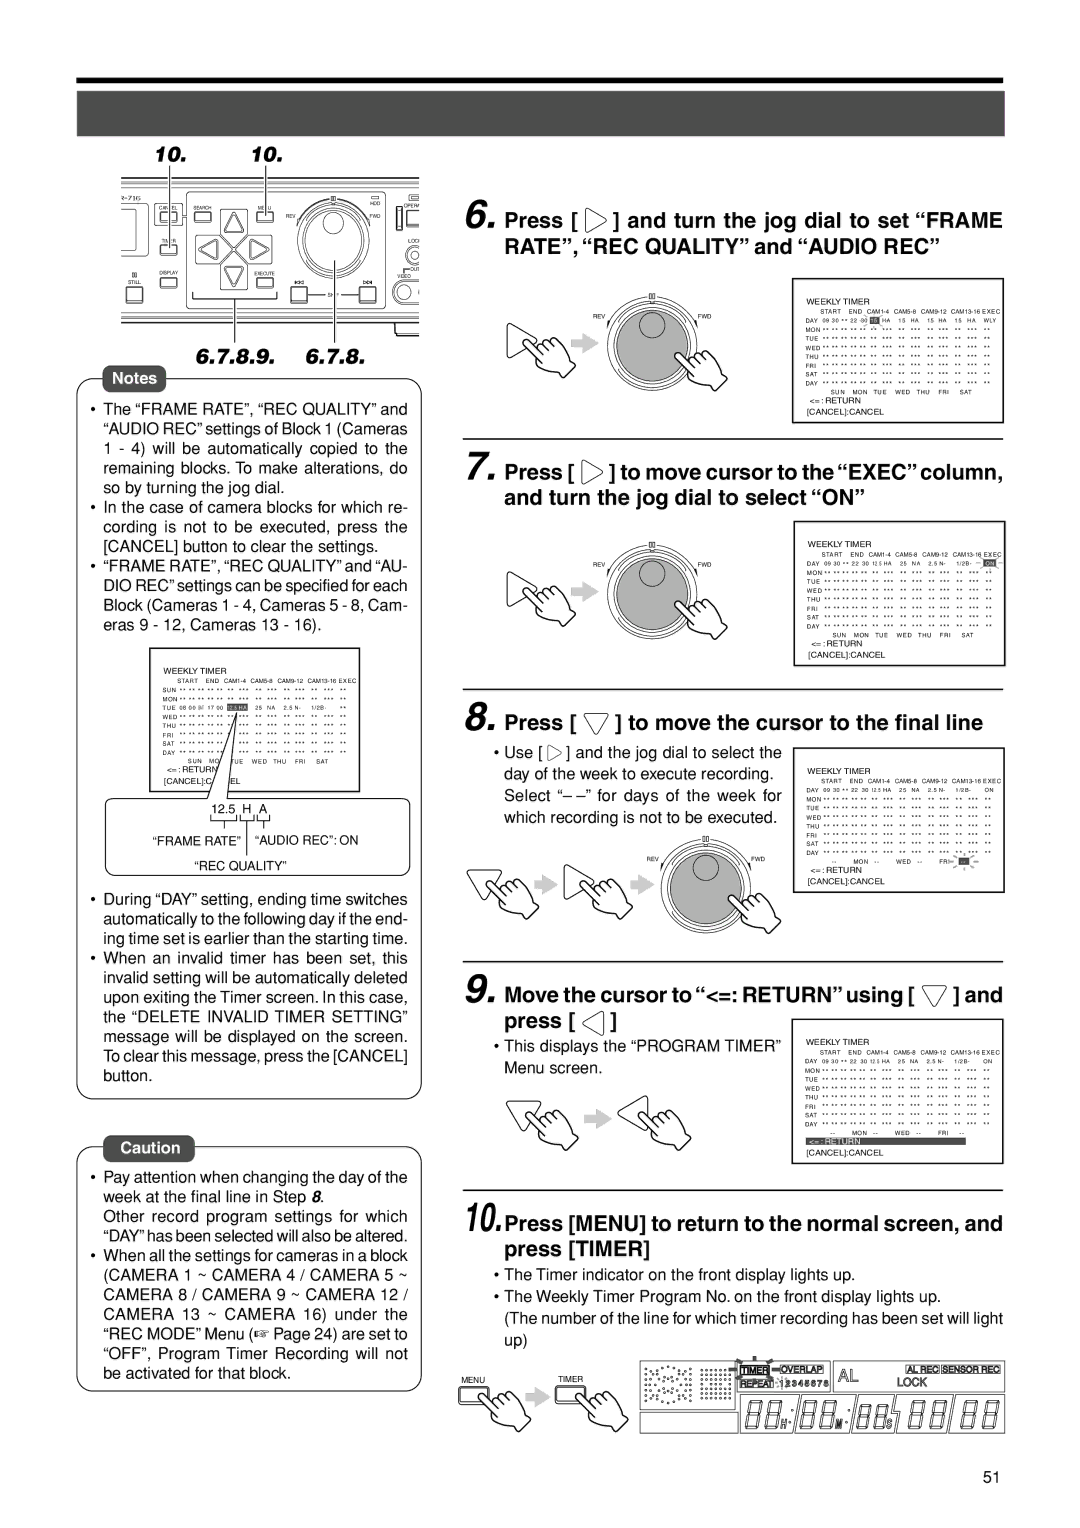
6. Press [ ![]() ] and turn the jog dial to set “FRAME RATE”, “REC QUALITY” and “AUDIO REC”
] and turn the jog dial to set “FRAME RATE”, “REC QUALITY” and “AUDIO REC”
SKIP
6.7.8.9.6.7.8.
Notes
•The “FRAME RATE”, “REC QUALITY” and “AUDIO REC” settings of Block 1 (Cameras 1 - 4) will be automatically copied to the remaining blocks. To make alterations, do so by turning the jog dial.
•In the case of camera blocks for which re- cording is not to be executed, press the [CANCEL] button to clear the settings.
•“FRAME RATE”, “REC QUALITY” and “AU- DIO REC” settings can be specified for each Block (Cameras 1 - 4, Cameras 5 - 8, Cam- eras 9 - 12, Cameras 13 - 16).
WEEKLY TIMER
| S TA RT E N D | ||||||||||||
S U N ** ** ** | ** ** | ** | *** | ** | *** | ** | *** | ** | *** | ** | |||
M O N ** ** ** ** ** | ** | *** | ** | *** | ** | *** | ** | *** | ** | ||||
T U E | 0 8 0 0 SAT | 1 7 0 0 |
| 12.5 H A |
| 2 5 | NA | 2 . 5 N - | 1/2B - | ** | |||
W E D ** ** ** | ** ** | ** | *** | ** | *** | ** | *** | ** | *** | ** | |||
T H U ** ** ** ** ** | ** | *** | ** | *** | ** | *** | ** | *** | ** | ||||
F R I | ** ** ** ** ** | ** | *** | ** | *** | ** | *** | ** | *** | ** | |||
S AT |
|
|
|
|
|
|
|
|
|
|
|
|
|
| WEEKLY TIMER |
|
|
|
|
|
|
|
| ||
REV | FWD | S TA RT E N D | |||||||||
0 9 3 0 ** 2 2 3 0 1 5 |
|
|
|
|
|
|
|
| |||
| DAY | H A | 1 5 | H A | 1 5 | H A | 1 5 | H A | W LY | ||
| M O N ** ** ** ** ** | ** | *** | ** | *** | ** | *** | ** | *** | ** | |
| T U E | ** ** ** ** ** | ** | *** | ** | *** | ** | *** | ** | *** | ** |
| W E D ** ** ** ** ** | ** | *** | ** | *** | ** | *** | ** | *** | ** | |
| T H U ** ** ** ** ** | ** | *** | ** | *** | ** | *** | ** | *** | ** | |
| F R I | ** ** ** ** ** | ** | *** | ** | *** | ** | *** | ** | *** | ** |
| S AT | ** ** ** ** ** | ** | *** | ** | *** | ** | *** | ** | *** | ** |
| DAY | ** ** ** ** ** | ** | *** | ** | *** | ** | *** | ** | *** | ** |
|
| S U N M O N T U E W E D T H U F R I S AT |
| ||||||||
| <= : RETURN |
|
|
|
|
|
|
|
|
| |
[CANCEL]:CANCEL
7. Press [ ![]() ] to move cursor to the “EXEC” column, and turn the jog dial to select “ON”
] to move cursor to the “EXEC” column, and turn the jog dial to select “ON”
|
| WEEKLY TIMER |
|
|
|
|
|
|
|
|
| |
|
|
| S TA RT E N D | |||||||||
REV | FWD | DAY | 0 9 3 0 ** 2 2 3 0 | 12.5 H A | 25 | N A | 2 . 5 N - | 1 / 2 B - | O N | |||
|
| M O N ** ** ** ** ** | ** | *** | ** | *** | ** | *** | ** | *** | ** | |
|
| T U E | ** ** ** ** ** | ** | *** | ** | *** | ** | *** | ** | *** | ** |
|
| W E D ** ** ** ** ** | ** | *** | ** | *** | ** | *** | ** | *** | ** | |
|
| T H U ** ** ** ** ** | ** | *** | ** | *** | ** | *** | ** | *** | ** | |
|
| F R I | ** ** ** ** ** | ** | *** | ** | *** | ** | *** | ** | *** | ** |
|
| S AT | ** ** ** ** ** | ** | *** | ** | *** | ** | *** | ** | *** | ** |
|
| DAY | ** ** ** ** ** | ** | *** | ** | *** | ** | *** | ** | *** | ** |
|
|
| S U N M O N T U E W E D T H U F R I S AT |
| ||||||||
|
| <= : RETURN |
|
|
|
|
|
|
|
|
| |
[CANCEL]:CANCEL
8. Press [  ] to move the cursor to the final line
** | ** | ** | ** | ** | ** | *** | ** | *** | ** | *** | ** | *** | ** |
DAY ** | ** | ** | ** | ** | ** | *** | ** | *** | ** | *** | ** | *** | ** |
S U N M O N T U E W E D T H U F R I S AT
<= : RETURN [CANCEL]:CANCEL
12.5 H A
“FRAME RATE” “AUDIO REC”: ON
“REC QUALITY”
•Use [ ![]() ] and the jog dial to select the day of the week to execute recording.
] and the jog dial to select the day of the week to execute recording.
Select “–
REV | FWD |
WEEKLY TIMER
S TA RT E N D
DAY | 09 30 ** 22 30 | 12.5 HA | 25 | NA | 2 . 5 N - | 1/2B - | ON | |||||
M O N ** ** ** ** ** | ** | *** | ** | *** | ** | *** | ** | *** | ** | |||
T U E | ** ** ** ** ** | ** | *** | ** | *** | ** | *** | ** | *** | ** | ||
W E D ** ** ** ** ** | ** | *** | ** | *** | ** | *** | ** | *** | ** | |||
T H U ** ** ** ** ** | ** | *** | ** | *** | ** | *** | ** | *** | ** | |||
F R I | ** ** ** ** ** | ** | *** | ** | *** | ** | *** | ** | *** | ** | ||
S AT | ** ** ** ** ** | ** | *** | ** | *** | ** | *** | ** | *** | ** | ||
DAY | ** ** ** ** ** | ** | *** | ** | *** | ** | *** | ** | *** | ** | ||
| - - | M O N - - |
| W E D - - |
| F R I |
| - - |
|
| ||
<= : RETURN [CANCEL]:CANCEL
•During “DAY” setting, ending time switches automatically to the following day if the end- ing time set is earlier than the starting time.
•When an invalid timer has been set, this invalid setting will be automatically deleted upon exiting the Timer screen. In this case, the “DELETE INVALID TIMER SETTING” message will be displayed on the screen. To clear this message, press the [CANCEL] button.
Caution
•Pay attention when changing the day of the week at the final line in Step 8.
Other record program settings for which “DAY” has been selected will also be altered.
•When all the settings for cameras in a block (CAMERA 1 ~ CAMERA 4 / CAMERA 5 ~ CAMERA 8 / CAMERA 9 ~ CAMERA 12 / CAMERA 13 ~ CAMERA 16) under the “REC MODE” Menu (☞ Page 24) are set to “OFF”, Program Timer Recording will not be activated for that block.
9. Move the cursor to “<=: RETURN” using [  ] and press [
  ]
]
• This displays the “PROGRAM TIMER” | WEEKLY TIMER |
|
|
|
|
|
|
|
|
| |
S TA RT | E N D | ||||||||||
Menu screen. | DAY 09 30 ** 22 30 12.5 HA | 25 | NA | 2 . 5 N - | 1/2B - | ON | |||||
M O N ** ** ** ** ** | ** | *** | ** | *** | ** | *** | ** | *** | ** | ||
| T U E ** ** ** ** ** | ** | *** | ** | *** | ** | *** | ** | *** | ** | |
| W E D ** ** ** ** ** | ** | *** | ** | *** | ** | *** | ** | *** | ** | |
| T H U ** ** ** ** ** | ** | *** | ** | *** | ** | *** | ** | *** | ** | |
| F R I ** ** ** ** ** | ** | *** | ** | *** | ** | *** | ** | *** | ** | |
| S AT ** ** ** ** ** | ** | *** | ** | *** | ** | *** | ** | *** | ** | |
| DAY ** ** ** ** ** | ** | *** | ** | *** | ** | *** | ** | *** | ** | |
| - - | M O N - - |
| W E D - - |
| F R I | - - |
|
| ||
<= : RETURN [CANCEL]:CANCEL
10.Press [MENU] to return to the normal screen, and press [TIMER]
•The Timer indicator on the front display lights up.
•The Weekly Timer Program No. on the front display lights up.
(The number of the line for which timer recording has been set will light up)
MENUTIMER
51