Names and Functions (Front)
|
|
|
| 5 |
|
|
| 4 |
| 3 | 2 |
| 1 | |
|
|
|
|
|
|
|
| CANCEL | SEARCH | MENU |
| HDD | OPERATE | |
|
|
|
|
|
|
|
|
|
| |||||
1 | 2 | ALARM | 5 | 6 |
|
|
|
|
|
|
| |||
|
|
|
|
| REV |
| FWD |
|
| |||||
|
| SENSOR |
|
|
|
|
|
|
|
|
|
| ||
3 | 4 | ALARM | 7 | 8 |
|
|
| TIMER |
|
|
|
| LOCK | |
|
| SENSOR |
|
|
|
|
|
|
|
|
|
|
|
|
9 | 10 | ALARM | 13 | 14 |
|
|
|
|
|
|
|
| OUT | |
|
| SENSOR |
|
|
|
|
| DISPLAY |
| EXECUTE |
|
| ||
|
|
|
|
|
|
|
|
|
| VIDEO | AUDIO | |||
|
|
|
| SEQUENCE |
|
|
|
|
|
|
|
| ||
|
|
|
| REC | STOP | PLAY | STILL |
|
|
|
|
|
| |
|
|
|
| MULTI |
|
|
|
|
|
|
|
|
|
|
11 | 1 | ALARM | 15 | 16 |
|
|
|
|
|
| SKIP |
|
|
|
|
| SENSOR |
|
|
|
|
|
|
|
|
|
|
|
|
67
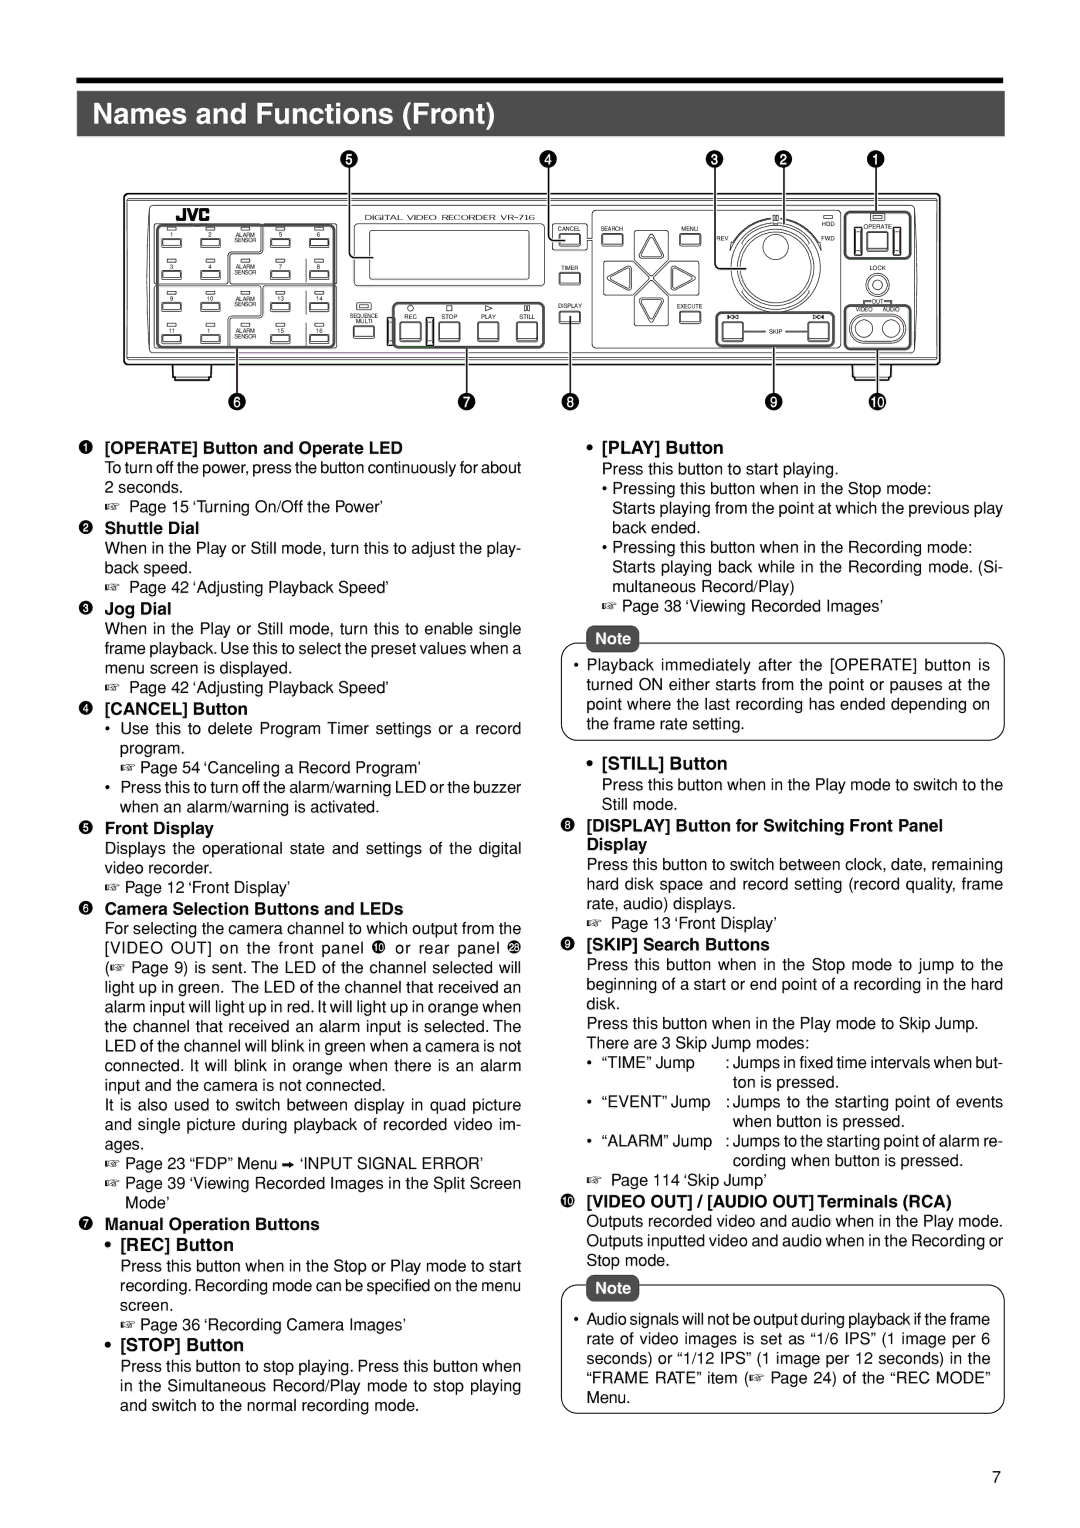
1 [OPERATE] Button and Operate LED
To turn off the power, press the button continuously for about 2 seconds.
☞Page 15 ‘Turning On/Off the Power’
2Shuttle Dial
When in the Play or Still mode, turn this to adjust the play- back speed.
☞ Page 42 ‘Adjusting Playback Speed’
3Jog Dial
When in the Play or Still mode, turn this to enable single frame playback. Use this to select the preset values when a menu screen is displayed.
☞ Page 42 ‘Adjusting Playback Speed’
4[CANCEL] Button
•Use this to delete Program Timer settings or a record program.
☞ Page 54 ‘Canceling a Record Program’
•Press this to turn off the alarm/warning LED or the buzzer when an alarm/warning is activated.
8 | 9 | 0 |
•[PLAY] Button
Press this button to start playing.
•Pressing this button when in the Stop mode:
Starts playing from the point at which the previous play back ended.
•Pressing this button when in the Recording mode:
Starts playing back while in the Recording mode. (Si- multaneous Record/Play)
☞Page 38 ‘Viewing Recorded Images’
Note
•Playback immediately after the [OPERATE] button is turned ON either starts from the point or pauses at the point where the last recording has ended depending on the frame rate setting.
•[STILL] Button
Press this button when in the Play mode to switch to the Still mode.
5Front Display
Displays the operational state and settings of the digital video recorder.
☞ Page 12 ‘Front Display’
6Camera Selection Buttons and LEDs
For selecting the camera channel to which output from the [VIDEO OUT] on the front panel 0 or rear panel ° (☞ Page 9) is sent. The LED of the channel selected will light up in green. The LED of the channel that received an alarm input will light up in red. It will light up in orange when the channel that received an alarm input is selected. The LED of the channel will blink in green when a camera is not connected. It will blink in orange when there is an alarm input and the camera is not connected.
It is also used to switch between display in quad picture and single picture during playback of recorded video im- ages.
☞Page 23 “FDP” Menu z ‘INPUT SIGNAL ERROR’
☞Page 39 ‘Viewing Recorded Images in the Split Screen Mode’
7Manual Operation Buttons
•[REC] Button
Press this button when in the Stop or Play mode to start recording. Recording mode can be specified on the menu screen.
☞ Page 36 ‘Recording Camera Images’
•[STOP] Button
Press this button to stop playing. Press this button when in the Simultaneous Record/Play mode to stop playing and switch to the normal recording mode.
8[DISPLAY] Button for Switching Front Panel Display
Press this button to switch between clock, date, remaining hard disk space and record setting (record quality, frame rate, audio) displays.
☞ Page 13 ‘Front Display’
9[SKIP] Search Buttons
Press this button when in the Stop mode to jump to the beginning of a start or end point of a recording in the hard disk.
Press this button when in the Play mode to Skip Jump.
There are 3 Skip Jump modes:
• | “TIME” Jump | : Jumps in fixed time intervals when but- |
|
| ton is pressed. |
• | “EVENT” Jump | : Jumps to the starting point of events |
|
| when button is pressed. |
• | “ALARM” Jump | : Jumps to the starting point of alarm re- |
|
| cording when button is pressed. |
☞Page 114 ‘Skip Jump’
0[VIDEO OUT] / [AUDIO OUT] Terminals (RCA) Outputs recorded video and audio when in the Play mode. Outputs inputted video and audio when in the Recording or Stop mode.
Note
•Audio signals will not be output during playback if the frame rate of video images is set as “1/6 IPS” (1 image per 6 seconds) or “1/12 IPS” (1 image per 12 seconds) in the “FRAME RATE” item (☞ Page 24) of the “REC MODE” Menu.
7