Defrag
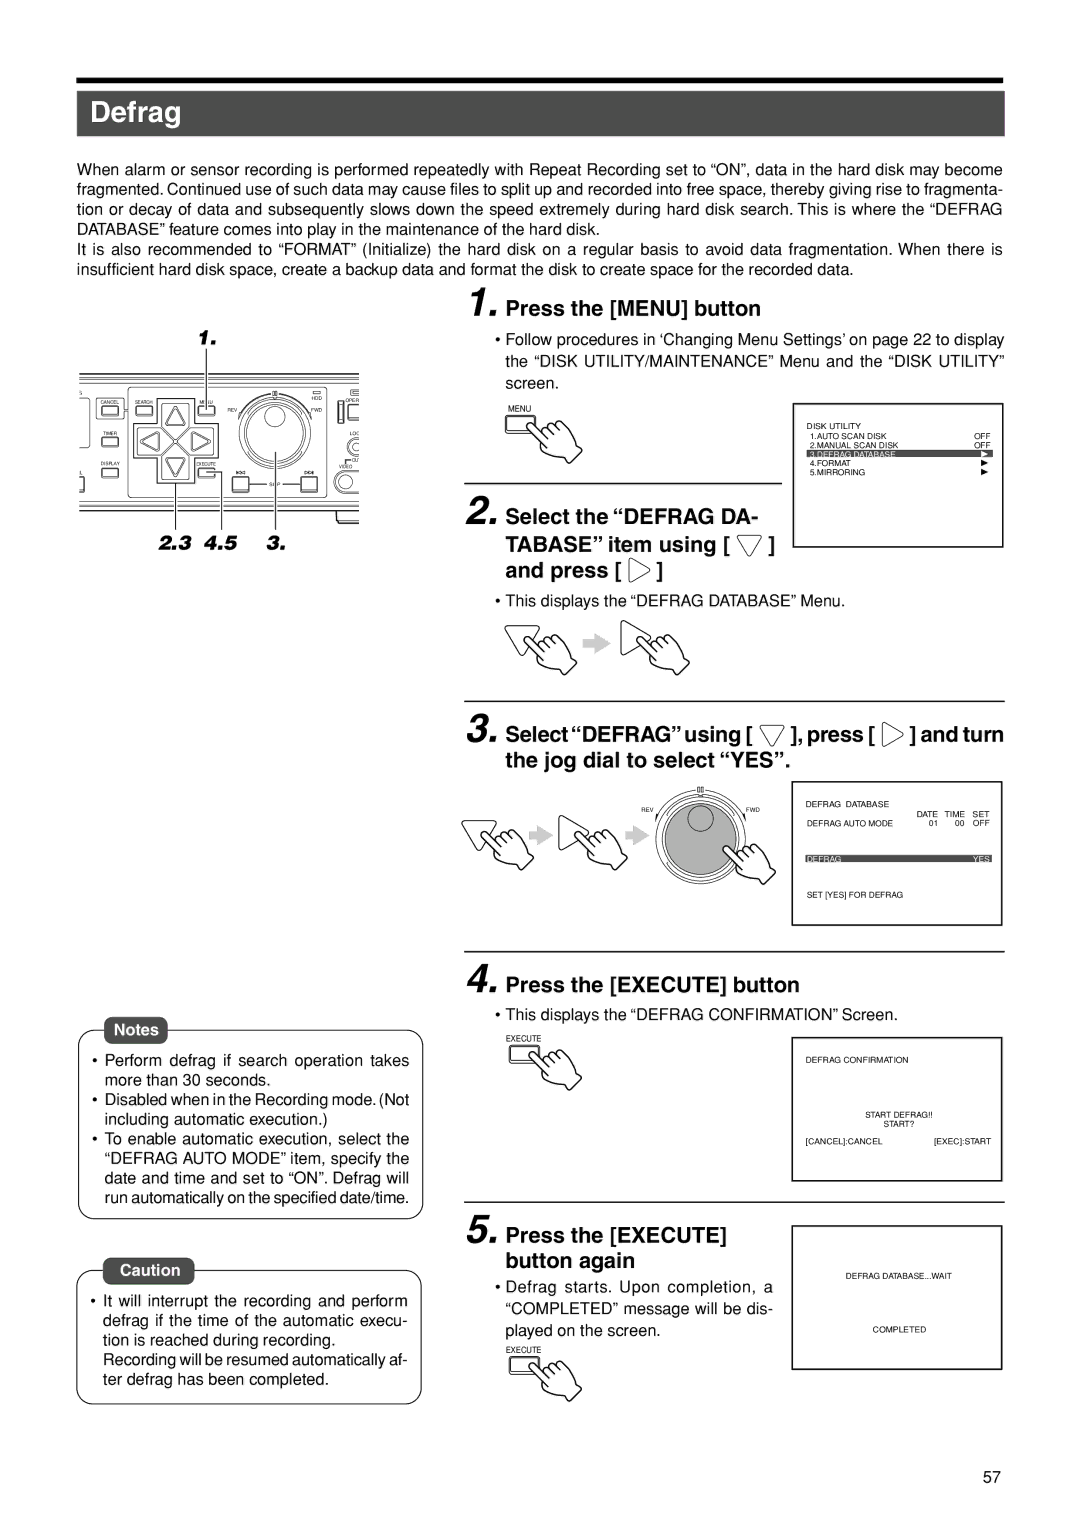
When alarm or sensor recording is performed repeatedly with Repeat Recording set to “ON”, data in the hard disk may become fragmented. Continued use of such data may cause files to split up and recorded into free space, thereby giving rise to fragmenta- tion or decay of data and subsequently slows down the speed extremely during hard disk search. This is where the “DEFRAG DATABASE” feature comes into play in the maintenance of the hard disk.
It is also recommended to “FORMAT” (Initialize) the hard disk on a regular basis to avoid data fragmentation. When there is insufficient hard disk space, create a backup data and format the disk to create space for the recorded data.
1. | 1. Press the [MENU] button |
• Follow procedures in ‘Changing Menu Settings’ on page 22 to display | |
| the “DISK UTILITY/MAINTENANCE” Menu and the “DISK UTILITY” |
| screen. |
CANCEL | SEARCH | MENU |
| HDD | OPER |
|
|
|
|
|
|
| MENU |
|
|
| |||
|
| REV |
| FWD |
|
|
|
| |
TIMER |
|
|
|
| LOC |
|
| DISK UTILITY |
|
|
|
|
|
|
| 1.AUTO SCAN DISK | OFF | ||
|
|
|
|
|
|
|
| ||
|
|
|
|
|
|
|
| 2.MANUAL SCAN DISK | OFF |
|
|
|
|
| OUT |
|
| 3.DEFRAG DATABASE |
|
DISPLAY |
| EXECUTE |
|
|
|
| 4.FORMAT |
| |
|
|
| VIDEO |
|
|
| |||
LL |
|
|
|
|
|
|
| 5.MIRRORING |
|
|
|
| SKIP |
|
| 2. Select the “DEFRAG DA- |
|
| |
| 2.3 | 4.5 | 3. |
|
|
|
| ||
|
|
| TABASE” item using [ | ] |
| ||||
|
|
|
|
|
| and press [ | ] |
|
|
• This displays the “DEFRAG DATABASE” Menu.
Notes
•Perform defrag if search operation takes more than 30 seconds.
•Disabled when in the Recording mode. (Not including automatic execution.)
•To enable automatic execution, select the “DEFRAG AUTO MODE” item, specify the date and time and set to “ON”. Defrag will run automatically on the specified date/time.
3. Select “DEFRAG” using [ ![]() ], press [
], press [ ![]() ] and turn the jog dial to select “YES”.
] and turn the jog dial to select “YES”.
REV | DEFRAG DATABASE |
|
|
|
FWD | DATE | TIME | SET | |
|
| |||
| DEFRAG AUTO MODE | 01 | 00 | OFF |
| DEFRAG |
|
| YES |
| SET [YES] FOR DEFRAG |
|
|
|
4. Press the [EXECUTE] button
• This displays the “DEFRAG CONFIRMATION” Screen.
EXECUTE
DEFRAG CONFIRMATION
START DEFRAG!!
START?
[CANCEL]:CANCEL[EXEC]:START
Caution
•It will interrupt the recording and perform defrag if the time of the automatic execu- tion is reached during recording.
Recording will be resumed automatically af- ter defrag has been completed.
5. Press the [EXECUTE] button again
•Defrag starts. Upon completion, a “COMPLETED” message will be dis-
played on the screen.
EXECUTE
DEFRAG DATABASE...WAIT
COMPLETED
57
