7022/7130/7135 Workgroup Document System
Page
Konica 7022/7130/7135
Correspondence
Basic
Contents
Safety Information
Machine Information
Contents
Troubleshooting
Machine Specifications
Advanced Information
Advanced
Applications
Key Operator Mode
Maintenance & Supplies
Paper and Original Information
Contents
Index
Features of the Konica 7022/7130/7135
Features of the Konica 7022/7130/7135
Output Mode for Machine with IT-101 Inner Tray Installed
Lens Mode RE, Zoom
Output Mode for Machine with FS-107 Finisher Installed
Job Memory
Platen Memory
Power Saver
Paper Capacity
Proof Copy
Stamp
Weekly Timer
Sheet/Cover Insertion
Staple
Page
Safety Information BasicMachine Information
Page
Safety Information
Precautions for Installation and Use
High Température ¡Temperatura Alta Temperature Élevée
Reminder
FDA Regulations
Regulations
FCC Regulations
Canadian Department of Communications Regulations
Power Source
Requirements for Safe Use
Requirements for Safe Use
Environment
Requirements for Safe Use
21.7 550 17.7 22.8 19.7 450 580 500 26.1 60.0
Precautions for Routine Handling
Requirements for Safe Use
Requirements for Safe Use
Page
Machine Configuration, Turning On
Power and Loading Paper
Machine Configuration
External Machine Items
Machine Configuration
Transfer/Separator wire cleaning lever forms the copy image
Machine Configuration
Internal Machine Items
Machine Configuration
Standard/Optional Equipment
Basic Screen
COUNT/SET
Machine Configuration
Control Panel Layout
Turn on the main power switch
Turning On the Power Switch
To Turn On the Power
Turn on the power switch
Turning On the Power Switch
Basic Screen will be displayed
Turn OFF the power switch
To Turn Off the Power
Turn OFF the main power switch
Reducing the Power in Standby Mode Auto Low Power
Shutting Off Automatically Auto Shut-Off
Shutting Off / Reducing the Power Manually
Turning On the Power Switch
Power save mode will be activated
Press Start
Entering an ECM Password ECM
Enter ECM password
Start a copying job
Loading Paper in Main Body Trays and DB-210 Trays
Loading Paper
Withdraw the main body tray or DB-210 tray
Stack paper with curl side up
Loading Paper
Push in the tray until it locks into place
Loading Paper in DB-410 Tray
Withdraw the DB-410 tray
When copying is completed, close the Multi-sheet bypass tray
Loading Paper in Multi-Sheet Bypass Tray
Withdraw the tray for which the paper size will be changed
Changing Paper Size of Main Body Trays and DB-210 Trays
Set the size indication dial at the correct paper size
Page
How to Make a Basic Copy
Copying Operations
Positioning Originals in Radf
Adjust paper guides
Positioning Originals
Position originals Face UP in the document feeder tray
Positioning Originals
Positioning originals in Mixed original mode
Document feeder tray
Positioning originals in Folded original mode
Positioning Original on Platen Glass
Raise the document feeder or platen cover
Positioning Originals
To Change Print Quantity
Setting Print Quantity
To Set Print Quantity
Enter the correct quantity
To Select Copy Size Automatically APS
Selecting Copy Size
Position originals
Selecting Copy Size
11x17
To Specify Desired Copy Size AMS
Original Size AMS Table
Close the Radf securely, then press Auto Reset
Selecting Magnification Ratio Lens Mode
To Copy in 1.00 Magnification Mode
Select additional copy conditions, as desired
Specification for Fixed Magnification Mode
Selecting Magnification Ratio Lens Mode
To Copy in Fixed Magnification Mode RE
Touch RE on the Basic Screen
Touch Zoom on the Basic Screen
To Copy in Zoom Mode
Specification for Zoom Mode
Touch OK
Copying
Selecting Density Level
To Select Copy Density
Selecting Density Level
Front
Using Radf
Making Double-Sided Copies 1a2, 2a2
Back Front
Making Double-Sided Copies 1a2, 2a2
Position originals Face UP in the document feeder
Open the document feeder
Using Platen Glass
Specification for Double-Sided Copying Using Platen Glass
Position original Face Down on the platen glass
Press Start to print
Front Back
Touch 2a1 on the Basic Screen to highlight it
Press Start
Specification for Store Mode
Copying Using Memory
To Scan Originals into Memory Store Mode
Make copying selections, as desired
Copying Using Memory
Touch Store Mode to highlight it
Touch Scan on the Basic Screen to scan
Press Start to start scanning/printing for the current job
Specifications for Reserve
To Set Next Copying Job Reserve
Touch Reserve to highlight it
Press Start to start scanning for the reserve job
To Check/Control Jobs in Progress Job List Screen
Perform the desired setting on the screen
Touch JOB List on the Basic Screen
Contents of Job List Screen
Touch OK on the Job List Screen
Output Mode for Machine without Finisher
Specification for Output Modes without Finisher
Select the desired output mode
Output Mode for Machine without Finisher
Press Output on the control panel
Output without Finisher
Output Mode for Machine with Finisher
Output Mode for Machine with Finisher
Specification for Output Modes with Finisher
Output Mode for Machine with Finisher
Select the desired staple position
IT-101 Output Modes Check Mode Proof Copy Interrupt
Output Mode for Machine with Inner Tray IT-101
Specification for Output Modes with Inner Tray
Output Mode for Machine with Inner Tray IT-101
Output Mode for Machine with Inner Tray IT-101
Specifications for Check Mode and Proof Copy
Press Check on the control panel
Checking Feature Selections and Proof Copying
Touch Exit or press Check to return to the Basic Screen
Checking Feature Selections and Proof Copying
Change the print quantity, as required
Interrupt Copying
Press Interrupt on the control panel
Set copy conditions, as desired
When Interrupt copying is completed, press Interrupt again
Interrupt Copying
Press Start to start the interrupt copying
Interrupt Copying
Job Memory & Help Mode
How to Use Helpful Functions
Specifications for Job Memory
Storing Job Conditions Job Memory Job Store
Storing Job Conditions Job Memory Job Store
Review the settings on the Job Store Check Screen
Touch Entry
Enter a job name
Job Memory Help Mode
Recalling Stored Job Settings Job Memory Job Recall
If desired, touch JOB Check
Recalling Stored Job Settings Job Memory Job Recall
Position originals, then press Start to print
Return to the Basic Screen, then press Help
To Display the Help Screen from Basic Screen
Touch the desired key to display specific information
Touch Exit to return to the Basic Screen
Displaying Screen for Operation Guide Help Mode
Details Help Menu Screen
While in any screen other than the Basic Screen, press Help
To Display Help Screen from Other Screens
Touch Exit
Troubleshooting
How to Handle Machine Troubles
When Call for Service Message Is Displayed
Turn OFF the power switch and main power switch
Turn OFF then on the power switch
Preventive Maintenance
Clearing Mishandled Paper
Follow the procedure on the screen to remove misfed paper
Touch Guide on the screen
When completed, the Basic Screen will be restored
Clearing Mishandled Paper
Display the Jam Position Screen
When JAM Appears on Folder Key
Touch Guide
When JAM Appears on Folder Key
Touch Reserve to continue the reserve job setting
Display the Basic Screen for the print job in progress
Check the empty tray, then supply that tray with paper
Check the original pages, then position originals again
Action
Wait until the current operation is completed
Press Start to complete the job
Press Start to continue copying
When Memory Full Message Is Displayed Memory Overflow
Following message displays
When Power OFF/ON Screen Is Displayed
Wait about 10 seconds Turn on the power switch
Troubleshooting Tips
Copy Image is TOO Light
Troubleshooting Tips
Copy Quality is Poor
Troubleshooting Tips
Please Check Original
Page
Machine Specifications
Main Body & Option Specifications
Main Body Specifications
Main Body Specifications
Main Body Specifications
Option Specifications
Page
Advanced
Page
How to Use Advanced Functions
Advanced Information
Press the power switch
Programmed Shut-Off Weekly Timer
Enter the password
Set the duration for the interrupt use
Programmed Shut-Off Weekly Timer
Press Start Set the minute for the interrupt use
Rotation
Rotation
Touch Auto to deselect it
Vertical/Horizontal Zoom Mode
Vertical/Horizontal Zoom Mode Specifications
Vertical/Horizontal Zoom Mode
Details
How to Use Application Functions
Applications
To Display Application Selection Screen
Touch OK on the Application Selection Screen
Specifications for Sheet/Cover Insertion
Inserting Sheets and Covers Sheet/Cover Insertion
Inserting Sheets and Covers Sheet/Cover Insertion
Select the desired insertion mode
Select the desired cover mode
Select the cover sheet tray source
Enter the page number
Inserting Sheets and Covers Sheet/Cover Insertion
Details Entering Page Numbers
Specifications for Chapter
Positioning Title Pages on the Right Side Chapter
Positioning Title Pages on the Right Side Chapter
When all entries are made, touch OK
Touch Chapter on the Application Selection Screen
Positioning Title Pages on the Right Side Chapter
Specifications for Combination
Lay Out Several Pages onto One Sheet Combination
Lay Out Several Pages onto One Sheet Combination
Select the desired Combination mode
Touch Combination on the Application Selection Screen
Details Original Type and Layout Order
Original Portrait type Landscape type
Specifications for Booklet
Making a Multiple Page Signature Booklet Booklet
Making a Multiple Page Signature Booklet Booklet
Touch to highlight the desired Booklet mode key Touch OK
Select the 1a2 or 2a2 copy mode and the desired paper size
Touch Booklet on the Application Selection Screen
Position originals Face UP in the document feeder
Specifications for Transparency
Copying onto Transparent Films Transparency
Copying onto Transparent Films Transparency
For details on positioning originals, see p -2 to p
Specifications for Image Insert
Inserting Images into Printed Sets Image Insert
Touch Image Insert on the Application Selection Screen
Inserting Images into Printed Sets Image Insert
Use the control panel keypad to enter the page number
Scan the platen glass images
Inserting Images into Printed Sets Image Insert
Touch Scan on the Basic Screen
Touch Scan
Specifications for Book Copy
Dividing an Image into Right and Left Pages Book Copy
Dividing an Image into Right and Left Pages Book Copy
Select the desired Book Copy mode
Touch Book Copy on the Application Selection Screen
Select the desired copy mode and magnification
Scanning Original for Cover
Dividing an Image into Right and Left Pages Book Copy
Specifications for Mixed Original
Copying Mixed Size Originals Mixed Original
Copying Mixed Size Originals Mixed Original
Touch Special Original on the Application Selection Screen
Copying Mixed Size Originals Mixed Original
Position mixed originals Face UP in the document feeder
Specifications for Folded Original
Copying Folded Originals Folded Original
Copying Folded Originals Folded Original
Position folded originals Face UP in the document feeder
Copying Folded Originals Folded Original
Specifications for Non-Standard Size
Copying Non-Standard Size Originals Non-Standard Size
Copying Non-Standard Size Originals Non-Standard Size
Touch Non-standard Size
Reverse the Second Side in 1-2 Mode Upside Down
Specifications for Upside Down
Reverse the Second Side in 1-2 Mode Upside Down
Touch 1-2 Upside down or 2-1 Upside down
Page
Increase Contrast Mode
Text Mode
Photo Mode
Specifications for Text/Photo Enhance
Making Copy Quality Closer to Originals Text/Photo Enhance
Touch OK to return to the Application Selection Screen
Reverse Image Repeat
Specifications for Reverse Image
Reversing Color in Black and White Image Reverse Image
Touch Reverse Image on the Application Selection Screen
Reversing Color in Black and White Image Reverse Image
Touch OK on the Application Selection Screen
Repeating Selected Image Area Repeat Verti./Horiz. Mode
Vertical/Horizontal Width Setting Mode Specifications
Repeating Selected Image Area Repeat Verti./Horiz. Mode
Touch Repeat on the Application Selection Screen
Repeating Selected Image Area Repeat Verti./Horiz. Mode
Select the desired magnification and copy size
Auto Detection/ Repeat Mode Specifications
Repeat mode
Touch Auto or Repeat, as desired
Touch to highlight the desired mode key
Position original
Specifications for Frame/Fold Erasure
Copying
Frame/Fold Erasure Selection Screen will be displayed
Touch OK
Specifications for Auto Layout
Copying Image in the Center of Copy Paper Auto Layout
Touch Auto Layout on the Application Selection Screen
Details
Adjusting Position of Copy Image Image Shift
Specifications for Image Shift
Touch Image Shift on the Application Selection Screen
Adjusting Position of Copy Image Image Shift
Touch Image Shift, then specify the shift amount
Adjusting Position of Copy Image Image Shift
Specifications for Reduce & Shift
Reducing Images to Create Binding Margin Reduce&Shift
Reducing Images to Create Binding Margin Reduce&Shift
Touch Reduce & Shift, then specify the shift amount
Touch OK
Specifications for Non-Image Area Erase
Erasing Outside of the Original Non-Image Area Erase
Erasing Outside of the Original Non-Image Area Erase
Select magnification and copy size, as desired
Erasing Outside of the Original Non-Image Area Erase
Details Oblique Erase and Rectangle Erase Modes
Specification for Stamp
Printing Stamp, Page, Watermark onto Copies Stamp
Touch Stamp on the Application Selection Screen
Printing Stamp, Page, Watermark onto Copies Stamp
Touch to select the desired key
Printing Stamp, Page, Watermark onto Copies Stamp
Touch OK
Details Print Position Selection Screen
Specification for Overlay
Overlaying an Image onto Each Page Copied in the Job Overlay
Touch STAMP/OVERLAY on the Application Selection Screen
Touch Overlay Touch OK on the Stamp/Overlay Selection Screen
Position the originals to be overlaid
Page
Paper and Original
Paper Weight
Paper Information
Paper Information
Tray/ Exit Tray Capacity
Paper Information
Paper Size
Special Paper in Multi-Sheet Bypass Tray
To Store Copy Paper
Platen Glass Originals
Platen Glass Original Specifications
Original Information
Unsuitable Radf Originals
Original Information
Normal mode
Mixed Original mode
Radf Originals
Folded Original mode
Original Information
Maintenance & Supplies
How to Maintain the Copier
Adding Toner
Adding Toner
10-4
Inserting a New Staple Cartridge into FS-107 Finisher
Inserting a New Staple Cartridge into FS-107 Finisher
Inserting a New Staple Cartridge into FS-107 Finisher
10-8
Cleaning Image Scanning Section
Cleaning the Document Glass and Cover
Cleaning the Left Partition Glass
Cleaning Image Scanning Section
Cleaning the Radf
Cleaning the Radf Platen Guide Cover
Cleaning the Radf Roller
Cleaning Image Printing Section
Cleaning the Writing Unit Glass and the Electrode Wires
Cleaning Image Printing Section
Checking Copy Count
Press Counter on the control panel
Repairs
Maintenance, Repairs, Supplies
Service
Supplies
Page
How to Monitor Copier Activity and Modify
Machine Settings
How to Access the Key Operator Mode
To Display the Key Operator Mode Screen
How to Access the Key Operator Mode
Touch Return to exit the Key Operator mode
System Initial
Time
System Initial
Language
Initial Setting
Copier Initial
Copy Mode
Copier Initial
Density
Magnification
Copier Initial
Tray
Machine with Inner Tray
Output
Machine with Finisher
Machine without Finisher
Machine with Inner tray
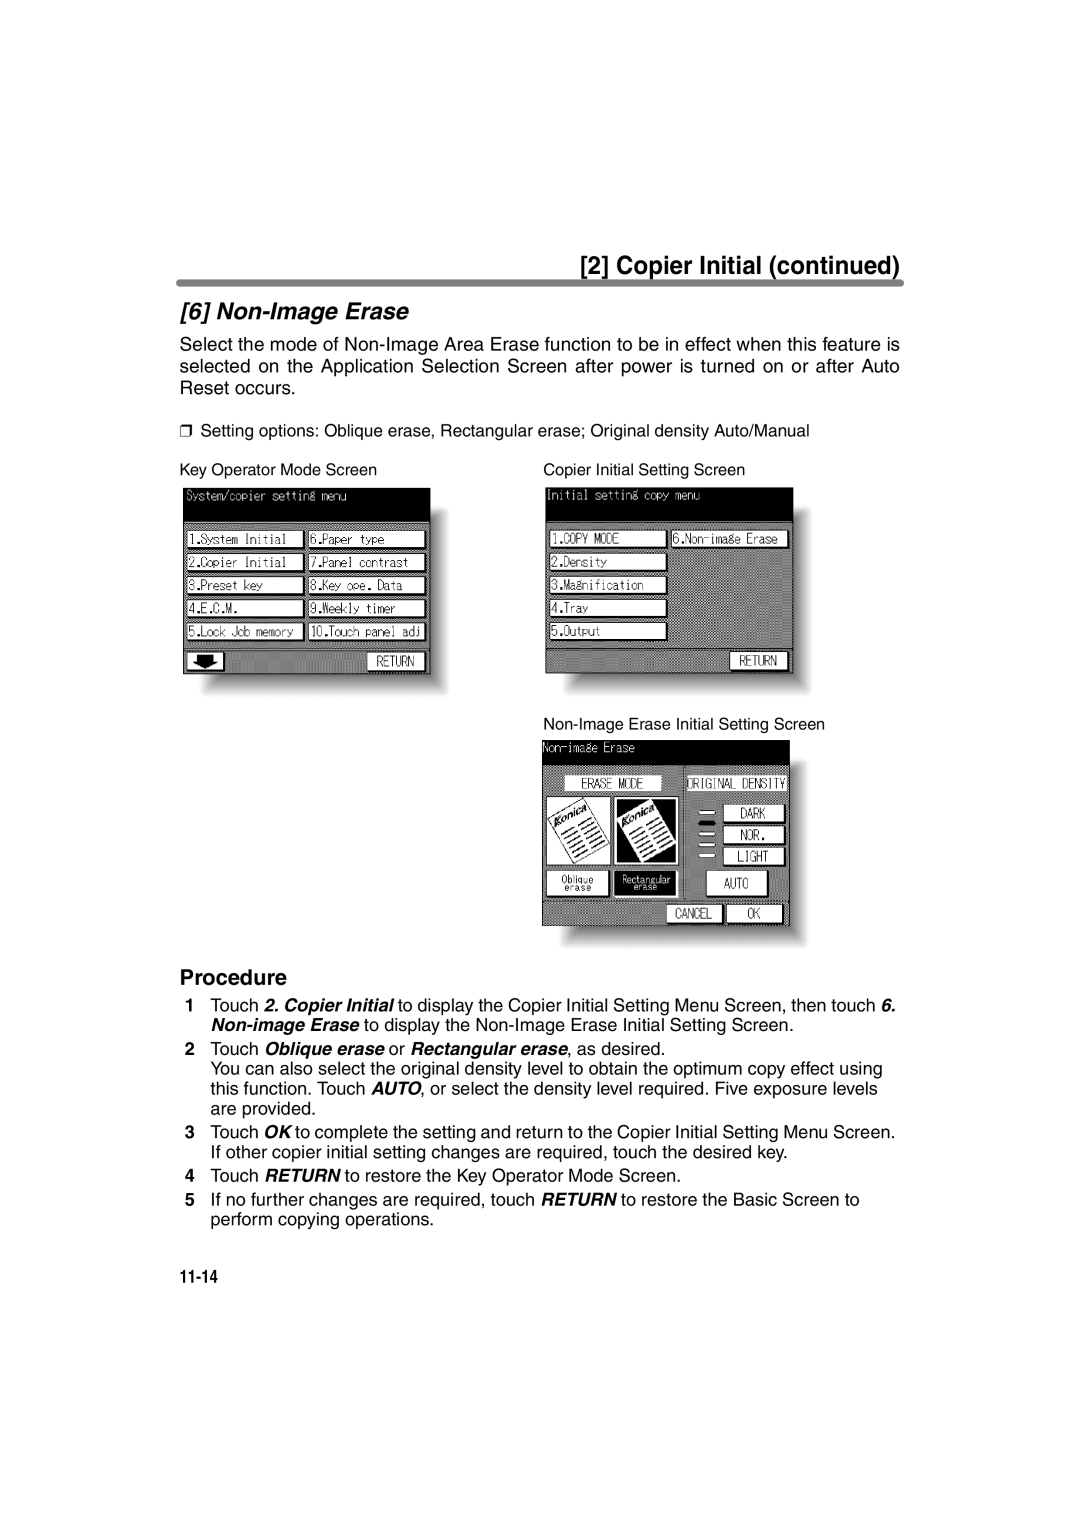
Non-Image Erase
Touch Oblique erase or Rectangular erase, as desired
Preset Key
Preset Key
Preset Key
C.M. Electronic Copy Monitor
How to Access the ECM Setting Mode
C.M. Electronic Copy Monitor
Change ECM Data
C.M. Electronic Copy Monitor
ECM Data List
C.M. Electronic Copy Monitor
All Counter Reset
Reset the count for all ECM password Nos
ECM On/Off Setting
11-25
Copy Limit Reached Effect
Lock Job Memory
Paper Type
Panel Contrast
Key Operator Data
Weekly Timer
Weekly Timer
How to Access the Weekly Timer Setting Mode
Weekly Timer Setting
Weekly Timer Copier ON/OFF Time Set
Weekly Timer
Machine Working Day Individual Set
Weekly Timer
Lunch Hour Off Function
Touch off-time
Password Setting
Touch Panel Adjustment
Power Save
11-41
Memory Switch
SW No Setting default is underlined
Memory Switch
Auto tray switch
Auto reset timer
Auto Reset effect
Load Radf effect
Memory Switch
20 5.5x8.5 orig. type
No-printing timer
Power save key
22 1 Shot indication time
List Print
Application Customize
Setting options Density shift 0/ 1/ 2/ 3 standard/ 4
Density Shift
Krds Host
Index
Page
Symbol
Number
Index
Iii
Index
Page
August