5Maintenance and Inspection
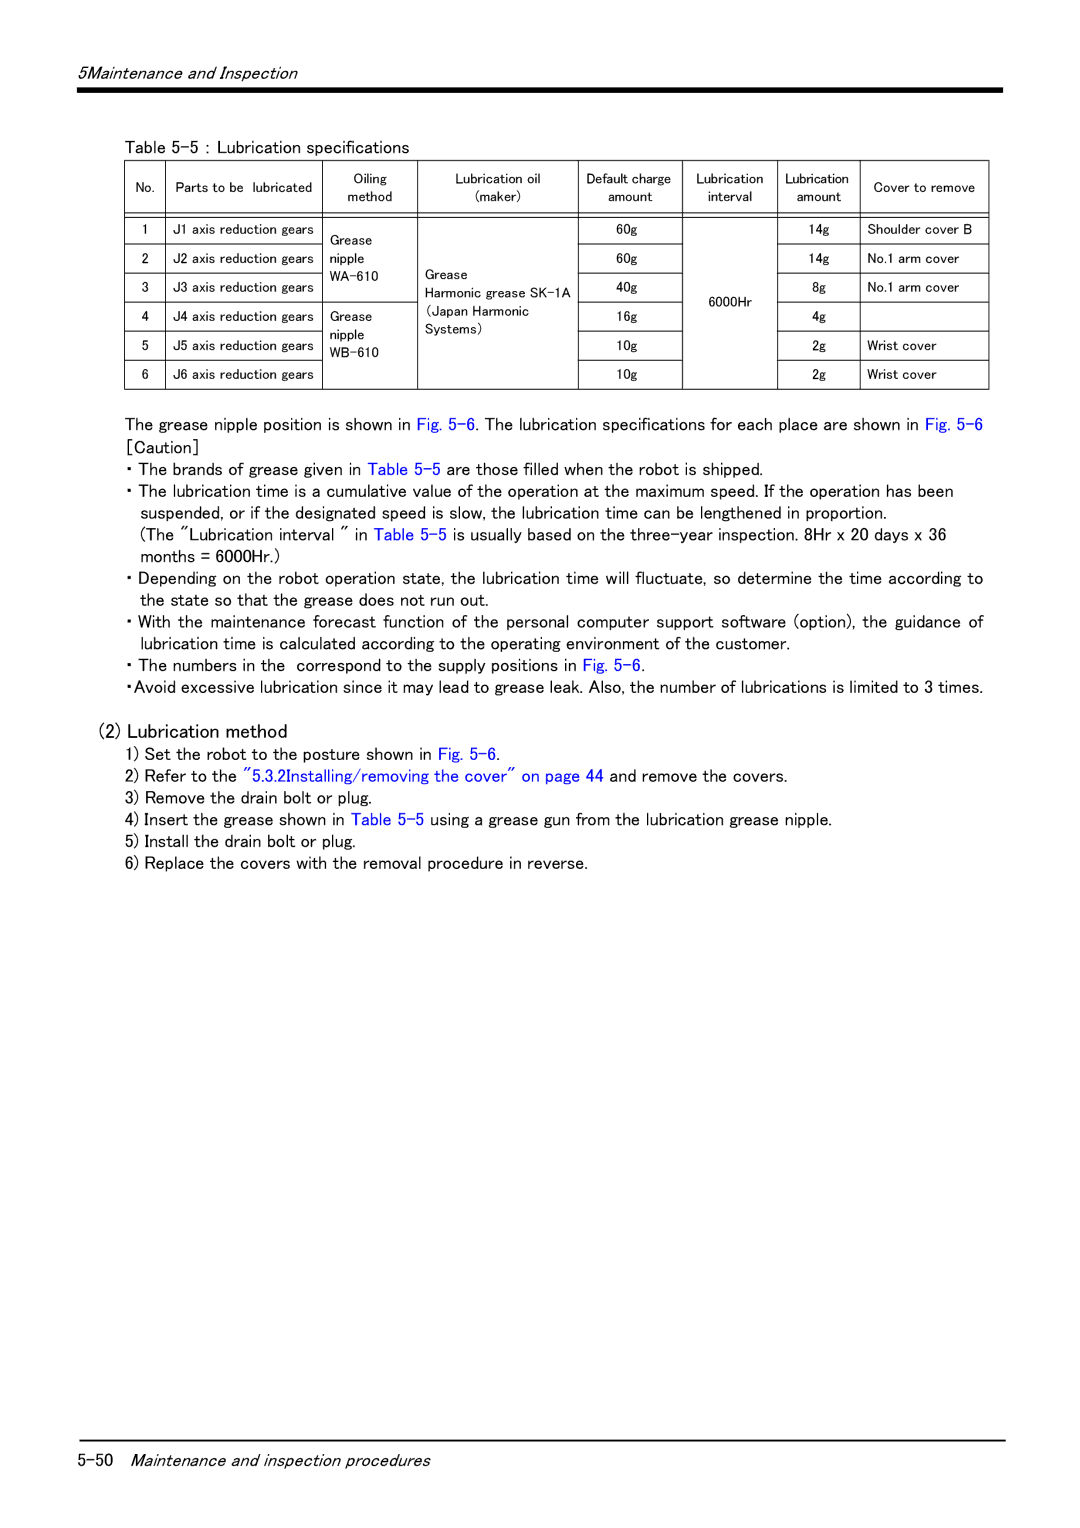
Table 5-5 : Lubrication specifications
No. | Parts to be lubricated | Oiling | Lubrication oil | Default charge | Lubrication | Lubrication | Cover to remove | ||
method | (maker) | amount | interval | amount | |||||
|
|
| |||||||
|
|
|
|
|
|
|
|
| |
|
|
|
|
|
|
|
|
| |
1 | J1 axis reduction gears | Grease |
| 60g |
|
| 14g | Shoulder cover B | |
2 | J2 axis reduction gears | nipple |
| 60g |
|
| 14g | No.1 arm cover | |
|
| Grease |
|
|
|
|
| ||
3 | J3 axis reduction gears | 40g |
|
| 8g | No.1 arm cover | |||
|
|
| Harmonic grease |
| 6000Hr |
|
|
| |
4 | J4 axis reduction gears | Grease | (Japan Harmonic | 16g |
| 4g |
| ||
|
|
| |||||||
Systems) |
|
|
| ||||||
|
| nipple |
|
|
|
|
| ||
5 | J5 axis reduction gears | 10g |
|
| 2g | Wrist cover | |||
|
|
| |||||||
|
|
| |||||||
6 | J6 axis reduction gears |
|
| 10g |
|
| 2g | Wrist cover | |
|
|
|
|
|
|
|
|
| |
The grease nipple position is shown in Fig.
・ The brands of grease given in Table
・ The lubrication time is a cumulative value of the operation at the maximum speed. If the operation has been suspended, or if the designated speed is slow, the lubrication time can be lengthened in proportion.
(The "Lubrication interval " in Table
・ Depending on the robot operation state, the lubrication time will fluctuate, so determine the time according to the state so that the grease does not run out.
・ With the maintenance forecast function of the personal computer support software (option), the guidance of lubrication time is calculated according to the operating environment of the customer.
・ The numbers in the correspond to the supply positions in Fig.
・Avoid excessive lubrication since it may lead to grease leak. Also, the number of lubrications is limited to 3 times.
(2)Lubrication method
1)Set the robot to the posture shown in Fig.
2)Refer to the "5.3.2Installing/removing the cover" on page 44 and remove the covers.
3)Remove the drain bolt or plug.
4)Insert the grease shown in Table
5)Install the drain bolt or plug.
6)Replace the covers with the removal procedure in reverse.
