Operating Instructions
Muratec F-65 Quick Reference Guide
Welcome …
Page
Find your serial number and write it down
Welcome to your Muratec fax machine
Getting started Beyond the basics
What’s in these operating instructions
Appendix and index
Just in case …
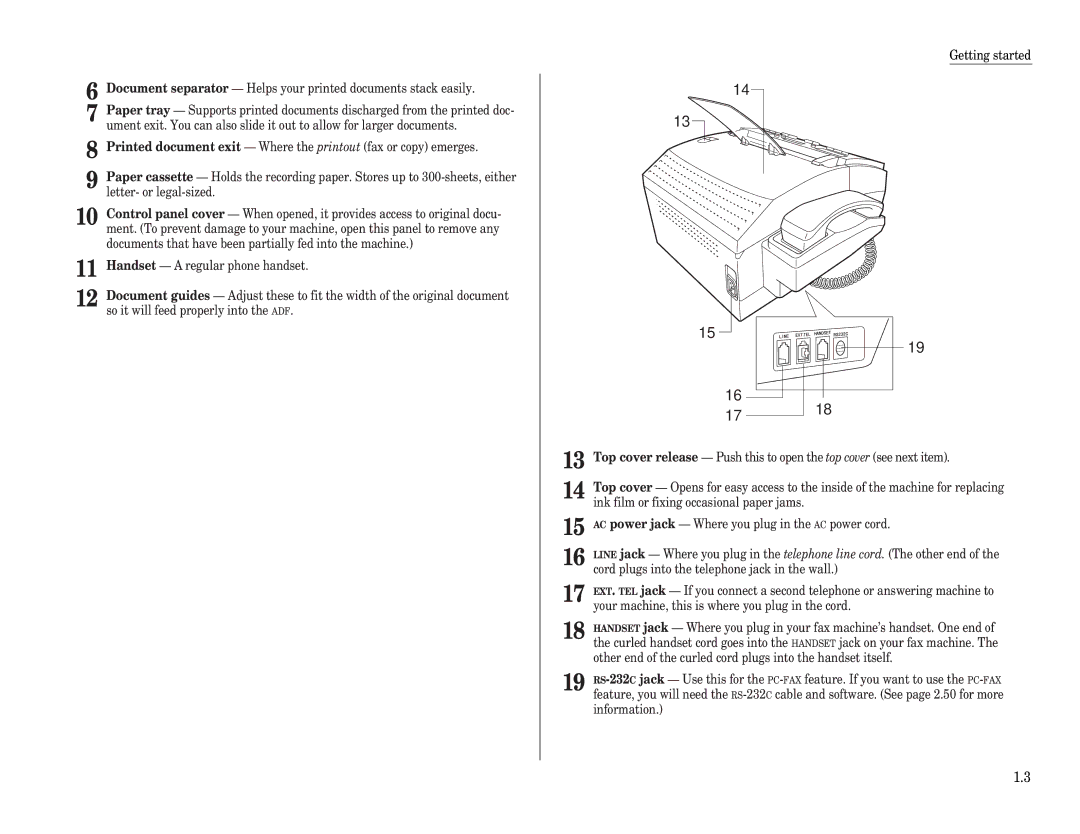
Getting started
What’s a fax document?
What are resolution and grayscale?
What’s inside this section
Quick introduction to fax
What are all the parts?
Take it out of the packaging
Page
What do the keys do?
Status indication lights
= The ink film is full
= Your machine is almost out of ink film
Loading paper
Setting up
Pick an installation spot first
Power tips
Paper face down into the paper
PaperSizeLetter
Plug in and power up
Setting the paper size
Attaching the paper-handling parts
Installing / Changing the Ink Film
Adjust the monitor speaker’s volume
Blue leader film
To press
When you install a new ink film
Operating Tips
Attaching a second phone or an answering machine
What do you want to do?
Clearing settings before beginning
Using EasyStart to enter initial settings
EasyStart
Phone TypeTone
When you see the character you want
Your Name
Abcdef
Complete
Phone TypePulse
How big and small your pages can be
Some thoughts on resolution, grayscale and contrast
Sending faxes
Some guidelines
Time 05-10
Entering a pause character when dialing
Potential problems with call-waiting and voice mail
Set DialingPause
Sending
How to insert a document
Using memory transmission
… or …
919725552009
Transmit
Dial the fax number
If the call doesn’t go through redialing
C015552009
Canceling a document while sending it
An introduction to Review Commands
Prog/Cancel
Different ways to get the job done
Tel Ready mode
Fax Ready mode
Receiving faxes
Fax Primary
Tel/Fax Ready mode
Primary Tel/Fax
Tel Primary
When the paper or ink film runs out
Ans/Fax Ready mode
No. of Copy =
Making copies
Copying from feeder
Copying from memory
It’s a great phone, too
Call request
Dialing during a power failure
Beyond the basics
Beyond the basics
Getting everything just the way you want it
Setting up for scans
Reduc Rate 91%
Setting the print parameters
Print Parameters
Reduc Rate Auto
Setting ECM
Setting the copy parameters
Setting the number of rings
Setting silent mode
Num Une-Touche
Setting the language
Printing your settings
Printing a program list
Autodialer basics
Autodialer
Using one-touch numbers
Erase One-Touch
Muratec Office
Completed
05No Number
Using speed-dial numbers
Enter Speed-Dial
01No Number
Muratec Office S05
05Name
Fax dialing via speed-dial
05555-987-6543
Phoning via speed-dial
Erasing a speed-dial number
Erase Speed-Dial
What if an EasyDial call does not go through?
EasyDial directory dialing
ABC Company
Setting up a delayed transmission
Delayed transmission
Printing a stored document
Reviewing or canceling delayed commands
Printing a delayed command list
Basics of broadcasting
Delayed broadcasting
Broadcasting
Group No ,4
Relay broadcast initiation
Relay Tx
Group No
Time 14/1400
Make and pay for the call. Your machine can perform
Polling
Polling
Enter Fax Number
Code polling
Limiting polling access to your fax machine
Code an introduction
Setting up the F-code boxes
Code communication
Sub-Addr. In Use
01Box Name
03Sub-Address#
54321#
Hold Time
03Password
135*7#9
Code Box In Use
Erasing an empty F-code box
Erase F-Code Box
03Muratec Offic
Code transmission and polling
Code Polling
Enter Password
654321
Code polling
Beyond the basics Press ENTER. The LCD shows briefly
Programmable one-touch keys
Using the power of programmable one-touch keys
Programming a delayed transmission
Time 00/1705
Programming a broadcast
Time 11/2030
Time 30/1705
P3Fax Number
Programming a relay broadcast initiation
P3No Number
Group No ,24
555-0692,A,S01
Programming an F-code transmission
23456#1
Programming F-code polling
Press ENTER. The LCD will show briefly
Programmable one-touch fax dialing
Erasing a programmable one-touch key
Printing a list of your programmable one-touch keys
Operation protection
Keeping things secure
Key to it all the passcode
Set Security Rx
Using your fax machine during operation protection
Security reception
Activating security reception
Print Mem Rx Doc
Set PIN Mode
Masking the PIN
Printing from security reception and turning it off
S01
Enter PIN Number
1057
1234
See Autodialing while using the pin mask,
19725550911*1234
19725550911
Setting Block Junk Fax
Setting for use with a closed network
Block Junk Off
BlockJunk Dial
01555-3038
Print Junk Dial
Cover
Special features
Auto Print On
Managing your fax with its journal and reports
Journal On/Off
Auto Print Off
Set TCR
Setting the Transmit confirmation reports TCRs
OneLine + distinctive ring detection
What the reports tell you
Ring Pattern a
Set DRD
DRDOff
DRDOn
Responding to a call request
Caller-ID
Talking first, then sending a fax
Talking first, then receiving a fax
Printing the caller-IDList
Making the PC-FAXconnection
PC-FAXfeature fax/computer connectivity
PC-FAXfeature requirements for your computer
Printing from your computer to your fax
Scanning from your fax to your computer
RS-232Cinterface cable
AT commands
Sending/receiving faxes with your computer
Just in case …
We’re online to help you
If a printout jams
Clearing paper jams
If an original document jams
Page
Comm. Error Enter No.0-32
Solving communications problems
Alarm
LCD error messages
Enter a different number for your F-code box’s subaddress
Reset the page and try again
Enter a PIN for that number, then try again
Specific errors
Errors
Error reports
Kinds of error codes
Paper. Try the call again
Check Message printouts
Re-try the call
Conditions can change rapidly, so try the call again later
Caring for your fax machine
Cleaning tips
Keep the air vents clean
Curing frequent jams in the document feeder
Corrective cleaning
Cleaning your fax machine
Other with isopropyl alcohol
Fixing unsatisfactory printout quality
Sending faxes
Common questions
General questions
Reports
How your fax machine works
Receiving faxes
Polling
Working with your answering machine
Page
Bits per second See bps
Glossary
Location ID See Station ID
Halftone See Grayscale
Hub See Relay broadcasting
Leased line See Private line
Scanning width See Effective scanning width
Receiver ID See Station ID
REN See Ringer equivalence number
Page
Just in case …
Appendix and index
Specifications
Regulatory information
See EasyDial
Index
50-2.52
See Sending faxes
Exclusions
Limited warranty
Obligations