■WJ-DR200 AV Disk Recorder Control
●Connections
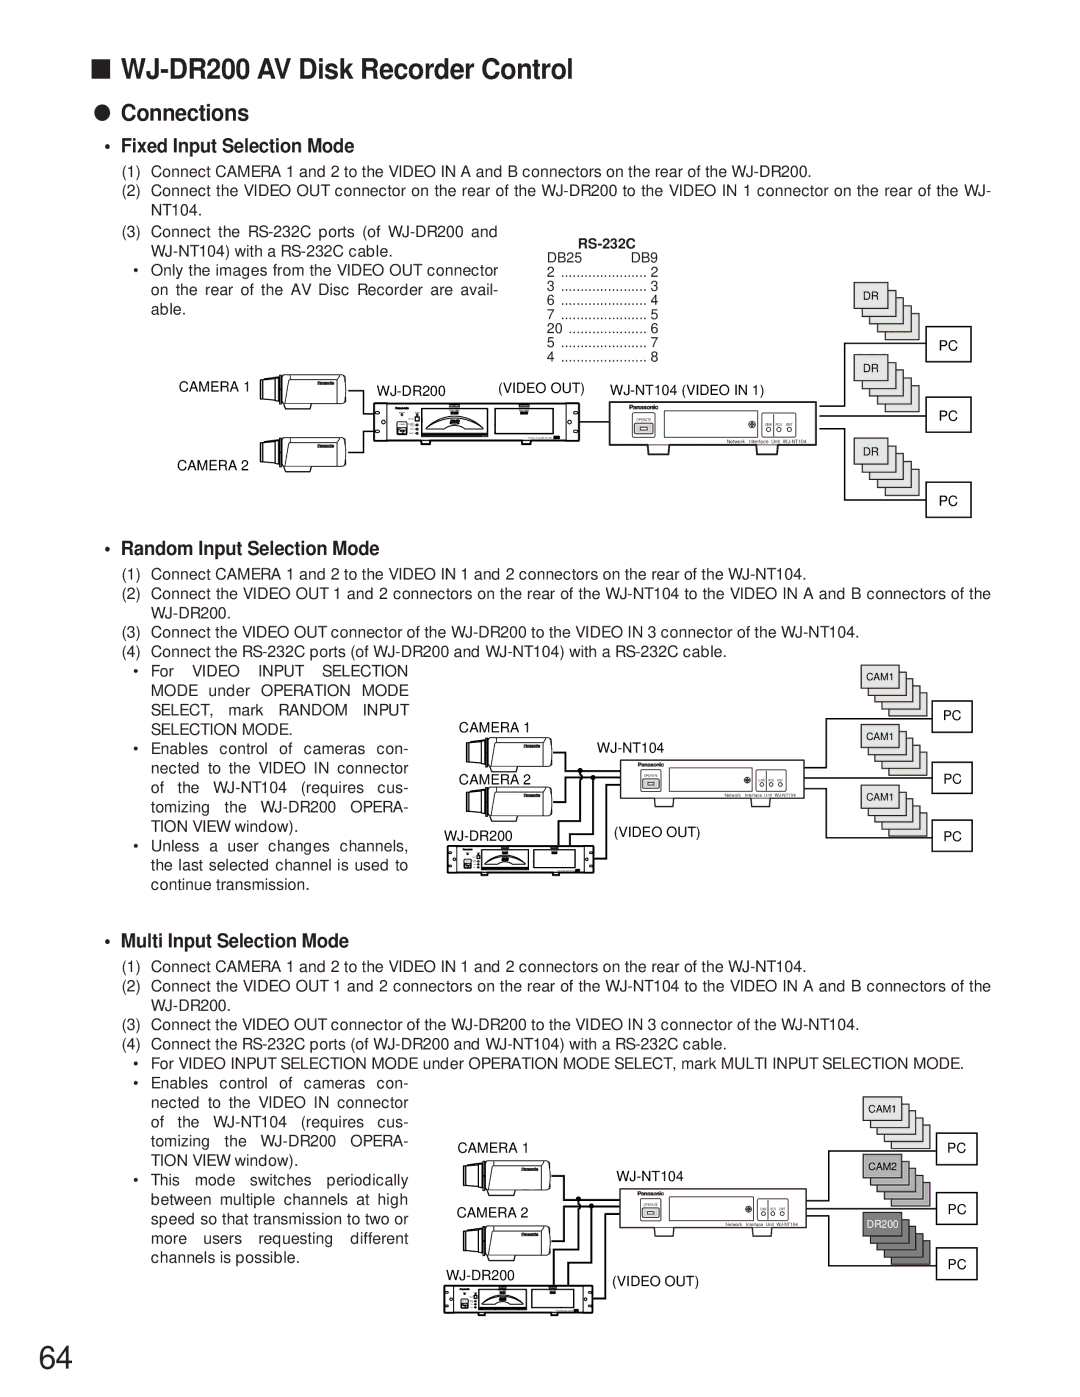
•Fixed Input Selection Mode
(1)Connect CAMERA 1 and 2 to the VIDEO IN A and B connectors on the rear of the
(2)Connect the VIDEO OUT connector on the rear of the
(3)Connect the
|
|
| |||
| DB25 | DB9 |
| ||
• Only the images from the VIDEO OUT connector |
| ||||
2 | 2 |
| |||
on the rear of the AV Disc Recorder are avail- | 3 | 3 | DR | ||
able. |
|
| 6 | 4 | |
|
| 7 | 5 |
| |
|
|
| 20 | 6 |
|
|
|
| 5 | 7 | PC |
|
|
| 4 | 8 | DR |
|
|
|
|
| |
CAMERA 1 | (VIDEO OUT) |
|
| ||
|
| PUSH OPEN | PUSH OPEN |
| PC |
| RESET |
|
| OPERATE | |
| ALARM |
|
| ||
| REC |
|
| LINK RCV XMT |
|
|
|
| AV Disc Recorder | Network Interface Unit |
|
|
|
|
|
| |
CAMERA 2 |
|
|
|
| DR |
|
|
|
|
| |
|
|
|
|
| PC |
•Random Input Selection Mode
(1)Connect CAMERA 1 and 2 to the VIDEO IN 1 and 2 connectors on the rear of the
(2)Connect the VIDEO OUT 1 and 2 connectors on the rear of the
(3)Connect the VIDEO OUT connector of the
(4)Connect the
• For VIDEO INPUT SELECTION |
|
|
| CAM1 | |
MODE under OPERATION MODE |
|
|
|
| |
SELECT, mark RANDOM | INPUT |
|
|
| PC |
SELECTION MODE. |
| CAMERA 1 |
|
| |
|
|
| CAM1 | ||
• Enables control of cameras con- |
|
| |||
|
|
| |||
nected to the VIDEO IN connector | CAMERA 2 | OPERATE |
| PC | |
of the |
| LINK RCV XMT | |||
|
| ||||
|
| Network Interface Unit | CAM1 | ||
tomizing the |
|
|
| ||
|
|
|
| ||
TION VIEW window). |
| (VIDEO OUT) |
| PC | |
• Unless a user changes channels, |
| ||||
|
|
|
| ||
the last selected channel is used to |
|
|
|
| |
continue transmission. |
|
|
|
|
|
•Multi Input Selection Mode
(1)Connect CAMERA 1 and 2 to the VIDEO IN 1 and 2 connectors on the rear of the
(2)Connect the VIDEO OUT 1 and 2 connectors on the rear of the
(3)Connect the VIDEO OUT connector of the
(4)Connect the
•For VIDEO INPUT SELECTION MODE under OPERATION MODE SELECT, mark MULTI INPUT SELECTION MODE.
•Enables control of cameras con-
nected to the VIDEO IN connector |
|
| CAM1 |
of the |
|
| |
|
|
| |
tomizing the | CAMERA 1 |
| PC |
TION VIEW window). |
| ||
| CAM2 | ||
• This mode switches periodically |
| ||
|
| ||
between multiple channels at high | CAMERA 2 | OPERATE | PC |
speed so that transmission to two or | LINK RCV XMT | ||
| |||
| Network Interface Unit | DR200 | |
more users requesting different |
|
|
|
channels is possible. |
|
| PC |
|
| ||
| (VIDEO OUT) |
| |
|
|
|
64
