Basic Operation/Fonctionnement de base

DISC LOADING/


INSERTION / RETRAIT DU

UNLOADING


DISQUE

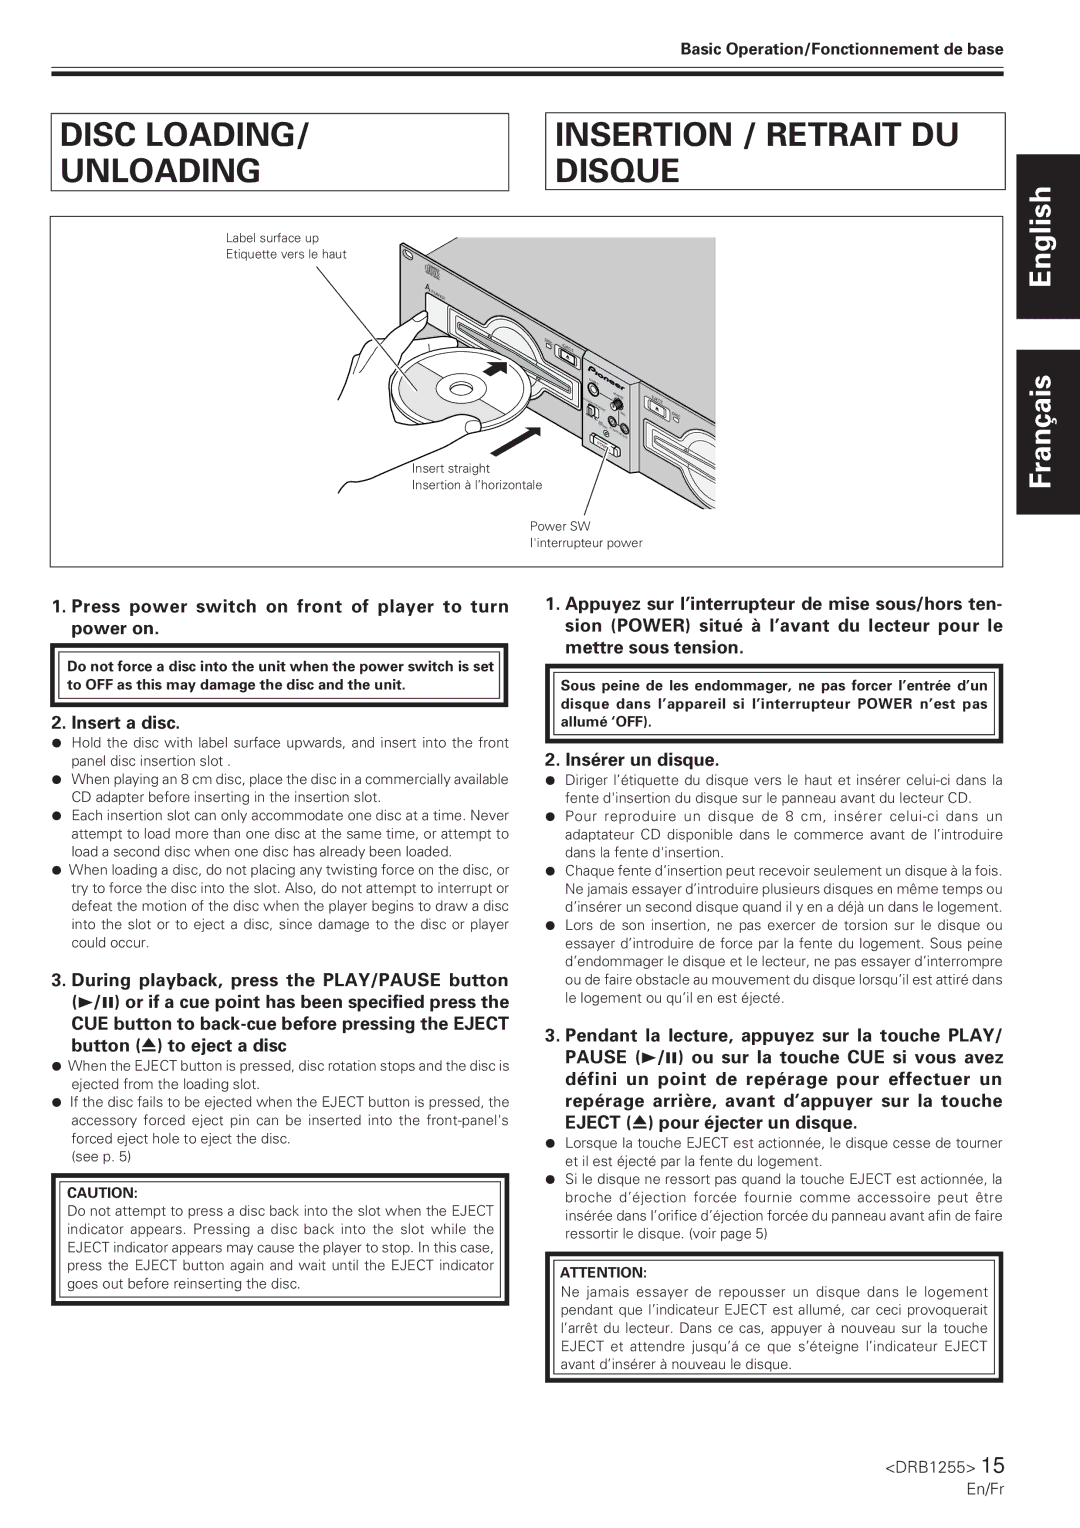
Label surface up


Etiquette vers le haut

'


A

PLAYER


DISC

EJECT


0


PHONES


A•B

AUDIO-


MONITOR

EJECT


OUT

SELECT

MIN


0


A•B


MAX

DISC


A•B/


A


AUTO

MIX

PLAYER

B


SELECT


POWER


Insert straight

Insertion à l’horizontale

Power SW

I'interrupteur power

English

Français

1.Press power switch on front of player to turn power on.

Do not force a disc into the unit when the power switch is set to OFF as this may damage the disc and the unit.

2. Insert a disc.

¦Hold the disc with label surface upwards, and insert into the front panel disc insertion slot .

¦When playing an 8 cm disc, place the disc in a commercially available CD adapter before inserting in the insertion slot.

¦Each insertion slot can only accommodate one disc at a time. Never attempt to load more than one disc at the same time, or attempt to load a second disc when one disc has already been loaded.

¦When loading a disc, do not placing any twisting force on the disc, or try to force the disc into the slot. Also, do not attempt to interrupt or defeat the motion of the disc when the player begins to draw a disc into the slot or to eject a disc, since damage to the disc or player could occur.

3.During playback, press the PLAY/PAUSE button (3/8) or if a cue point has been specified press the

CUE button to back-cue before pressing the EJECT

button (0) to eject a disc

¦When the EJECT button is pressed, disc rotation stops and the disc is ejected from the loading slot.

¦If the disc fails to be ejected when the EJECT button is pressed, the accessory forced eject pin can be inserted into the front-panel's forced eject hole to eject the disc.

(see p. 5)

CAUTION:

Do not attempt to press a disc back into the slot when the EJECT indicator appears. Pressing a disc back into the slot while the EJECT indicator appears may cause the player to stop. In this case, press the EJECT button again and wait until the EJECT indicator goes out before reinserting the disc.

1.Appuyez sur l’interrupteur de mise sous/hors ten- sion (POWER) situé à l’avant du lecteur pour le mettre sous tension.

Sous peine de les endommager, ne pas forcer l’entrée d’un disque dans l’appareil si l’interrupteur POWER n’est pas allumé ‘OFF).

2. Insérer un disque.

¦Diriger l’étiquette du disque vers le haut et insérer celui-ci dans la fente d'insertion du disque sur le panneau avant du lecteur CD.

¦Pour reproduire un disque de 8 cm, insérer celui-ci dans un adaptateur CD disponible dans le commerce avant de l’introduire dans la fente d'insertion.

¦Chaque fente d’insertion peut recevoir seulement un disque à la fois. Ne jamais essayer d’introduire plusieurs disques en même temps ou d’insérer un second disque quand il y en a déjà un dans le logement.

¦Lors de son insertion, ne pas exercer de torsion sur le disque ou essayer d’introduire de force par la fente du logement. Sous peine d’endommager le disque et le lecteur, ne pas essayer d’interrompre ou de faire obstacle au mouvement du disque lorsqu’il est attiré dans le logement ou qu’il en est éjecté.

3.Pendant la lecture, appuyez sur la touche PLAY/ PAUSE (3/8) ou sur la touche CUE si vous avez défini un point de repérage pour effectuer un repérage arrière, avant d’appuyer sur la touche

EJECT (0) pour éjecter un disque.

¦Lorsque la touche EJECT est actionnée, le disque cesse de tourner et il est éjecté par la fente du logement.

¦Si le disque ne ressort pas quand la touche EJECT est actionnée, la broche d’éjection forcée fournie comme accessoire peut être insérée dans l’orifice d’éjection forcée du panneau avant afin de faire ressortir le disque. (voir page 5)

ATTENTION:

Ne jamais essayer de repousser un disque dans le logement pendant que l’indicateur EJECT est allumé, car ceci provoquerait l’arrêt du lecteur. Dans ce cas, appuyer à nouveau sur la touche EJECT et attendre jusqu’á ce que s’éteigne l’indicateur EJECT avant d’insérer à nouveau le disque.

<DRB1255> 15 En/Fr

Page 15
Image 15
Pioneer CMX-5000 manual Disc Loading Insertion / Retrait DU Unloading Disque, Insert a disc, Insérer un disque

CMX-5000 specifications

The Pioneer CMX-5000 is a robust professional CD player designed for DJs and audio professionals who demand high-quality sound and user-friendly features. Known for its reliability and versatility, the CMX-5000 provides a wide array of tools that enhance any DJ's performance.

At the heart of the CMX-5000 are its dual CD drives, which allow DJs to effortlessly mix tracks from two different sources. This dual-drive capability ensures smooth transitions between tracks, enabling seamless mixing and creating dynamic sets. The player supports a variety of audio formats, including standard audio CDs and CD-Rs, offering flexibility in music selection.

One of the standout features of the CMX-5000 is its intuitive interface. The large, backlit LCD display provides clear visibility of track information, making it easy for DJs to navigate through their music libraries. The player also includes a jog dial for precise control over track selection and cueing, allowing for quick adjustments during live performances.

In terms of effects, the CMX-5000 offers multiple onboard features that enhance sound manipulation. It includes the ability to set loop points and create seamless loop samples, giving DJs the freedom to extend particular sections of a track. The player is also equipped with a range of pitch control options, enabling precise adjustments to the tempo of tracks, which is crucial for harmonic mixing.

Another notable technology integrated into the CMX-5000 is its anti-shock system, which utilizes a large memory buffer to prevent skips and interruptions during playback. This feature is essential for live environments where any disruption in sound can impact the overall experience for the audience.

Connectivity is another strong suit of the CMX-5000. It offers multiple output options, including balanced XLR outputs, RCA outputs, and digital outputs, ensuring compatibility with various sound systems. This adaptability makes the player suitable for different venues, whether in clubs, festivals, or private events.

In summary, the Pioneer CMX-5000 is a feature-rich CD player that merges cutting-edge technology with user-friendly design. Its dual CD drives, intuitive interface, comprehensive effects, and robust connectivity options make it a powerful tool for any DJ looking to elevate their performance and deliver an unforgettable musical experience. With its reliable build quality and professional capabilities, the CMX-5000 remains a favored choice among industry experts.