Manuals
/
Canon
/
Computer Equipment
/
Projector
Canon
X700, SX7 Press the OK button, Press the MENU button when you finish. The menu disappears
Models:
X700
SX7
1
87
141
141
Download
141 pages
24.31 Kb
84
85
86
87
88
89
90
91
<
>
Troubleshooting
Specification
Install
Maintenance
Menu Configuration
Connecting the Projector to the Computer
Symptoms and Solutions
Resetting the Image Settings
Setting Up the Projector
Factory defaults
Page 87
Image 87
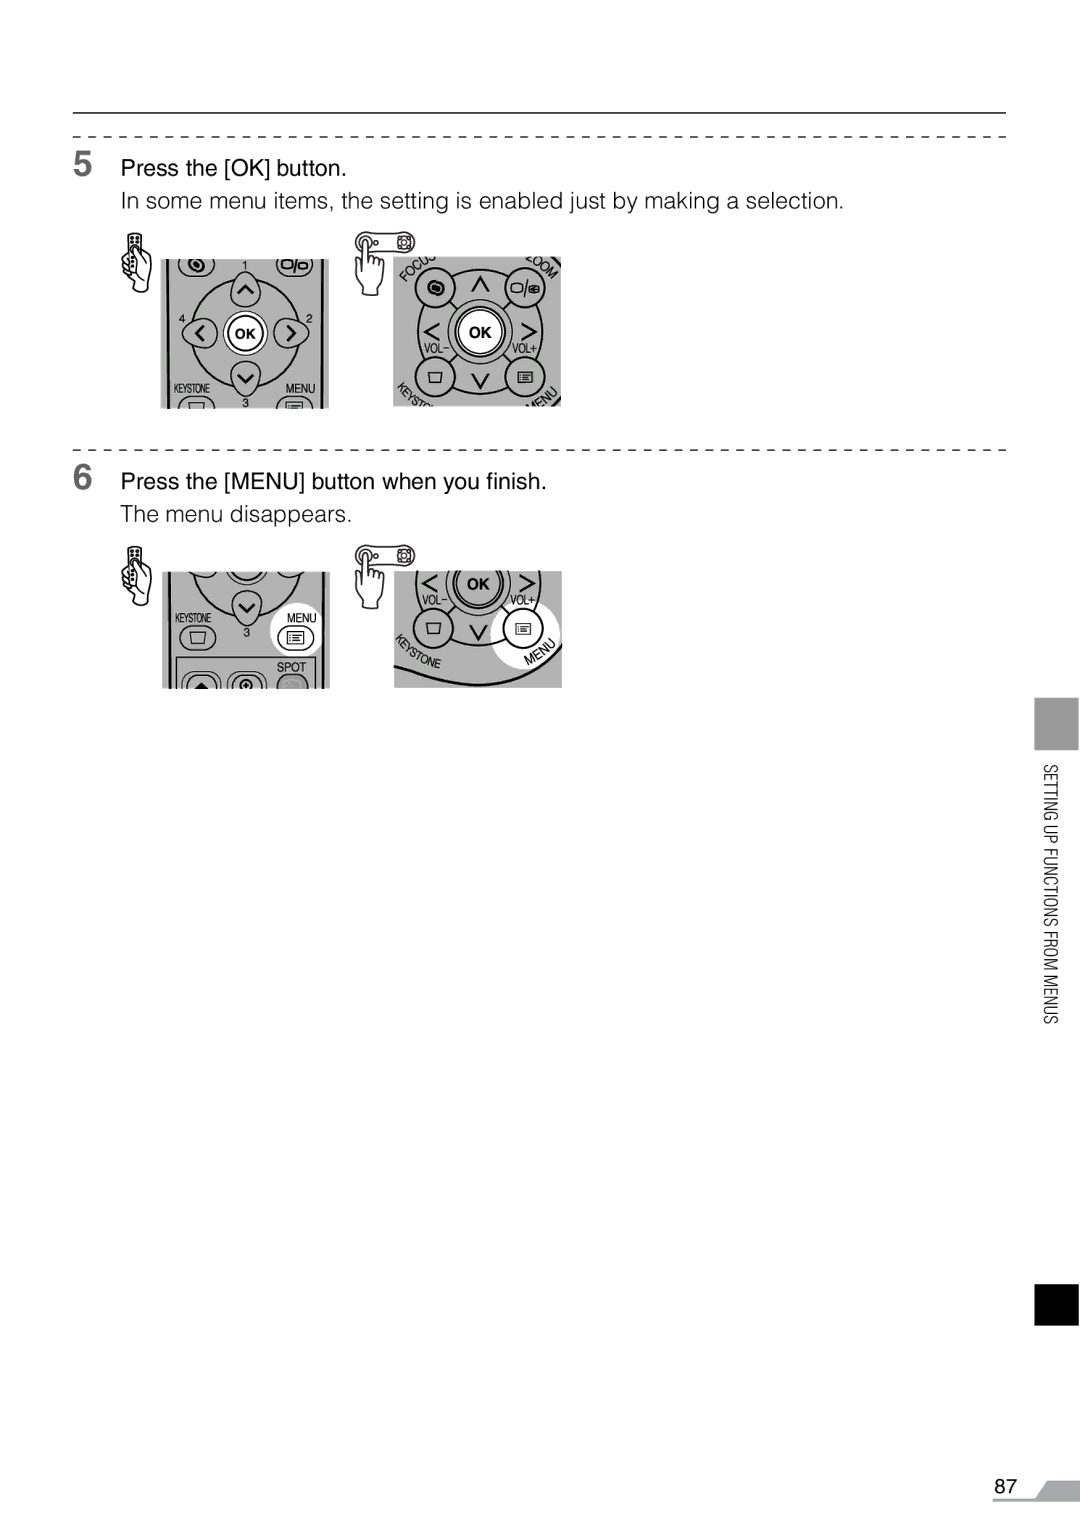
5
Press the [OK] button.
In some menu items, the setting is enabled just by making a selection.
6
Press the [MENU] button when you finish. The menu disappears.
SETTING UP FUNCTIONS FROM MENUS
87
Page 86
Page 88
Page 87
Image 87
Page 86
Page 88
Contents
Setting Up Functions from Menus Maintenance Troubleshooting Appendix
User’s Manual
Table of contents/Safety Instructions Before Use
Setting Up the Projector Projecting an Image from the Computer
Computer
Quick Reference - How to start projection
AV Equipment
Features of the Multimedia Projector SX7/SX6/SX60/X700
Table of Contents
Freezing the Picture
Setting Various Function
RISK OF ELECTRIC SHOCK DO NOT OPEN
Safety Instructions
Safety Precautions
READ AND KEEP THIS OWNERS MANUAL FOR LATER USE
a. When the power cord or plug is damaged or frayed
European Union and EEA only
AC Power Cord Requirement
AC Power Cord for the United States and Canada
NOTE FOR CUSTOMERS IN THE US
Canadian Radio Interference Regulations
Federal Communication Commission Notice
Disposal of Waste Lamp
Lamp Handling Precautions
Carrying/Transporting the Projector
If a Lamp Explodes
Hot Air from Exhaust Vent
Installation Precautions
Installation
Using the Projector at 2300 Meters or More Above Sea Level
Major Features
Features of the Multimedia Projector SX7/SX6/SX60/X700
Supplied Manuals
Supplied Manuals and Symbols Used in This Manual
Symbols of Button Operations
Symbols Used in This Manual
Setting Up Functions from Menus Maintenance Troubleshooting Appendix
BEFORE USE
Table of contents/Safety Instructions
Setting Up the Projector Projecting an Image from the Computer
Before Use
Supplied Accessories
Installing the Lens Cap
Main Unit of Projector
Part Names
Bottom Side
Mounting the Projector on the Ceiling
You can mount the projector on the ceiling
Buttons on the Remote Control and Top Control
Top Control
Input Terminals on Main Unit
SX7/X700
SX6/SX60
1 Input Terminal-1 DIGITAL IN/ANALOG IN-1 P34, 35
Indicators on the Top Control
The projector is being turned off the lamp is being
The image is blackened out NO SHOW
Preparing the Remote Control
Installing Remote Control Batteries
Remote Control Operating Range
Page
Projecting an Image from the Computer
SETTING UP THE PROJECTOR
Table of contents/Safety Instructions Before Use
Setting Up Functions from Menus Maintenance Troubleshooting Appendix
Determining the Distance to the Screen
Setting Up the Projector
Determining the Installation Position
Placing in Front of the Screen
Placing on a Level Place
Page
Setting Up Functions from Menus Maintenance Troubleshooting Appendix
PROJECTING AN IMAGE FROM THE COMPUTER
Table of contents/Safety Instructions Before Use
Setting Up the Projector
Connecting the Projector to the Computer
Connecting to Video Terminals
Projecting an Image from the Computer
DVI cable
5-BNC cable
COMPUTER
Connecting to an External Monitor
Connecting to AUDIO IN Termi- nals SX7/X700
Projector
Audio cable
Connecting to AUDIO IN Termi- nals SX6/SX60
Starting Projection
Unplug the Power Cord When the Projector is Not in Use
Connect the Ground Terminal
Selecting a Language
Adjusting the Image Size ZOOM
Adjusting the Image
If Keystone Distortion is Too Large
Adjusting the Projection Angle
Preparing the Computer
Determining the Output Resolution of the Computer
FROM THE COMPUTER
Projecting the Image from the Notebook Computer
Performing the Auto Setup
3 Press the AUTO SET button again
2 Press the AUTO SET button. The Auto setup window appears
Selecting an Input Signal
PROJECTING AN IMAGE FROM THE COMPUTER
4 Press the OK button
PROJECTING AN IMAGE FROM THE COMPUTER
Adjusting the Focus
Adjusting Keystone Distortion
z The result of keystone adjustment is memorized. If you place the projector at the same posi- tion, the keystone adjustment is not necessary
Setting Up the Computer Screen Automatically AUTO PC
Selecting an Image Mode IMAGE
Brightness Adjust this when the image is too bright or dark
Selecting a Screen Mode Aspect
A clear image can be obtained because of no image pro- cessing
True size
Selecting Aspect Ratio of the Projecting Image Screen aspect
Turning Off the Projector
Setting Up the Power Management Function
Page
Setting Up Functions from Menus Maintenance Troubleshooting Appendix
PROJECTING AN IMAGE FROM AV EQUIPMENT
Table of contents/Safety Instructions Before Use
Setting Up the Projector Projecting an Image from the Computer
Connecting the Projector to an AV Equipment
Projecting an Image from AV Equipment
Connecting to Video Terminals
Input Terminal-1
SCART cable
Digital cable
DVI terminal
SX7/X700 SX6/SX60
S-VIDEO cable
SX7/X700 SX6/SX60
Video cable
PROJECTING AN IMAGE FROM AV EQUIPMENT
Connecting to AUDIO IN Terminals SX7/X700
Connecting to AUDIO OUT Termi- nals SX7/X700
Audio cable
SX7/X700
Projecting a Video Image from an AV Equipment
Selecting an Input Signal
Performing the Auto Setup
Selecting DIGITAL VIDEO
Selecting SCART
z Refer to the table on the page 129 for more detailed information on the screen size for the wide screen
Selecting a Screen Mode Aspect
Selecting Aspect Ratio of the Projecting Image Screen aspect
169 D. image shift
Page
Setting Up Functions from Menus Maintenance Troubleshooting Appendix
USEFUL FUNCTIONS AVAILABLE DURING A PRESENTATION
Table of contents/Safety Instructions Before Use
Setting Up the Projector Projecting an Image from the Computer
Useful Functions Available During a Presentation
Blackened Out an Image Temporarily
Muting the Sound
Freezing the Picture
Adjusting the Volume
DURING A
Showing the Elapsed Time
Page Up or Down through the Pages
USEFUL FUNCTIONS AVAILABLE
Zooming an Image
Operating a Mouse with the Remote Control
Pointing with a Spotlight
Page
Maintenance Troubleshooting Appendix Index
SETTING UP FUNCTIONS FROM MENUS
Table of contents/Safety Instructions Before Use
Setting Up the Projector Projecting an Image from the Computer
Setting Up Functions from Menus
How to Use Menus
Symbols Indicating Item Categories
This section provides the basic operation on the menu
4 Set the menu item
5 Press the OK button
In some menu items, the setting is enabled just by making a selection
6 Press the MENU button when you finish. The menu disappears
SETTING UP FUNCTIONS FROM MENUS
Full screen
Setting Display Status
Aspect
Selecting an Input Signal Type
Input signal select
Selecting a Screen Mode
480p
1080i
1035i
575p
Tracking
Adjusting the Total Number of Dots
Adjusting the Tracking
Total dots
Vertical position
Adjusting the Horizontal Position
Adjusting the Vertical Position
Horizontal position
Vertical pixels
Adjusting the Number of Horizontal
Adjusting the Number of Vertical Pixels
Horizontal pixels
Menu position
Performing Progressive Processing
Selecting a Menu Position
Progressive
Image flip H/V
Performing the Ceiling-mounted/Rear Projection
Logo capture
Correcting the Screen Color
Capturing a Logo to Be Projected
Screen color
Logo position
Displaying a Logo No signal screen
No signal screen
Selecting a Logo Display Position
Projector on
Displaying a Logo NO SHOW
Selecting a Logo at Startup
NO SHOW
Screen aspect
Selecting Aspect Ratio of the Screen
Selecting an Image Mode
Setting the Image Quality
Contrast
Adjusting the Brightness
Adjusting the Contrast
Brightness
Gamma
Adjusting the Sharpness
Making a Gamma Correction
Sharpness
Color adjustment
Making Color Adjustment
Color adjustment
Disables dynamic gamma
Dynamic gamma
Mem. color correct
Lamp mode
6-axis color adjust
Reset
Resetting the Image Settings
Setting Various Function
Setting Auto Setup Function
Selecting the Power Management
Beep
Skip the POWER Button Operation
Direct power on
Enabling/Disabling the Beep
Language
Selecting a Display Language
Guide
Prohibiting the Projector Operation
Enabling/Disabling the Guide Message
Key lock
LED illumination
Setting up the Remote Control
Remote control
Turning On/Off the LED Illumination
Digital video
Setting up the Digital Video Input Signal
Setting a Password
Password settings
Factory defaults
Resetting to the Default Setting
Lamp counter
Resetting the Lamp Counter
Setting Up Functions from Menus
MAINTENANCE
Table of contents/Safety Instructions Before Use
Setting Up the Projector Projecting an Image from the Computer
Cleaning the Projector
Maintenance
Cleaning and Replacing the Air Filter
Cleaning the Air Filter
Replacing the Air Filter
Replacing Lamp
Replacing the Lamp
Replacing the Lamp
Page
Setting Up Functions from Menus Maintenance
TROUBLE- SHOOTING
Table of contents/Safety Instructions Before Use
Setting Up the Projector Projecting an Image from the Computer
WARNING Lamp Flash Patterns
Troubleshooting
Symptoms and Solutions
You cannot turn on the projector
You cannot project an image from the projector
Check whether the distance to the screen is appropriate. If the
You cannot hear sound
The projected image is blur
You cannot project an image appropriately
You cannot project an image from a notebook computer
The projector is forced to be turned off
VGA function key or a key with an icon for the external moni
Check whether you are operating the remote control within the
You cannot operate the remote control
You cannot use the wireless mouse function
Check whether batteries are installed correctly. If batteries are
Table of contents for Appendix
APPENDIX
Appendix
Supported Computer Signal Types
Relationship between Screen Size and Projecting Distance
Analog PC P25, 34
Glossary
6-axis color adjust P105
AdobeRGB P53
DVI P35, 46, 63
Component P25, 62
Composite P25
Digital PC P25
Progressive P94
Resolution P42
Memorized Color Correction P104
Offset P103
S-video P25, 64
Tracking P91
Video P25, 64
lens
Specifications
External View
Index
Page
z Ceiling-mounting plate Part No RS-CL02
Options
Page
The Display settings menu
Menu Configuration
Standard
The Image adjustment menu
The System settings menu
Power management mode