Use
Page
Use guide
Hewlett-Packard Company Chinden Boulevard Boise, Idaho
Warranty
Contents
Menu Map 104 Configuration 105 PCL or PS Font List 107
Performing Routine Maintenance
104
Glossary
Enww
Printer Basics
Overview
Wide Format Printing
Printer Features and Benefits
High Print Quality
High Performance
Paper Handling
Expandability
Best Value
Euro Character
Environmental Features
HP LaserJet 5100 printer
Printer Information
HP LaserJet 5100tn printer
HP LaserJet 5100dtn printer
Optional Tray Configurations
Switch Power Connector Network, I/O, or optional
Power
Printer Parts and Locations
Tray
Suggested Accessories
Accessories and Supplies
To ensure optimum performance
Following
Description or Use Part Number
Ordering Information
Paper
HP LaserJet Printer Family
Maintenance
Control Panel Lights
Control Panel Layout
Printer’s control panel consists of the following
Ready
Tray x Load Type Size or Unexpected Paper Size
Control Panel Keys
Network administrator
To change a control panel setting
Control Panel Menus
To print a control panel menu map
Configure the control panel display language Optional
Printer Software
Start guide for installation instructions
Software included and supported languages
Drivers Included with the Printer
Printer Drivers
Additional Drivers
Software for Windows
Access the Windows Printer Driver
Guide
Printer Driver Help
Choose the Right Driver for Your Needs
PostScript Printer Description Files PPDs
Software for Macintosh Computers
Print Dialog Extensions PDEs Mac OS X only
HP LaserJet Utility
Software for Linux
HP Web Jetadmin
Printing Tasks
Printing Tasks
Guidelines
Selecting the Output Bin
Top Output Bin Rear Output Bin
Top Output Bin
Printing to the Top Output Bin
Printing to the Rear Output Bin
Adjust the Paper Stop
Loading Tray
On the next
Load the tray. For correct orientation, see
Loading the 500-Sheet Tray Optional
Printing Tasks
Duplexer
Printing Both Sides of Paper Optional
Guidelines for Printing Both Sides of Paper
Separating the Printer from the Duplexer
Tray All other trays
Paper Orientation for Printing Both Sides of Paper
Layout Options for Printing Both Sides of Paper
Layout Options for Printing Both Sides of Paper
Printing Letterhead, Prepunched, or
Printing Special Paper
Preprinted Paper
Paper Orientation for Tray
Paper Orientation
Printing Envelopes
Loading Envelopes in Tray
Do not
Printing Labels
Printing Transparencies
Printing Transparencies
Tray
Printing Rotated Paper
Printing Rotated Paper from the 500-Sheet Tray
Sheet Tray
Printing Full-Bleed Images
Printing Cards, Custom-Size and Heavy Paper
Load the tray
Loading Custom-Size Paper in the 500-Sheet Tray
Slide the tray into the printer
Guidelines for Printing Custom-Size Paper
Setting Custom Paper Sizes
Driver, and from the printer’s control panel
Paper is loaded long-edge first X is longer than Y
Printing Tasks
Tray 1 MODE=CASSETTE
Printing Vellum
Saving Printer Setup Information
Using Features in the Printer Driver
Advanced Printing Tasks
Printing with a Watermark
Printing Multiple Pages on One Sheet of Paper
Printing the First Page on Different Paper
Tray 1 Mode=First
Customizing Tray 1 Operation
Tray 1 Mode=Cassette
Manually Feeding Paper from Tray
Feed can also be enabled from the Paper Handling Menu
Printer will print only from Tray
Printer’s control panel
Printing by Type and Size of Paper
Select the paper size settings from the control panel
Benefits of Printing by Type and Size of Paper
To print by type and size of paper, do the following
Size of paper
Type and size settings can also be configured from
Help
Quick Copying a Job
Job Retention
Deleting a Stored Quick Copy Job
Printing Additional Copies of a Quick Copy Job
Printing the Remaining Copies of a Held Job
Proofing and Holding a Job
Deleting a Held Job
Enww
Specifying a Private Job
Printing a Private Job
Releasing a Private Job
Before it is ever printed
Deleting a Private Job
Press Select to select the job. PIN0000 appears
Specifying a Stored Job as Private
Storing a Print Job
Printing a Stored Job
Deleting a Stored Job
Printer Maintenance
Printer Maintenance
Performing Routine Maintenance
HP Policy on Non-HP Print Cartridges
Managing the Print Cartridge
Print Cartridge Storage
Print Cartridge Life Expectancy
Continue Printing When Toner is Low
Redistributing the Toner
Location of the Transfer Roller-Do Not Touch
Cleaning the Printer
Cleaning the Printer
Press Item until Create Cleaning page appears
Using the Printer Cleaning
Problem Solving
Problems
Help you to locate paper jams, properly clear them from
Printer, and solve repeated paper jams
Clearing Paper Jams
Jams. If paper jams are a recurring problem, see
Paper jam is not obvious, look first in the top cover area
Paper jam message
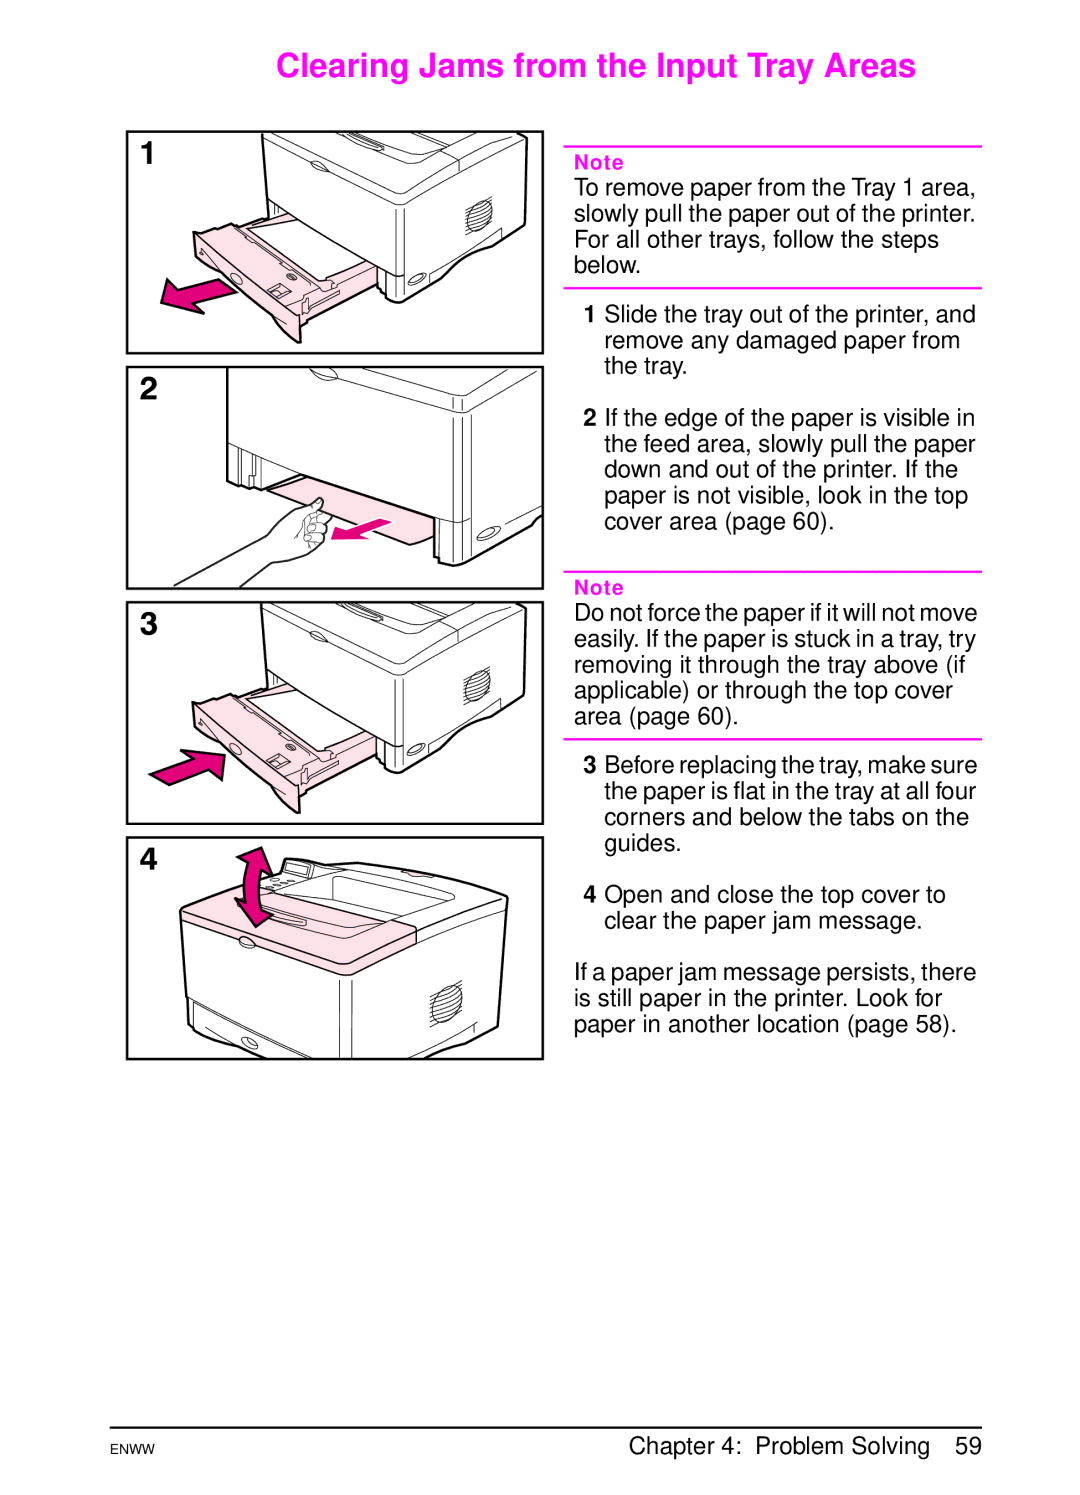
Clearing Jams from the Input Tray Areas
Clearing Jams from the Top Cover Area
Clearing Jams from the Output Areas
Clearing Jams from the Optional Duplexer
Problem Solving
If paper jams occur frequently, try the following
Solving Repeated Paper Jams
If a message persists
Understanding Printer Messages
Self-explanatory
Printer’s control panel page B-13
Close TOP Cover
Not Available
Disk Device
Failure
Flash Device
Install Toner
Flash File
Operation Failed
JOB Cleared
Changed
Simplified
Mopy page TOO
RAM Disk File
Resend Upgrade
Tray 2 Load
Legal
XX.YY
Printer Error
Press GO to Continue
Memory
Paper Size
Fuser Error
41.x
56.x
53.xy.zz
58.x, or
62.x
Nvram Error
Cycle Power
Check Settings
Device Failure
Problem
Correcting Output Quality Problems
Examples below depict letter-size paper that has passed
Vertically rather than horizontally
Follow the steps in the order they are listed
Troubleshooting Steps
Troubleshooting Flowchart
Determining Printer Problems
Macintosh users For more troubleshooting information, see
Ready is
Printing Configuration
Can you print a configuration page?
Can you print from a software application?
Does the job print as expected?
Cancel Job might have been pressed
Does the job print as expected?
Does the printer select the proper trays
To Mac OS
Troubleshooting Flowchart for Macintosh Users
Print job is not sent to the desired printer
Mac OS 8.6 to Mac OS
Selecting an Alternate PPD
Click Select PPD
Mac OS
Renaming the Printer
Linux Problem Solving
Mac OS
Rename the printer
Menu Map
Checking the Printer’s Configuration
Configuration
Event Log
Options Handling accessories that are installed Toner Level
Options
Memory
To print a PCL or PS font list
PCL or PS Font List
Problem Solving
Specifications A-1
Specifications
Paper Specifications
Polyester media
Specifications A-3
Tray Dimensions1 Weight Capacity2
Supported Sizes and Weights of Paper
Specifications A-5
Sheet Tray Dimensions1 Weight Capacity2 Optional
Optional Duplex Printing Dimensions1 Weight
Specifications A-7
Supported Types of Paper
Duplexer
Symptom Problem with Paper Solution
Guidelines for Using Paper
Set Fuser MODE=LOW
Inks, such as those used in some types of thermography
Specifications A-9
Paper Weight Equivalence Table
Transparencies
Labels
Label Construction
Vellum
Specifications A-11
Envelopes
Envelope Construction
Envelopes with Adhesive Strips or Flaps
Envelopes with Double-Side-Seams
Acceptable Unacceptable
Card Stock and Heavy Paper
Specifications A-13
Envelope Margins
Envelope Storage
Card Stock Guidelines
Card Stock Construction
Physical Dimensions
Printer Specifications
Specifications A-15
55 in 139.8 cm 24.6 in 62.5 cm
18.5 in 47.0 cm 10.6 in 27.0 cm 24.4 in 62.0 cm 15.5 cm
Chapter
Printer Weight without print cartridge
18.5 in 47.0 cm 16.6 cm 10.6 in 27.0 cm 29.7 in 75.5 cm
Electrical Specifications
Environmental Specifications
Printer State Power Consumption Average, in watts
Power Requirements Acceptable Line Voltage
Printer State Sound Power1
General Specifications
Acoustic Emissions Per ISO
Chapter
Control Panel Menus B-1
Control Panel Menus
Information, see
Private/Stored Jobs Menu
Displayed on the control panel
Jobname
Control Panel Menus B-3
Information Menu
Paper Handling Menu
Control Panel Menus B-5
Print Quality Menu
ECONOMODE=OFF
Create Cleaning
Toner DENSITY=3
Control Panel Menus B-7
Printing Menu
Control Panel Menus B-9
ERRORS=OFF
PCL Symbol
PCL Font Point
SET=PC-8
Control Panel Menus B-11
Configuration Menu
PCL MEMORY=
Resource SAVE= OFF
400K
PS MEMORY=
Control Panel Menus B-13
Maintenance OFF
JAM RECOVERY= Auto
RAM DISK=AUTO OFF
RAM Disk
Control Panel Menus B-15
Menu
TIMEOUT=15
BUFFER=AUTO Auto
Control Panel Menus B-17
EIO Menu 5100tn/5100dtn
CFG LINK=NO
CFG TCP/IP=NO
Resets Menu
Printer Memory and Expansion C-1
Printer Memory and Expansion
Printer Memory and Expansion
Installing a Dimm
Printer Memory and Expansion C-3
If an optional duplexer is installed
Checking Memory Installation
Resource Saving
Adjusting Memory Settings
To determine how much memory to allocate to a language
Buffering
To change the I/O Buffer setting
Installing EIO Cards or Mass Storage Devices
Installing EIO Cards/Mass Storage
Users who are already familiar with PCL command structure
Method for entering printer commands, if needed
That the printer leave PCL language and enter HP-GL/2 mode
Are printer language switching, job separation, printer
Printer Commands
Understanding PCL Printer Command Syntax
Group
Combining Escape Sequences
Printer Commands D-3
?&l3A?&l1O?&l8D
?&l3a1o8D
Characters, select the 10U PC-8 or 12U PC-850 symbol set
Example, if you want a symbol set that contains line-draw
Selecting PCL Fonts
Others
Printer Commands D-5
Common PCL Printer Commands
?&s#C
?&l#E ?&l#F ?&a#L ?&a#M ?&k#H ?&l#C ?&l#D ?&l#L
?%#A
?%#B
?s#P ?s#H ?&k#S ?s#V ?s#S ?s#B ?s#T
Printer Commands D-7
Printer Commands
Embedded Web Server E-1
To access the embedded Web server
Home Pages
Device Pages
Networking Pages
Media. All trays used in the printer are adjustable
Adjustable tray
Accessories for older printers and the newer EIO
Circuit board that holds extra memory chips for
Help button or a question mark symbol in the printer
Software is already installed
Where paper or other print media is loaded
Printer software help
Index
EIO
Chapter
Chapter
Chapter
??- B-5
Chapter
Chapter
Chapter
Page
Copyright 2002 Hewlett-Packard Company