RECLINER | SECTION 14 |
|
|
6.Turn the spreader bar on the existing back canes CLOCKWISE (toward back upholstery) and remove the spreader bar from the existing back canes.
7.Loosely install the spreader bar onto the NEW back cane handles by rotating the spreader bar COUNTERCLOCKWISE (away from the back canes).
NOTE: If the spreader bar does not thread onto the back canes, do not force. Turn the spreader bar around and repeat STEP 7.
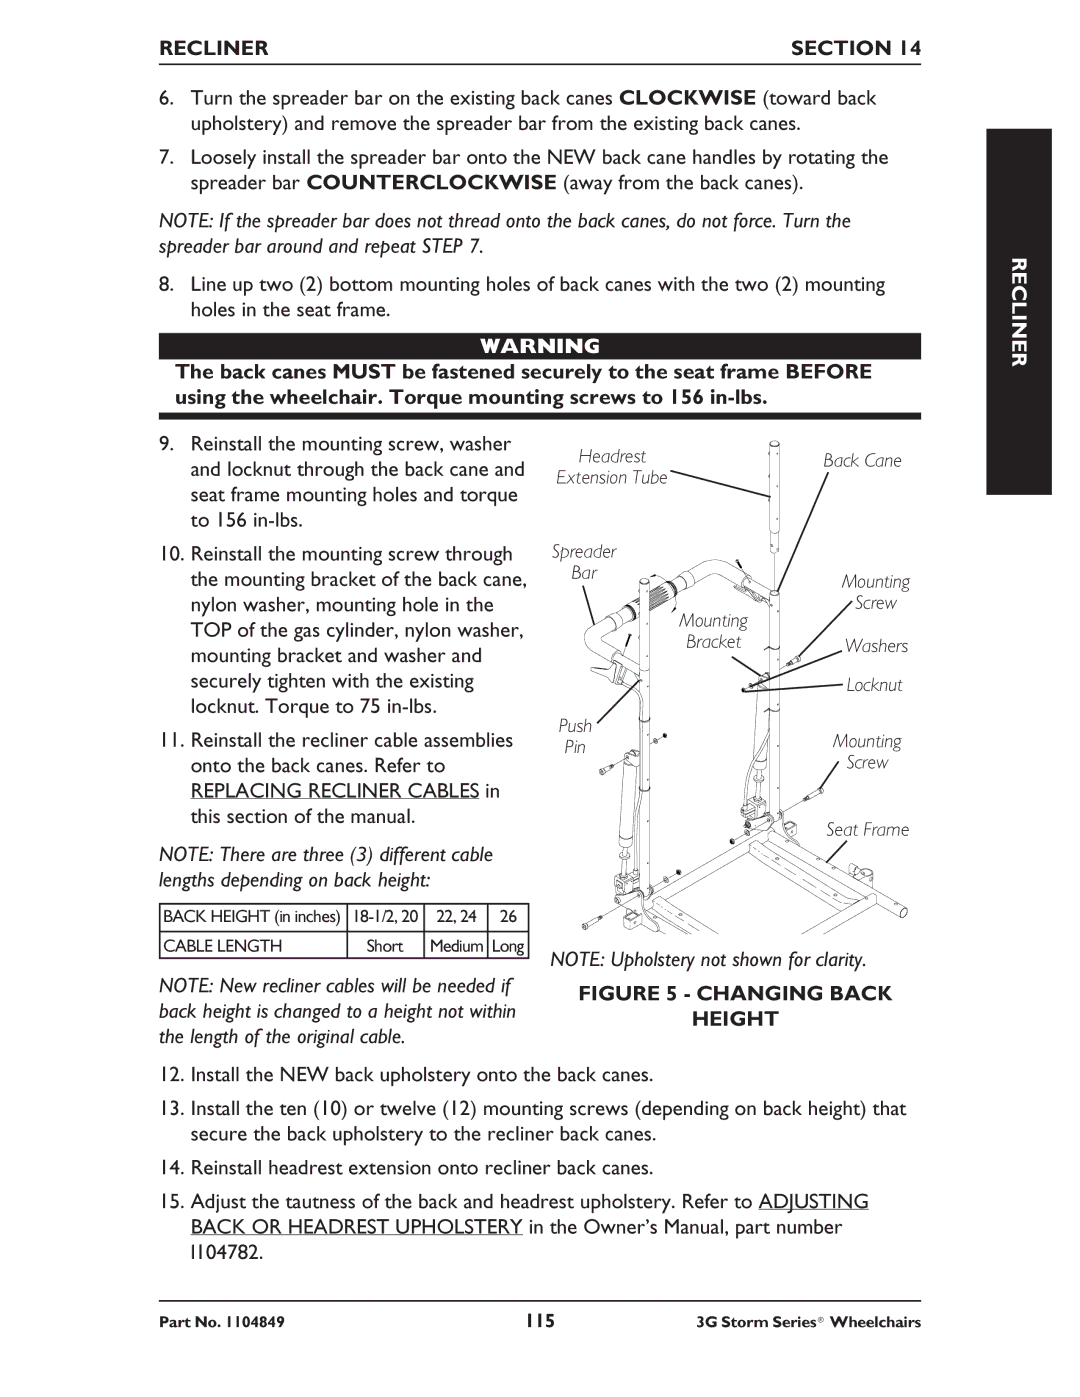
8.Line up two (2) bottom mounting holes of back canes with the two (2) mounting holes in the seat frame.
WARNING
The back canes MUST be fastened securely to the seat frame BEFORE using the wheelchair. Torque mounting screws to 156
9. | Reinstall the mounting screw, washer | Headrest | Back Cane | |||
| and locknut through the back cane and | |||||
| Extension Tube |
| ||||
| seat frame mounting holes and torque |
| ||||
|
|
| ||||
| to 156 |
|
|
|
| |
10. | Reinstall the mounting screw through | Spreader |
| |||
| the mounting bracket of the back cane, | Bar | Mounting | |||
|
| |||||
| nylon washer, mounting hole in the | Mounting | Screw | |||
| TOP of the gas cylinder, nylon washer, |
| ||||
| Bracket | Washers | ||||
| mounting bracket and washer and | |||||
|
|
| ||||
| securely tighten with the existing |
| Locknut | |||
| locknut. Torque to 75 |
|
| |||
11. | Reinstall the recliner cable assemblies | Push | Mounting | |||
Pin | ||||||
| onto the back canes. Refer to | Screw | ||||
|
| |||||
| REPLACING RECLINER CABLES in |
|
| |||
| this section of the manual. |
|
| Seat Frame | ||
|
|
|
|
| ||
NOTE: There are three (3) different cable |
|
| ||||
lengths depending on back height: |
|
| ||||
BACK HEIGHT (in inches) | 22, 24 26 |
|
| |||
CABLE LENGTH | Short | Medium Long | NOTE: Upholstery not shown for clarity. | |||
|
|
|
| |||
NOTE: New recliner cables will be needed if | FIGURE 5 - CHANGING BACK | |||||
back height is changed to a height not within | ||||||
HEIGHT |
| |||||
the length of the original cable. |
|
| ||||
|
|
| ||||
12.Install the NEW back upholstery onto the back canes.
13.Install the ten (10) or twelve (12) mounting screws (depending on back height) that secure the back upholstery to the recliner back canes.
14.Reinstall headrest extension onto recliner back canes.
15.Adjust the tautness of the back and headrest upholstery. Refer to ADJUSTING BACK OR HEADREST UPHOLSTERY in the Owner’s Manual, part number l104782.
RECLINER
Part No. 1104849 | 115 | 3G Storm Series® Wheelchairs |
