Chapter 5 Configuring | |
|
|
172.17.15.11
172.17.15.12
1
2
3
4
30 voice timeslots routed to bundle 1, destination port 1
| Bundle 1 |
30 voice timeslots routed to | Destination IP - 172.17.15.21 |
bundle 1, destination port 2 |
|
| |
30 voice timeslots routed to |
|
bundle 1, destination port 3 |
|
|
|
| Bundle 1 |
30 voice timeslots routed to | Destination IP - 172.17.15.22 |
bundle 1, destination port 4 |
|
|
| 30 voice timeslots routed to |
| bundle 1, destination port 1 |
|
|
Bundle 1 |
|
Destination IP - 172.17.15.11 | 30 voice timeslots routed to |
| bundle 1, destination port 2 |
| |
| 30 voice timeslots routed to |
| bundle 1, destination port 3 |
|
|
Bundle 1 |
|
Destination IP - 172.17.15.12 | 30 voice timeslots routed to |
| bundle 1, destination port 4 |
|
1
2
3
4
172.17.15.21
172.17.15.22
Local | Remote |
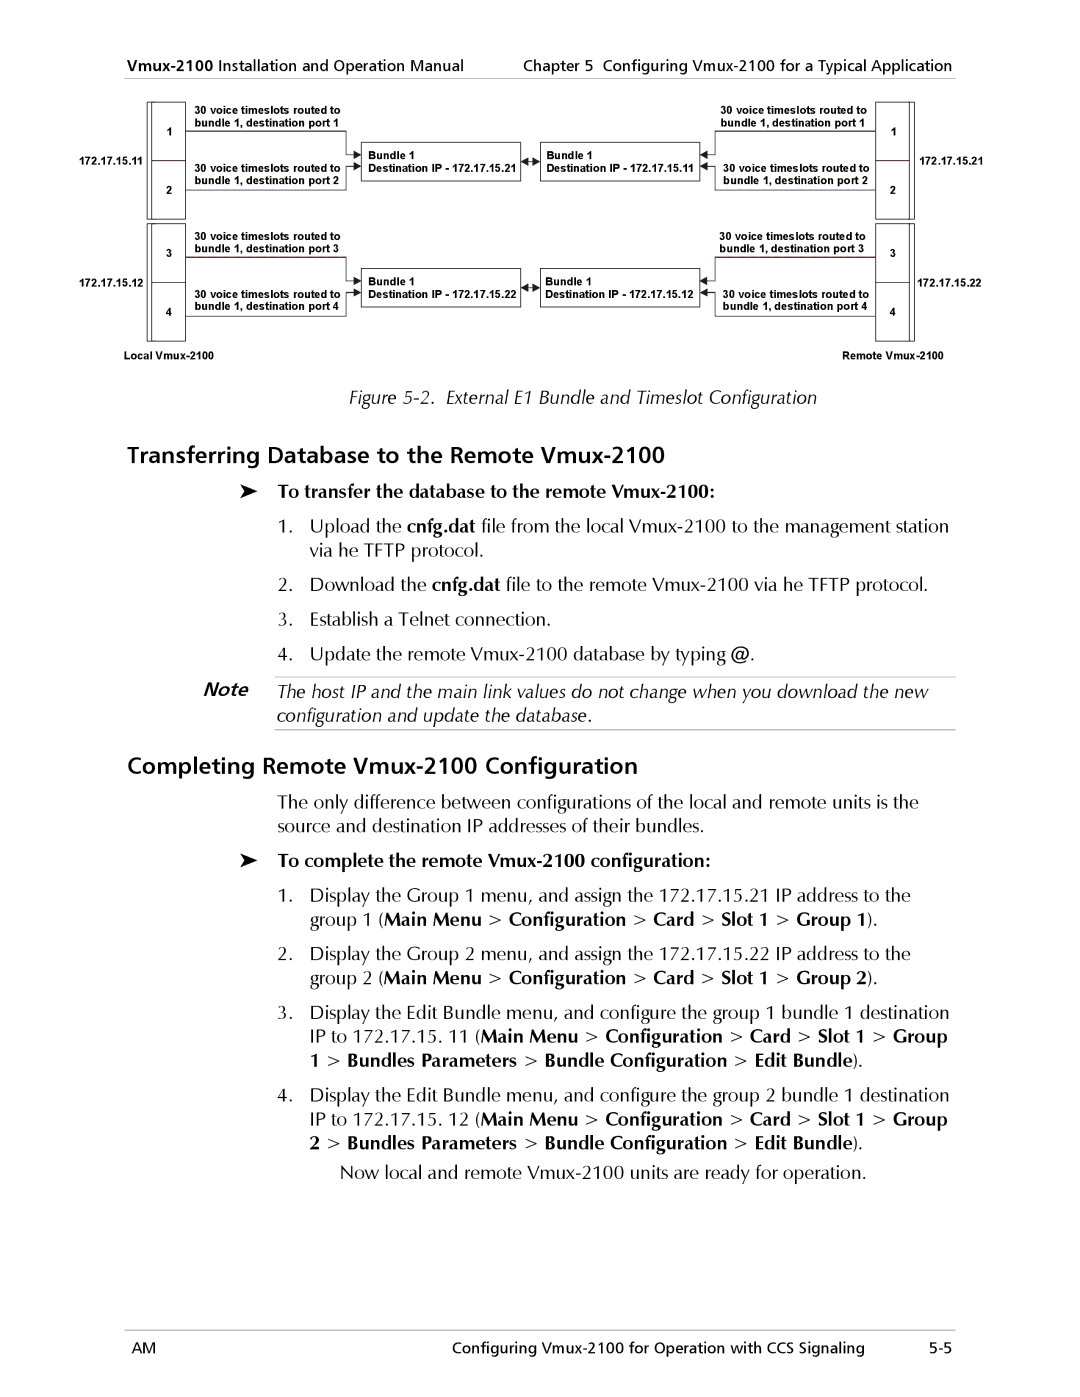
Figure 5-2. External E1 Bundle and Timeslot Configuration
Transferring Database to the Remote Vmux-2100
To transfer the database to the remote Vmux-2100:
1.Upload the cnfg.dat file from the local
2.Download the cnfg.dat file to the remote
3.Establish a Telnet connection.
4.Update the remote
Note The host IP and the main link values do not change when you download the new configuration and update the database.
Completing Remote Vmux-2100 Configuration
The only difference between configurations of the local and remote units is the source and destination IP addresses of their bundles.
To complete the remote Vmux-2100 configuration:
1.Display the Group 1 menu, and assign the 172.17.15.21 IP address to the group 1 (Main Menu > Configuration > Card > Slot 1 > Group 1).
2.Display the Group 2 menu, and assign the 172.17.15.22 IP address to the group 2 (Main Menu > Configuration > Card > Slot 1 > Group 2).
3.Display the Edit Bundle menu, and configure the group 1 bundle 1 destination IP to 172.17.15. 11 (Main Menu > Configuration > Card > Slot 1 > Group
1> Bundles Parameters > Bundle Configuration > Edit Bundle).
4.Display the Edit Bundle menu, and configure the group 2 bundle 1 destination IP to 172.17.15. 12 (Main Menu > Configuration > Card > Slot 1 > Group
2> Bundles Parameters > Bundle Configuration > Edit Bundle).
Now local and remote
AM | Configuring |