Operating Instructions
Page
2. Projecting an Image
TABLE OF CONTENTS
1. Preparations for Using the Projector
Symbols
3. Using the Projector via a Network
4. Changing the Projector Settings
7. Appendix
5. Troubleshooting
6. Maintenance
Trademarks
Where to Inquire
Copyrights
INDEX
Notes to Users Viewing 3D Images
Introduction
Copyrights to Images
Adult supervision is required for children using 3D glasses
Manuals List
Manuals Provided with the Projector
Manuals for the Projector
The manuals are provided in various formats
Operating Instructions
Manual Name
Printed Manuals
PDF Manuals Provided
2. Specify a language
Viewing the PDF Manual on the CD-ROM
1. Insert the CD-ROM in the CD-ROM drive of your computer
3. Click Read PDF manuals
How to Read This Manual
Symbols
1. Preparations for Using the Projector
Main Functions
1. Preparations for Using the Projector
Checking the Accessories
Use only the RGB cable provided with the projector
Projector Parts and Their Functions
Control Panel Top View
Front and Left-Side View
Rear and Right-Side View
Remote Control Parts and Their Functions
9. Enter button Enters the selected item or mode 10. Volume buttons
How to Use the Remote Control
Effective Range of the Remote Control
Loading Batteries into the Remote Control
1. Remove the battery cover from the remote control
2. Insert the batteries
3. Close the battery cover
Inputting Text
3. After inputting all the characters, select OK
Operating a Computer with the Remote Control
2. Press the Enter button
2. Operate the projector
Operating Multiple Projectors with the Remote Control
1. Connect the mouse remote control receiver to the computer
The remote control cannot operate a projector unless the ID on the remote control is the same as the controller ID specified in the projectors Default Settings menu
Positioning the Projector
Relationship Between the Projection Distance and the Screen Size
Projection size *1
CLB023
Connecting Equipment to the Projector
Connecting a Computer
4. To the video output 5. To the HDMI port 6. To the Y/Pb/Pr output
Connecting AV Equipment
1. Video player, DVD player 2. DVD recorder 3. To the audio output
7. To the audio output
Connecting the Power Cord
1. Preparations for Using the Projector
Connecting the Power Cord
2. Insert the power plug into a power outlet
Do not place anything near the power outlet
CLB028
1. Preparations for Using the Projector
2. Projecting an Image
Basic Operations
2. Select the lamp power level, and then press the Enter button
When the start menu is displayed
1. Press the Power button
Turning On the Projector
2. Press the Input button
Selecting an Input Signal
1. Turn on the equipment that is connected to the projector
Adjusting the Angle of the Projection
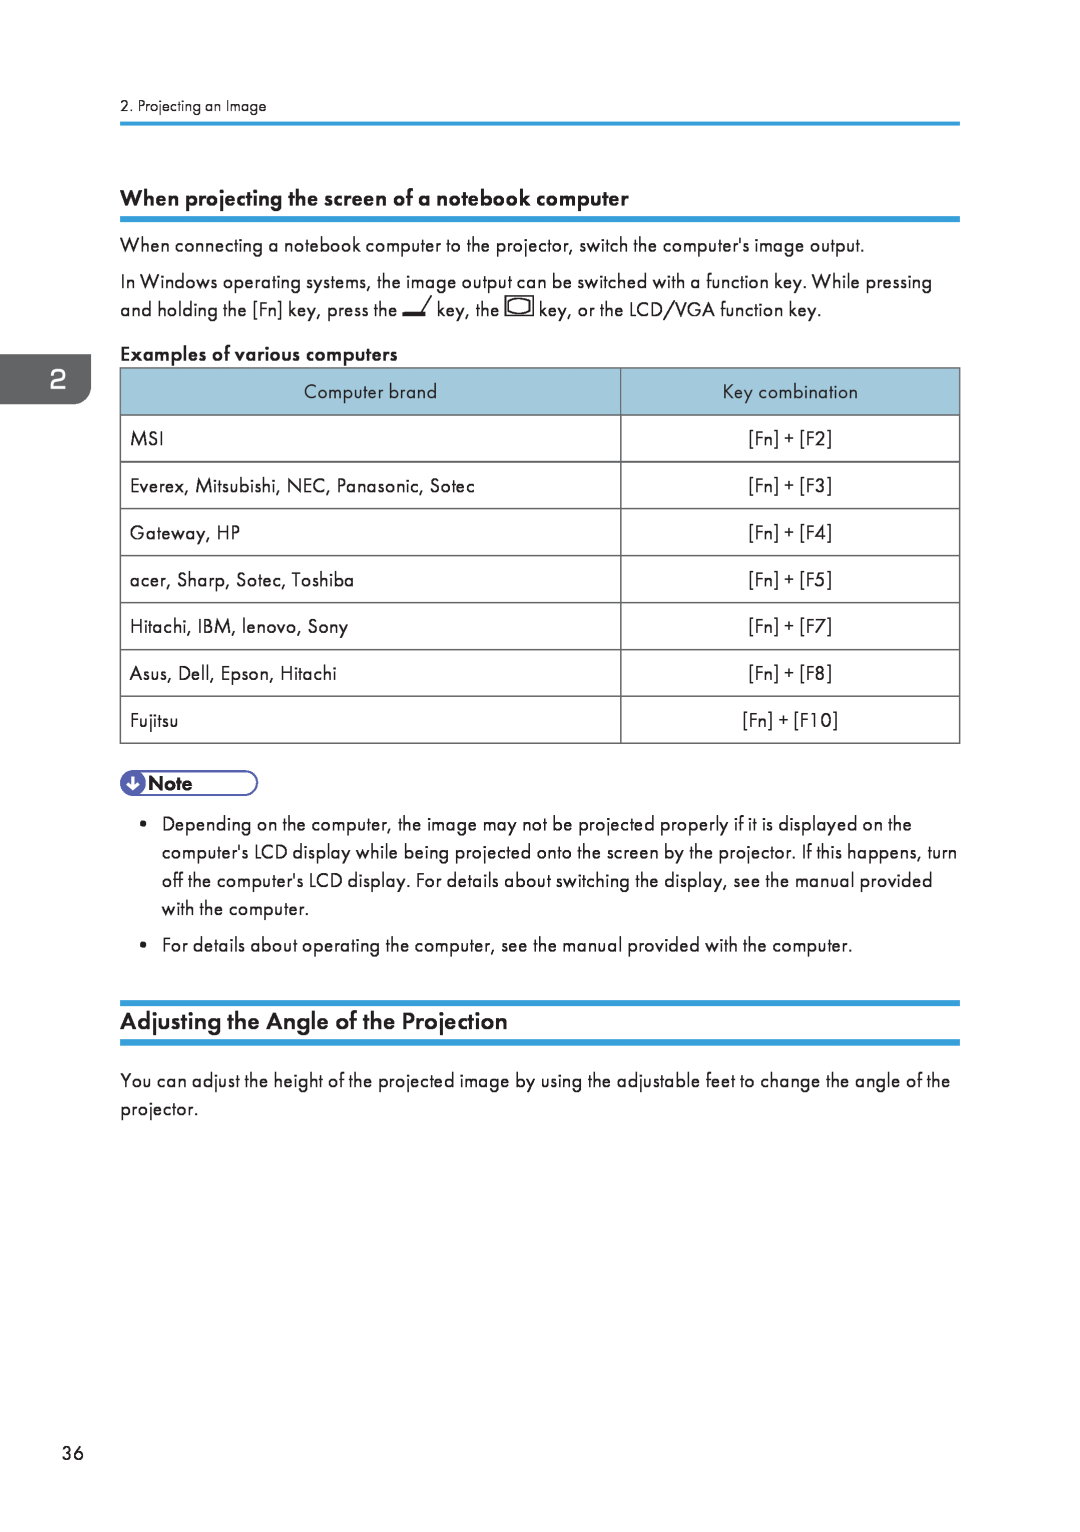
When projecting the screen of a notebook computer
Adjusting the Image
Changing the size of the projected image
2. Press the Zoom button to enlarge the image
Adjusting the focus
1. Press the Zoom button to reduce the image
CLB033
Adjusting for keystone distortion
Automatically adjusting the image
CLB063
1. Press the Volume and Volume buttons to adjust the volume
Adjusting the Volume of the Speaker
Manipulating Images with the Remote Control
1. Press the Auto set button
1. Press the Magnify button to enlarge the image
Enlarging the image
Temporarily blanking the image and muting the audio
2. Press the Magnify button to reduce the image
2. To cancel this function, press the Freeze button again
Pausing the image
2. To cancel this function, press the AV Mute button again
1. Press the AV Mute button
1. Press the Picture button
Changing the image quality
Changing the aspect ratio of the projected image
1. Press the Aspect button
1. Press the Eco button
Switching the lamp mode
Turning Off the Projector
1. Press the Power button
2. Press the Power button
The projector beeps and the projector turns off
Projecting Images from a USB Memory Device or Digital Camera
Connecting the USB Device
Projecting Still Images
2. Use the and buttons to select the JPEG file or folder
Projecting Videos
1. Press the USB button
3. Press the Enter button
2. Use the and buttons to select the MPEG file or folder
Disconnecting the USB Device
Converting Presentation Files to JPEG Files
1. Press the Menu button while the video is being projected
4. Click Convert&Save 5. Click OK
The converted files can also be transferred to a server
4. Specify a destination to save the application
How to use JPEG Conversion Tool
3. Click JPEG Conversion Tool Type A
5. To create a shortcut icon on the desktop, click OK
2. Projecting an Image
3. Using the Projector via a Network
Connecting the Projector to a Network
For details, see p.96 Network Settings
3. Using the Projector via a Network
3. Turn the projector on
Connecting Using an Ethernet Cable
1. Insert the Ethernet cable into the Ethernet interface
3. Using the Projector via a Network
Use an Ethernet cable that is shielded
Connecting Using a Wireless LAN
Wireless LAN Connection Workflow
Ad Hoc mode
Infrastructure mode
1. Press the Menu button
Simple Wireless LAN Setup
2. Select the Network/USB Settings menu
3. Select Network Settings 4. Select Wireless LAN
7. If Connect by Push is selected, press the access point push button
How to use Network Utility
Projecting Images Using Network Utility
What Is Network Utility?
1. Turn the projector on 2. Press the Network button
Simple 11 Connection
3. Click PJ Network Utility Type A
1. Insert the CD-ROM in the CD-ROM drive of your computer
8. Click Start
Network Connection
5. Click the Simple 11 Connection tab 6. Select the projection method
4. Click the Network Connection tab
3. Click Menu 4. Click Write Settings to USB Memory
Settings Using a USB Memory Device
Copying computer settings to the projector
5. Click Execute in Copy Setting Information
10. Select OK
Copying projector settings to the computer
8. Press the Network button
11. Select OK
9. Select OK 10. Press the Menu Button 11. Select USB Settings
4. Select the Network/USB Settings menu 5. Select Network Settings
6. Select Wireless LAN
16. Click Menu 17. Click Read Settings from USB Memory 18. Click OK
Using the Projection Server Function
Configuring the Network Server
Configuring the Projector
Projecting Files that Are Stored on the Server
1. Turn the projector on 2. Press the Network button
4. Select OK
5. Select the file to be projected
3. Press the Enter button
3. Using the Projector via a Network
4. Changing the Projector Settings
Viewing the Menu Screen
5. Display Status tab
3. Press the button
Using the Menu Screen
2. Select the menu tab using the and buttons
Using the Menu Screen
5. Press the Enter button
4. Select the item to be changed using the and buttons
6. Change the settings
The method for changing the settings depends on the item
Selecting the value from a list
Use the number buttons on the remote control to input numbers
Using the Menu Screen
Inputting numbers
Inputting text
1. Press the Menu button
Restoring Settings to Their Default Settings
Restoring Settings to Their Default Settings
CLB046
The following settings cannot be reset with this function
3. Select Reset All, and then press the Enter button
4. Select OK in the confirm screen, and then press the Enter button
Select whether or not to use the function to reduce
List of Menu Items
Automatically adjust the items set for the image
Select the strength of the functions that reduce the
Select the image hue according to the projection
Select whether or not to display Help when there is
power shutdown when there are no input signals
Select whether or not to display the start-up screen
Select the level of energy saving while on standby
Specify the file projection method using a USB
Specify the common wired LAN and wireless
Select whether or not to increase the speed of the
Confirm the status of the network application
Image Adjustment Menu
16 to +16 Sharpness Adjust the sharpness of the image
Page
0 to +255 Clamp Pulse Adjust the clamp pulse width 0 to +255
4. Changing the Projector Settings
Display Settings Menu
Gray Blackboard Green Background on NoSignal
Reset Logo Delete the registered user logo
Display Settings Menu
Default Settings Menu
3D Projection Specify 3D projection 3D Projection
Page
Default Stnd Eco Stnd High Altitude Mode
4. Changing the Projector Settings
On Off
Network/USB Settings Menu
USB Settings
Network Settings
Default Auto-Negotiation
Enter the subnet mask. Default
Default No Encryption
Network Key
Default Wired LAN Priority
Enter an HTTP proxy user name that is up to 31 characters
SSID Display the SSID of the connected wireless LAN network
Network Application Settings
Index File
Display Status
Display Status
4. Changing the Projector Settings
5. Troubleshooting
Indicator Display List
Flashing interval 2 seconds
5. Troubleshooting
For details of how to install the lamp
Indicator Display List
Common Problems
Problem
Problem
Make sure the ID assigned to the remote control and in
using administrator privileges to configure the wireless
compatible with Network Utility. Log in to the computer
6. Maintenance
Operating Precautions
Cleaning the Projector
Cleaning the Projector
Cleaning the Projection Window
Replacing the Lamp
4. Hold the handle, and then pull the lamp unit out of the projector
2. Turn the knob counterclockwise, and then open the lamp cover
3. Raise the metal handle
6. Maintenance
6. Close the lamp cover
7. Reset the lamp time
5. Insert a new lamp unit
For the reset method, see the manual provided with the lamp
5. Install the application by following the on-screen instruction
Managing the Projector Using Projector Management Utility
Installing Projector Management Utility
1. Close all applications
Settings Required to Use Projector Management Utility
Starting Projector Management Utility
Projector input signal
Consumables
Consumables
Lamp unit Replacement Lamp Type
6. Maintenance
7. Appendix
Specifications
Specifications for the Projector
7. Appendix
List of Compatible Signals
Computer Input
Resolution
Y/Pb/Pr Input
List of Compatible Signals
Video Input
HDMI Input
Resolution
Resolution
Resolution
Specifications for Ports
Computer In Port
RS-232C, 115,200bps, No Parity, Data Length 8 bits Stop Bit
Control Port
=3Dh + Command3byte + 3Ah + E45h + R52h +
030h + CR0Dh
Command
Copyrights
Copyrights
Where to Inquire
7. Appendix
Trademarks
Microsoft Windows HPC Server 2008 R2
INDEX
Page
Projecting an image
Remote control
Troubleshooting
33, 46, 47, 48, 61, 67
Volume button
Wired LAN
Wireless LAN
Zoom button
Page
EN GB EN US EN AU Y0127511