INITIAL SET MENU
 CLOCK SET settings
(default setting: 01-01-2002 TUE 00:00:00)
You should always set the date and time correctly. This digital video recorder includes the recording time with recorded images, and uses this time for playback and searching.
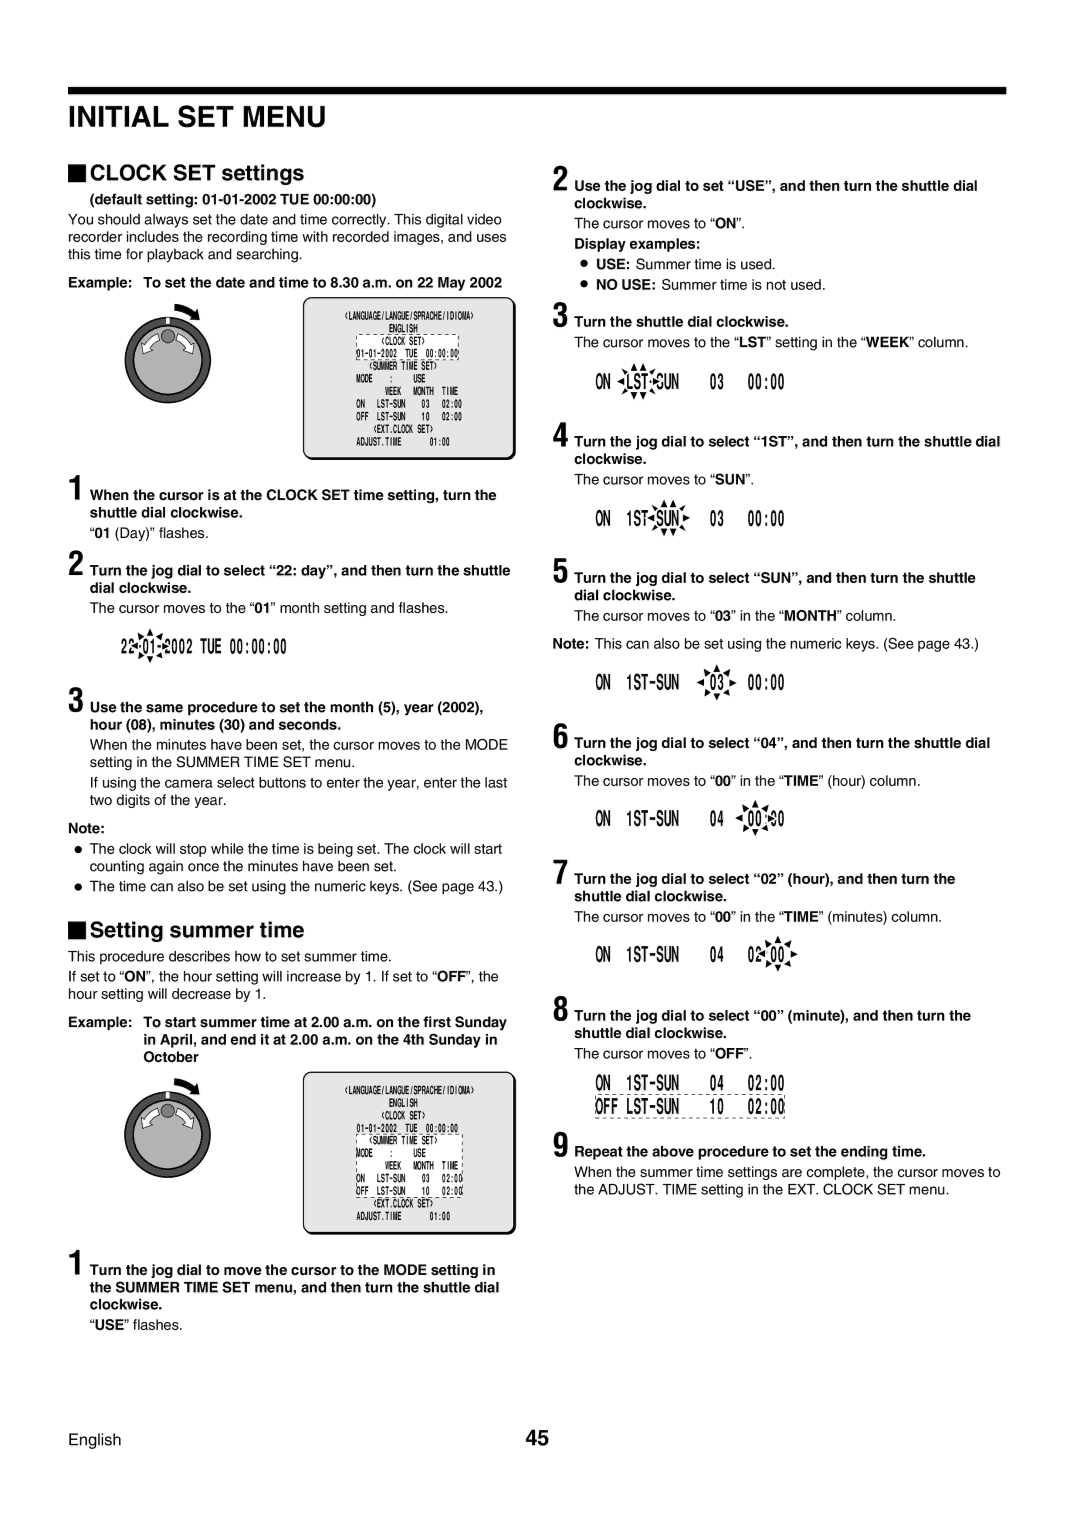
Example: To set the date and time to 8.30 a.m. on 22 May 2002
<LANGUAGE/LANGUE/SPRACHE/IDIOMA>
| ENGLISH |
|
| |
| <CLOCK SET> |
|
| |
| ||||
<SUMMER TIME SET> |
|
| ||
MODE | : | USE |
|
|
| WEEK | MONTH | TIME | |
ON | 03 | 02:00 | ||
OFF | 10 | 02:00 | ||
<EXT.CLOCK SET>
ADJUST.TIME 01:00
1 When the cursor is at the CLOCK SET time setting, turn the shuttle dial clockwise.
“01 (Day)” flashes.
2 Turn the jog dial to select “22: day” , and then turn the shuttle dial clockwise.
The cursor moves to the “01” month setting and flashes.
22-01-2002 TUE 00:00:00
3 Use the same procedure to set the month (5), year (2002), hour (08), minutes (30) and seconds.
When the minutes have been set, the cursor moves to the MODE setting in the SUMMER TIME SET menu.
If using the camera select buttons to enter the year, enter the last two digits of the year.
Note:
•The clock will stop while the time is being set. The clock will start counting again once the minutes have been set.
•The time can also be set using the numeric keys. (See page 43.)
 Setting summer time
This procedure describes how to set summer time.
If set to “ON”, the hour setting will increase by 1. If set to “OFF”, the hour setting will decrease by 1.
Example: To start summer time at 2.00 a.m. on the first Sunday in April, and end it at 2.00 a.m. on the 4th Sunday in October
<LANGUAGE/LANGUE/SPRACHE/IDIOMA> ENGLISH
<CLOCK SET>
<SUMMER TIME SET> |
| ||
MODE | : | USE |
|
| WEEK | MONTH | TIME |
ON | 03 | 02:00 | |
OFF | 10 | 02:00 | |
| <EXT.CLOCK SET> |
| |
ADJUST.TIME | 01:00 | ||
1 Turn the jog dial to move the cursor to the MODE setting in the SUMMER TIME SET menu, and then turn the shuttle dial clockwise.
“USE” flashes.
2 Use the jog dial to set “USE” , and then turn the shuttle dial clockwise.
The cursor moves to “ON”.
Display examples:
•USE: Summer time is used.
•NO USE: Summer time is not used.
3 Turn the shuttle dial clockwise.
The cursor moves to the “LST” setting in the “WEEK” column.
ON LST-SUN
 03 00:00
4 Turn the jog dial to select “1ST” , and then turn the shuttle dial clockwise.
The cursor moves to “SUN”.
ON 1ST-SUN
03 00:00
5 Turn the jog dial to select “SUN” , and then turn the shuttle dial clockwise.
The cursor moves to “03” in the “MONTH” column.
Note: This can also be set using the numeric keys. (See page 43.)
ON ![]() 03
03![]() 00:00
00:00
6 Turn the jog dial to select “04” , and then turn the shuttle dial clockwise.
The cursor moves to “00” in the “TIME” (hour) column.
ON 1ST-SUN 04  00:00
00:00
7 Turn the jog dial to select “02” (hour), and then turn the shuttle dial clockwise.
The cursor moves to “00” in the “TIME” (minutes) column.
ON ![]()
8 Turn the jog dial to select “00” (minute), and then turn the shuttle dial clockwise.
The cursor moves to “OFF”.
ON | 04 | 02:00 |
OFF | 10 | 02:00 |
9 Repeat the above procedure to set the ending time.
When the summer time settings are complete, the cursor moves to the ADJUST. TIME setting in the EXT. CLOCK SET menu.
English | 45 |
