GENERAL SETTING
☞Security lock setting
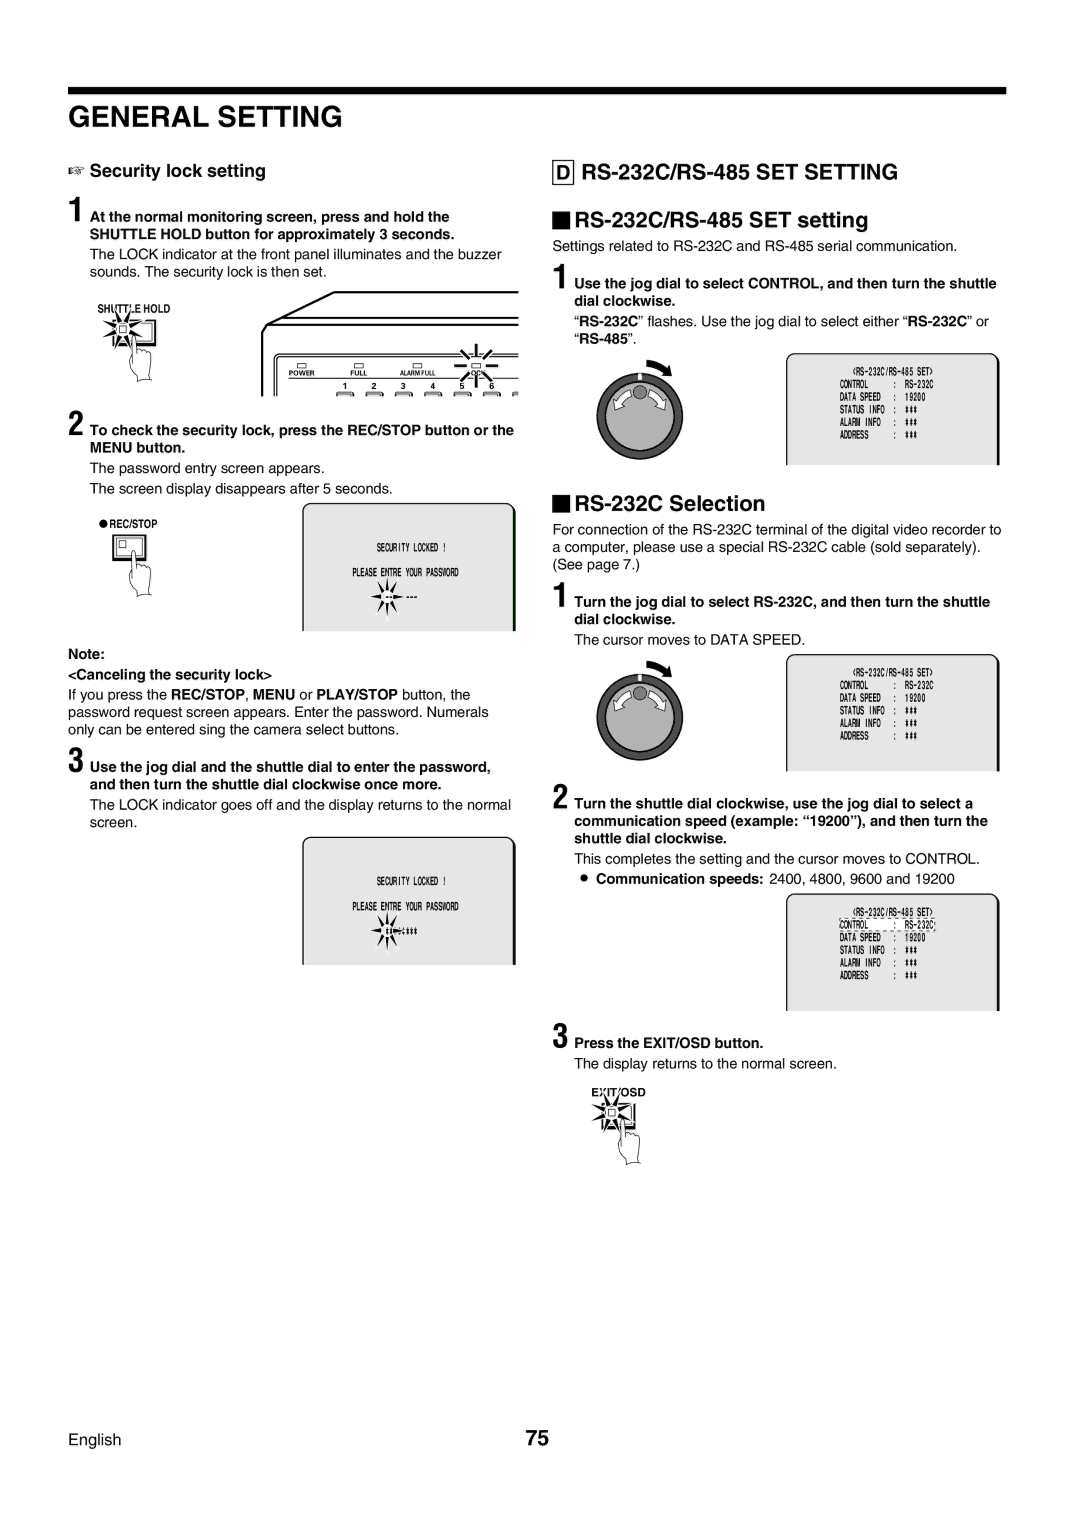
1 At the normal monitoring screen, press and hold the SHUTTLE HOLD button for approximately 3 seconds.
The LOCK indicator at the front panel illuminates and the buzzer sounds. The security lock is then set.
SHUTTLE HOLD
POWER | FULL | ALARM FULL |
| LOCK | |
1 | 2 | 3 | 4 | 5 | 6 |
2 To check the security lock, press the REC/STOP button or the MENU button.
The password entry screen appears.
The screen display disappears after 5 seconds.
![]() REC/STOP
REC/STOP
SECURITY LOCKED !
PLEASE ENTRE YOUR PASSWORD
![]()
Note:
<Canceling the security lock>
If you press the REC/STOP, MENU or PLAY/STOP button, the password request screen appears. Enter the password. Numerals only can be entered sing the camera select buttons.
3 Use the jog dial and the shuttle dial to enter the password, and then turn the shuttle dial clockwise once more.
The LOCK indicator goes off and the display returns to the normal screen.
SECURITY LOCKED !
PLEASE ENTRE YOUR PASSWORD
![]() ********
********
DRS-232C/RS-485 SET SETTING

RS-232C/RS-485 SET setting
Settings related to
1 Use the jog dial to select CONTROL, and then turn the shuttle dial clockwise.
CONTROL | : | |
DATA SPEED | : | 19200 |
STATUS INFO | : | ¤¤¤ |
ALARM INFO | : | ¤¤¤ |
ADDRESS | : | ¤¤¤ |

RS-232C Selection
For connection of the
1 Turn the jog dial to select
The cursor moves to DATA SPEED.
CONTROL | : | |
DATA SPEED | : | 19200 |
STATUS INFO | : | ¤¤¤ |
ALARM INFO | : | ¤¤¤ |
ADDRESS | : | ¤¤¤ |
2 Turn the shuttle dial clockwise, use the jog dial to select a communication speed (example: “19200” ), and then turn the shuttle dial clockwise.
This completes the setting and the cursor moves to CONTROL.
•Communication speeds: 2400, 4800, 9600 and 19200
CONTROL | : | |
DATA SPEED | : | 19200 |
STATUS INFO | : | ¤¤¤ |
ALARM INFO | : | ¤¤¤ |
ADDRESS | : | ¤¤¤ |
3 Press the EXIT/OSD button.
The display returns to the normal screen.
EXIT/OSD
English | 75 |
