Section 4: Cleaning and Maintenance
4.5 ADJUSTING PRINT QUALITY
Print quality can be optimized with regular cleaning and maintenance of the print head and components along the label path. Additionally, you can
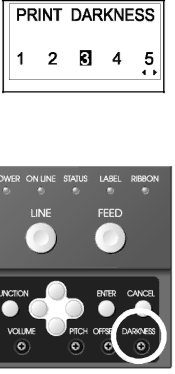
This4.5.1adjustmentAdjustingallowsPrintDarknessthe user to control (within a specified range) the amount of power applied to the individual print head heat elements. It is important to find a proper print darkness level based on your particular label and ribbon combination. The printed images should not be too light nor should the ink from the ribbon “bleed.” The edges of each image should be crisp and well defined.
LCD Panel — Thecan be set using the front panel LCD panel or by sending the Print Darkness software command from a computer. There are five settings, from 1 (lightest) to 5 (darkest). The default setting is 3.
Once the range has been selected, the Darkness Potentiometer on the front panel can be used to make finer adjustments. For instructions on setting Print Darkness, refer to Section 3, Configuration.
Darkness Potentiometer — The fine adjustment for Print Darkness is the Darkness Potentiometer on the front panel. It provides a continuous range of adjustment, allowing you to make precise changes. Use a small
Note
The PRINT potentiometer adjustment will affect the darkness in all of the command code speed ranges, i.e., if the PRINT potentiometer is adjusted for lighter print, the darkness will be lighter in all speed ranges selected by the command code.
Page | GT Series Operator’s Manual |
