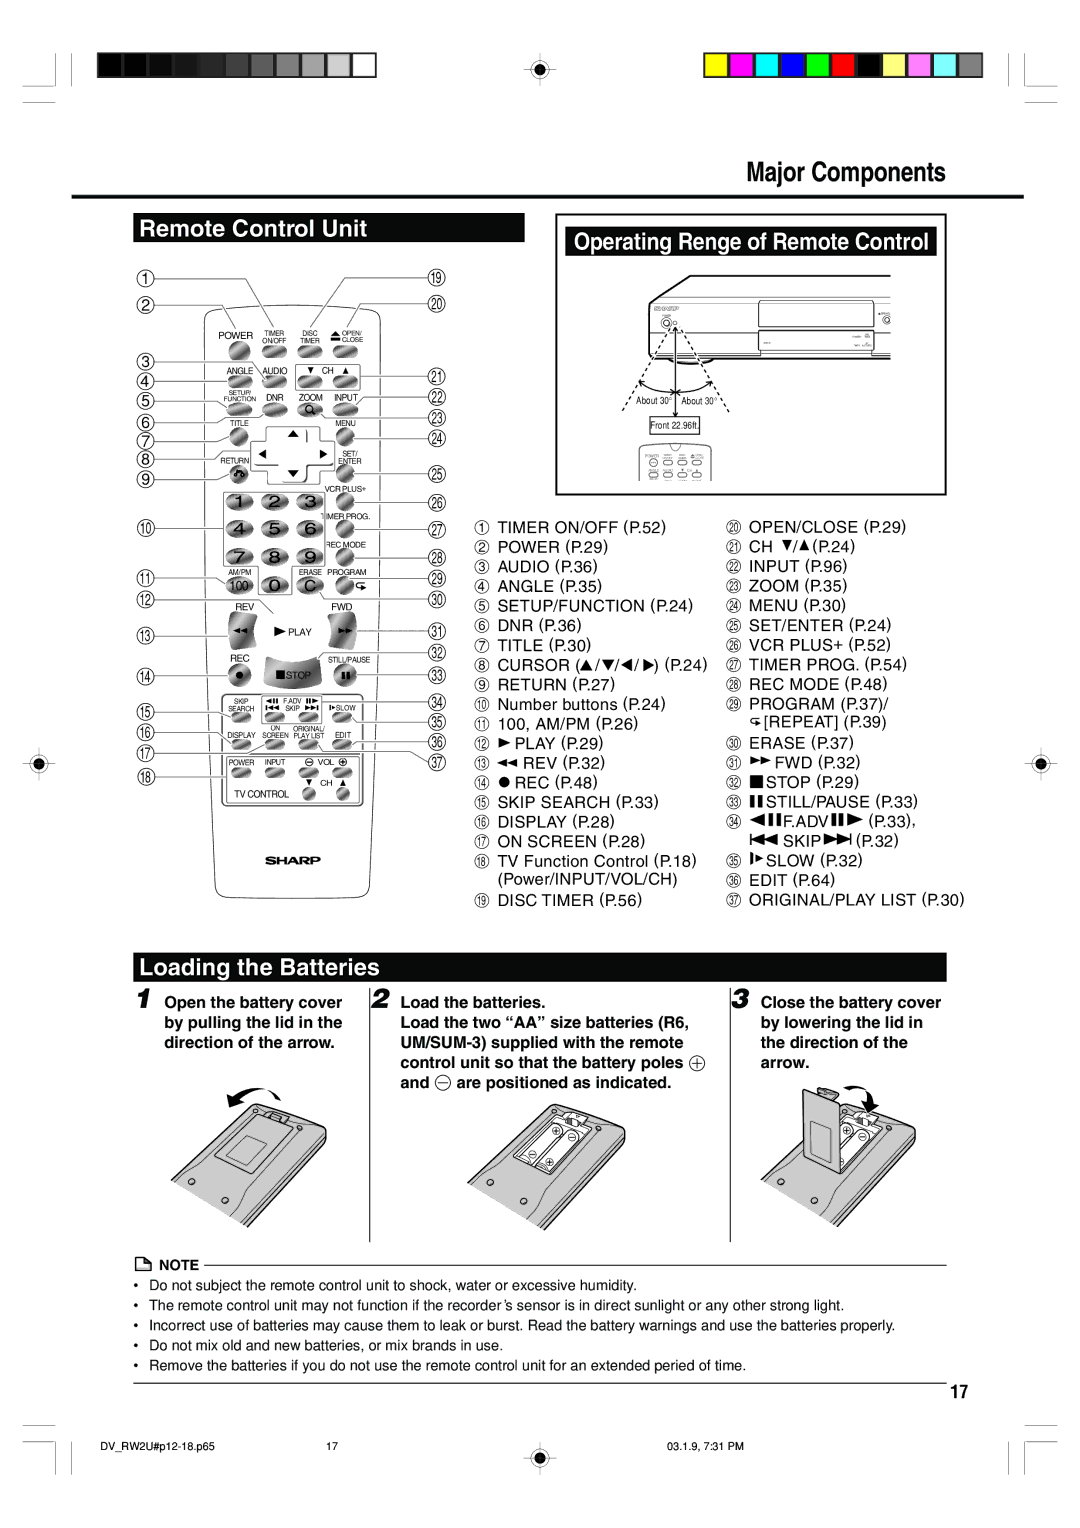
Major Components
Remote Control Unit
1
2
POWER | TIMER | DISC |
| OPEN/ |
| ON/OFF | TIMER |
| CLOSE |
3 | ANGLE | AUDIO | CH | |
4 | ||||
SETUP/ |
|
| ||
5 | DNR | ZOOM INPUT | ||
FUNCTION | ||||
6 | TITLE |
| MENU | |
7 |
|
| SET/ | |
8 | RETURN |
| ||
| ENTER | |||
9 |
|
| VCR PLUS+ | |
|
|
| ||
0 |
|
| TIMER PROG. | |
|
|
| ||
|
|
| REC MODE | |
q | AM/PM |
| ERASE PROGRAM | |
w | 100 |
|
| |
REV |
| FWD | ||
|
| |||
e |
|
| PLAY | |
|
|
| ||
| REC |
| STILL/PAUSE | |
r |
| STOP | ||
| SKIP | F.ADV | ||
tSEARCH ![]()
![]() SKIP
SKIP ![]()
![]()
![]() SLOW
SLOW
y | DISPLAY | ON | ORIGINAL/ |
SCREEN | PLAY LIST EDIT | ||
u | POWER | INPUT | VOL |
|
i![]()
![]()
![]() CH
CH![]()
TV CONTROL
|
|
|
|
|
|
|
|
|
|
|
|
|
|
|
|
|
|
|
|
|
|
|
|
|
|
|
|
|
|
|
| Operating Renge of Remote Control |
|
| |||||||||||||||||||||||
o |
|
|
|
|
|
|
|
|
|
|
|
|
|
|
|
|
|
|
|
|
|
|
|
|
|
|
|
|
p |
|
|
|
|
|
|
|
|
|
|
|
|
|
|
|
|
|
|
|
|
|
|
|
|
|
|
|
|
|
|
|
| POWER |
|
|
|
|
|
|
|
|
|
|
|
|
|
|
|
|
|
| OPEN/CL |
| ||||
|
|
|
|
|
|
|
|
|
|
|
|
|
|
|
|
|
|
|
|
|
|
|
| |||||
|
|
|
|
|
|
|
|
|
|
|
|
|
|
|
|
|
|
|
|
|
|
|
|
|
|
|
| |
|
|
|
|
|
|
|
|
|
|
|
|
|
|
|
|
|
|
|
|
|
| DISC |
|
|
| |||
|
|
|
|
|
|
|
|
|
|
|
|
|
|
|
|
|
|
|
|
| STANDBY | TIMER |
| |||||
|
|
|
|
|
|
|
|
|
|
|
|
| DISC IN |
|
|
|
|
|
|
| AV |
| ||||||
|
|
|
|
|
|
|
|
|
|
|
|
|
|
|
|
|
|
|
|
| TIMER AUTO REC |
| ||||||
a |
|
|
|
|
|
|
|
|
|
|
|
|
|
|
|
|
|
|
|
|
|
|
|
|
|
|
|
|
|
|
|
|
|
|
|
|
|
|
|
|
|
|
|
|
|
|
|
|
|
|
|
|
|
|
|
| |
|
|
|
|
|
|
|
|
|
|
|
|
|
|
|
|
|
|
|
|
|
|
|
|
|
|
|
| |
|
|
|
|
|
|
|
|
|
|
|
|
|
|
|
|
|
|
|
|
|
|
|
|
|
|
|
| |
s |
|
| About 30° | About 30° |
|
|
|
|
|
|
|
|
|
|
|
|
|
|
|
|
|
|
|
| ||||
d |
|
|
|
|
|
|
|
|
|
|
|
|
|
|
|
|
|
|
|
|
|
|
|
|
|
|
|
|
|
|
| Front 22.96ft. |
|
|
|
|
|
|
|
|
|
|
|
|
|
|
|
|
|
|
|
|
| ||||
f |
|
|
|
|
|
|
|
|
|
|
|
|
|
|
|
|
|
|
|
|
|
|
|
| ||||
|
|
|
|
|
|
|
|
|
|
|
|
|
|
|
|
|
|
|
|
|
|
|
|
|
|
|
| |
|
| POWER | TIMER | DISC | OPEN/ |
|
|
|
|
|
|
|
|
|
|
|
|
|
|
|
|
|
|
|
| |||
|
|
|
|
|
|
|
|
|
|
|
|
|
|
|
|
|
|
|
|
|
|
| ||||||
|
|
| ON/OFF | TIMER | CLOSE |
|
|
|
|
|
|
|
|
|
|
|
|
|
|
|
|
|
|
|
| |||
g |
|
| ANGLE | AUDIO | CH |
|
|
|
|
|
|
|
|
|
|
|
|
|
|
|
|
|
|
|
|
|
| |
|
| SETUP/ | DNR | ZOOM | INPUT |
|
|
|
|
|
|
|
|
|
|
|
|
|
|
|
|
|
|
|
| |||
h |
|
|
|
|
|
|
|
|
|
|
|
|
|
|
|
|
|
|
|
|
|
|
|
|
|
|
|
|
1 TIMER ON/OFF (P.52) |
|
|
| p OPEN/CLOSE (P.29) | ||||||||||||||||||||||||
j |
|
|
| |||||||||||||||||||||||||
k | 2 POWER (P.29) |
|
|
|
| a CH |
|
| / (P.24) |
|
|
|
|
|
|
| ||||||||||||
3 AUDIO (P.36) |
|
|
|
| s INPUT (P.96) |
|
|
|
|
|
|
| ||||||||||||||||
l | 4 ANGLE (P.35) |
|
|
|
| d ZOOM (P.35) |
|
|
|
|
|
|
| |||||||||||||||
; | 5 SETUP/FUNCTION (P.24) | f MENU (P.30) |
|
|
|
|
|
|
| |||||||||||||||||||
z | 6 DNR (P.36) |
|
|
|
| g SET/ENTER (P.24) | ||||||||||||||||||||||
x | 7 TITLE (P.30) |
|
|
|
| h VCR PLUS+ (P.52) | ||||||||||||||||||||||
c | 8 CURSOR ( / / / ) (P.24) | j TIMER PROG. (P.54) | ||||||||||||||||||||||||||
9 RETURN (P.27) |
|
|
|
| k REC MODE (P.48) | |||||||||||||||||||||||
v | 0 Number buttons (P.24) |
|
|
| l PROGRAM (P.37)/ | |||||||||||||||||||||||
b | q 100, AM/PM (P.26) |
|
|
|
|
|
|
|
| [REPEAT] (P.39) | ||||||||||||||||||
n | w PLAY (P.29) |
|
|
|
| ; ERASE (P.37) |
|
|
|
|
|
|
| |||||||||||||||
m | e REV (P.32) |
|
|
|
| z | FWD (P.32) |
|
|
|
|
|
|
| ||||||||||||||
| r REC (P.48) |
|
|
|
| x |
| STOP (P.29) |
|
|
|
|
|
|
| |||||||||||||
|
|
|
|
|
|
|
|
|
|
|
|
| ||||||||||||||||
|
|
|
|
|
|
|
|
|
|
|
|
| ||||||||||||||||
| t SKIP SEARCH (P.33) |
|
|
|
| c STILL/PAUSE (P.33) | ||||||||||||||||||||||
| y DISPLAY (P.28) |
|
|
|
| v |
|
|
| F.ADV |
|
|
|
| (P.33), | |||||||||||||
|
|
|
|
|
|
|
|
| ||||||||||||||||||||
| u ON SCREEN (P.28) |
|
|
|
|
|
|
|
|
|
|
|
| SKIP (P.32) | ||||||||||||||
| i TV Function Control (P.18) | b SLOW (P.32) |
|
|
|
|
|
|
| |||||||||||||||||||
| (Power/INPUT/VOL/CH) |
|
|
| n EDIT (P.64) |
|
|
|
|
|
|
| ||||||||||||||||
| o DISC TIMER (P.56) |
|
|
|
| m ORIGINAL/PLAY LIST (P.30) | ||||||||||||||||||||||
Loading the Batteries
1 Open the battery cover | 2 Load the batteries. |
by pulling the lid in the | Load the two “AA” size batteries (R6, |
direction of the arrow. | |
| control unit so that the battery poles |
| and are positioned as indicated. |
|
|
3 Close the battery cover by lowering the lid in the direction of the arrow.
![]() NOTE
NOTE
•Do not subject the remote control unit to shock, water or excessive humidity.
•The remote control unit may not function if the recorder’s sensor is in direct sunlight or any other strong light.
•Incorrect use of batteries may cause them to leak or burst. Read the battery warnings and use the batteries properly.
•Do not mix old and new batteries, or mix brands in use.
•Remove the batteries if you do not use the remote control unit for an extended peried of time.
17
17 | 03.1.9, 7:31 PM |