Digital Multitracker
10/B 11/C 12/D 13/E 14/F 15/G 16/H
Safety Instructions
About damage
About power supply
About copyrights
Want to make a backup of the song data
Want to simultaneously record analog and digital signals
Want to store and recall the mixing setting
Want to send a signal to an external effector
Want to operate the Chain play mode
Want to operate the audio CD playback mode
Want to setup PAN
Want to mixdown without using external equipment
Table of Contents
Cueing/Digital Scrubbing
Variable Pitch Control
Auto Function
Program
Others
Mixer Section
Recorder Section
Buss Recording
Two Recording Modes
Direct Recording
For Direct recording
For Buss recording
BUSS-REC TRK key
Remain Indicator
Recording System
Channel and Track
Input Monitoring and Playback Monitoring
Trim
CH STATUS/CH SEL Key
Time Base
Names and Functions
LIN OUT
Top Panel
Analog Input/Output Section
Mixer Section
CH STATUS/CH SEL Key channels
Channel Fader channels
SCENE-RECALL/DIRECT RCL Key
EFF EDIT-EFF1/MUTE Key
EFF EDIT-EFF2/MUTE Key
CH Param EDIT-EFF1/EFF2/PRE/POST Key
CH Param EDIT-EQ/COMP-HI/G/F/Q/COMP Key
Recorder Section
Auto RTN-START/MARK1 Key
Auto PUNCH-IN/MARK2 Key
Auto PUNCH-OUT/MARK3 Key
Auto RTN-END/MARK4 Key
Fader ADJUST/LEVEL Adjust Key
SCRUB/CD Play Key
RECORD/AUTO Punch Key
Stop Key
Display Section
Rear Panel
Front Panel
Reformatting the hard disk
Turn on the VF160EX Press the Setup key
About the hard disk storage device
Operation Confirmed HD & Backup Media List for the VF160EX
Precautions Upon Replacement
Precautions Upon Handling the Hard Disk
Replacing a hard disk
Connector Hard disk unit
Cushion Hard disk unit Connector
Put back the new hard disk into the VF160EX main unit
Disk and the case
Press the ENTER/YES key
Press the ENTER/YES key where the Standard is flashed
Formatting the new hard disk
To check whether a demonstration song is recorded or not
If the level meters move Demonstration song is recorded
Microphone Monitor Amplifier Balanced output Headphones
Connections of Peripheral Equipment
Normal display
Menu shown when turning power on
Switching the Time Base
Switching with Disp SEL Key
Normal Display of Current Time Base
Remain Display of Current Time Base
MTC Time Display Input
Instructions for Direct Record
Direct Recording
Recording to One Track
Hint
Preparing to Record
Recording to 2 Tracks
Connect the stereo sound source to record to Input
Press the EXIT/NO key
Press the Stop key to stop recording
Locating a mark point using a Memory Key and Mark Key
Tips Changing the recording mode
Locate Function
ABS Locate
Direct Location of Memory key or Mark key
Saving on the Memory key and Mark key
Changing the Time Saved in the Memory key and Mark key
Locating an event memory
Creating an event memory
Locate by specifying the event memory
Viewing the event memories
Punch IN/OUT with Foot switch
Tips Foot Switch
Punch In/Out
Manual Punch IN/OUT
Auto Punch IN/OUT
Programming the Punch IN/OUT points
Auto Punch IN/OUT rehearsal
Auto Punch IN/OUT take
Turn the JOG dial to select the track to exchange from
Track Exchange
Instructions
Level Adjustment
Equalizer Adjustment
PAN Adjustment
Mixing
Effect Send Level Adjustment
Modifying Effect Type
Digital Mix Down
Mix Down
Analog Mix Down
Instructions for recording with Buss Record
Description of Buss Record
Recording the H Input Signal to Track
Press the CH STATUS/CH SEL key for ch16 so the key
Starts flashing Orange =INPUT Flashing
Press the CH STATUS/CH SEL key of ch16 Orange
Press the BUSS-REC TRK key RED Flashing
Press the CH STATUS/CH SEL key of ch 1 RED Flashing
Recording 8 INPUTs to Tracks 7
Recording
Play
Hint
Ch9-16 is ready to start signals of input a to H
Tips Applying an Effect on the Source Channel
Initial condition when the power is turned on
Operation while the Normal display is shown
Fader
Channel mute and Solo function
Hints
Adjusting Pan
Channel Parameter Edit
Adjusting EQ
Controlling Effect send level
Selecting pre/post of Effect sends
Selecting pre/post of AUX sends
Controlling AUX Send level
To set another channels send level, repeat steps 2
Key
Setting the compressor
Controlling fader levels
Channel view
To turn off the channel view screen, press the EXIT/NO key
Effect Edit Mode
P. Fostex Advanced Signal Processing Technology
A. Harmonic Feedback Algorithm
L. P. Hi-Density Logarithmic Processing
Effect types preset for EFF
About the effect types
When the EFF 2 key is pressed
When the EFF 1 key is pressed
Selecting the effect type
Use the JOG dial to select the effect type
Effect parameter settings
To cancel muting
Muting an effect
To mute the effect sound
BPM delay effect parameters parameter type BPM Delay
TipsTo reflect the tempo map setting to parameters
Short delay effect parameters parameter type Short Delay
Doubling effect parameters parameter type Doubling
Delay pitch effect parameters parameter type Delay Pitch
Scene Memory
Storing to a scene memory
Flanger effect parameters parameter type Flange
Recalling a scene memory
Level adjust
Fader adjust
Direct recall of a scene memory
Clearing a scene memory
Press the SCENE-RECALL key while holding down the Shift key
Press the Scene Recall and Scene Store keys simultaneously
Scene Event Map
Creating an event memory
On the fly By specifying a desired time
To create other event memories, repeat through 3 above
Deleting an event memory
Creating the scene event map
Screen appearances during playback
Scene sequence mode on/off selection
Executing the scene sequence
Cueing/Digital Scrubbing
Cueing with the F FWD/REWIND key
Shuttle Cueing
Digital scrubbing with the Scrub key
Variable Pitch Control ON/OFF
Setting the Speed
Variable Pitch Control
Auto Function
Auto Play
Auto Return
Set Store START/END Point
Program
Creating a New Program
Press the Setup key in the Stop state
Selecting a Program
Erasing a Program
Editing a Program Title
Editing theTrack
Copy & Paste and Move & Paste
Copy & Paste
Move & Paste
To execute the Copy & Paste feature select Copy Clip?
To execute the Move & Paste feature select Move Clip?
Copy & Paste and Move & Paste
Executing Copy or Move and Clip
Please note
UNDO/REDO Paste
Turn the JOG dial to choose the paste repeat frequency
Erase
Erasing Data
Erasing a selected section between ABS REC END
Erasing from a voluntarily specified point to REC END
Next press the ENTER/YES key
UNDO/REDO Erase
Press the ENTER/YES key once again
Turn the JOG dial while 1-8 is flashing
Exchange in 8-track units
Exchange in mono or 2-track units
Direct Record while listening to the input signal
Applications of Direct Record
Internal Mixdown Mode
Playback
Internal mixdown mode display
Hint
Select the program to be mixed down
Normal display
Select the desired program to be mixed down
Press the Play key while holding down the Record key
Hint
At ABS 06M 00S 00F
When mixdown starts from ABS
Then carry out the move & paste operation
When mixdown starts from non-ABS
When the unit stopped, press the Clipboard in key
Change the Clipboard OUT point
Change the Clipboard in point
Tips How to adjust the REC Buss Master Level
Preparations to record
Connect the sound sources to record to Input a to D
Press the CH STATUS/CH SEL key of ch7 and ch8
Ping-Pong Record
Press the CH STATUS/CH SEL key of ch1-ch14
Setting the tempo map
Setting metronome output
Metronome Function
Set the time base to the BAR/BEAT
Setting the digital input
Digital Recording
Digital recording from an external digital device
Selecting the program to record
Connecting a Sound Source or External Device
Recording 16Tracks at the SameTime
Selecting a track to record
Starting to record
Midi Clock Sync System
Connecting external equipment
Setup of the VF160EX
MTC Sync/MIDI Machine Control System
Confirming the Midi clock sync
Connecting to external equipment
Setup of external equipment
Setup the following in the sequence software
Confirming MTC sync/MMC
Connection to external equipment
External Midi Equipment Sync System by the Slave mode
Sequence software is setup as follows
Confirming chase lock
One Point Advice
Sync signal Vari of the Slave mode setting menu
Application example of Adat Mixer Mode
Midi OUT
Chain play function
Pause
Play
Repeat
Pnn
While the VF160EX is stopped, press the Setup key
Making the chain play list by selecting all the programs
As with procedure above, END of C02 END starts flashing
Making the chain play list by selecting desired programs
Setting the chain play mode
100
Selecting a program in the chain play list
Deleting or replacing a program in the chain play list
While the recorder is stopped, press the PGM SEL key
101
Deleting all programs from the chain play list
102
Inserting a program to the chain play list
Use the JOG dial to selectINSand press the ENTER/ YES key
After inserting all desired programs,press the EXIT/NO key
Audio CD playback mode
103
SCRUB/CD Play key
Shift key
104
Display in the audio CD playback mode
105
Save/Load of song data
106
Setup mode
Items that can be saved or loaded as song data
Items that cannot be saved or loaded as song data
107
Connecting to an external device
Setting the external device
108
Saving data
109
To edit the save length
Select tracks to be saved
After selecting tracks, press the ENTER/YES key again
Locate the beginning of the pilot signal for the song data
110
Loading data
Details about Load PGM menu
Start playback of the player
111
Select tracks to be loaded
Save/Load using CD-RW/CD-R
Care and handling of CD-RW/CD-R discs
About data writing and reading speeds for data save/load
112
Place the disc with the label side up
To open the tray, press the eject switch lightly
113
114
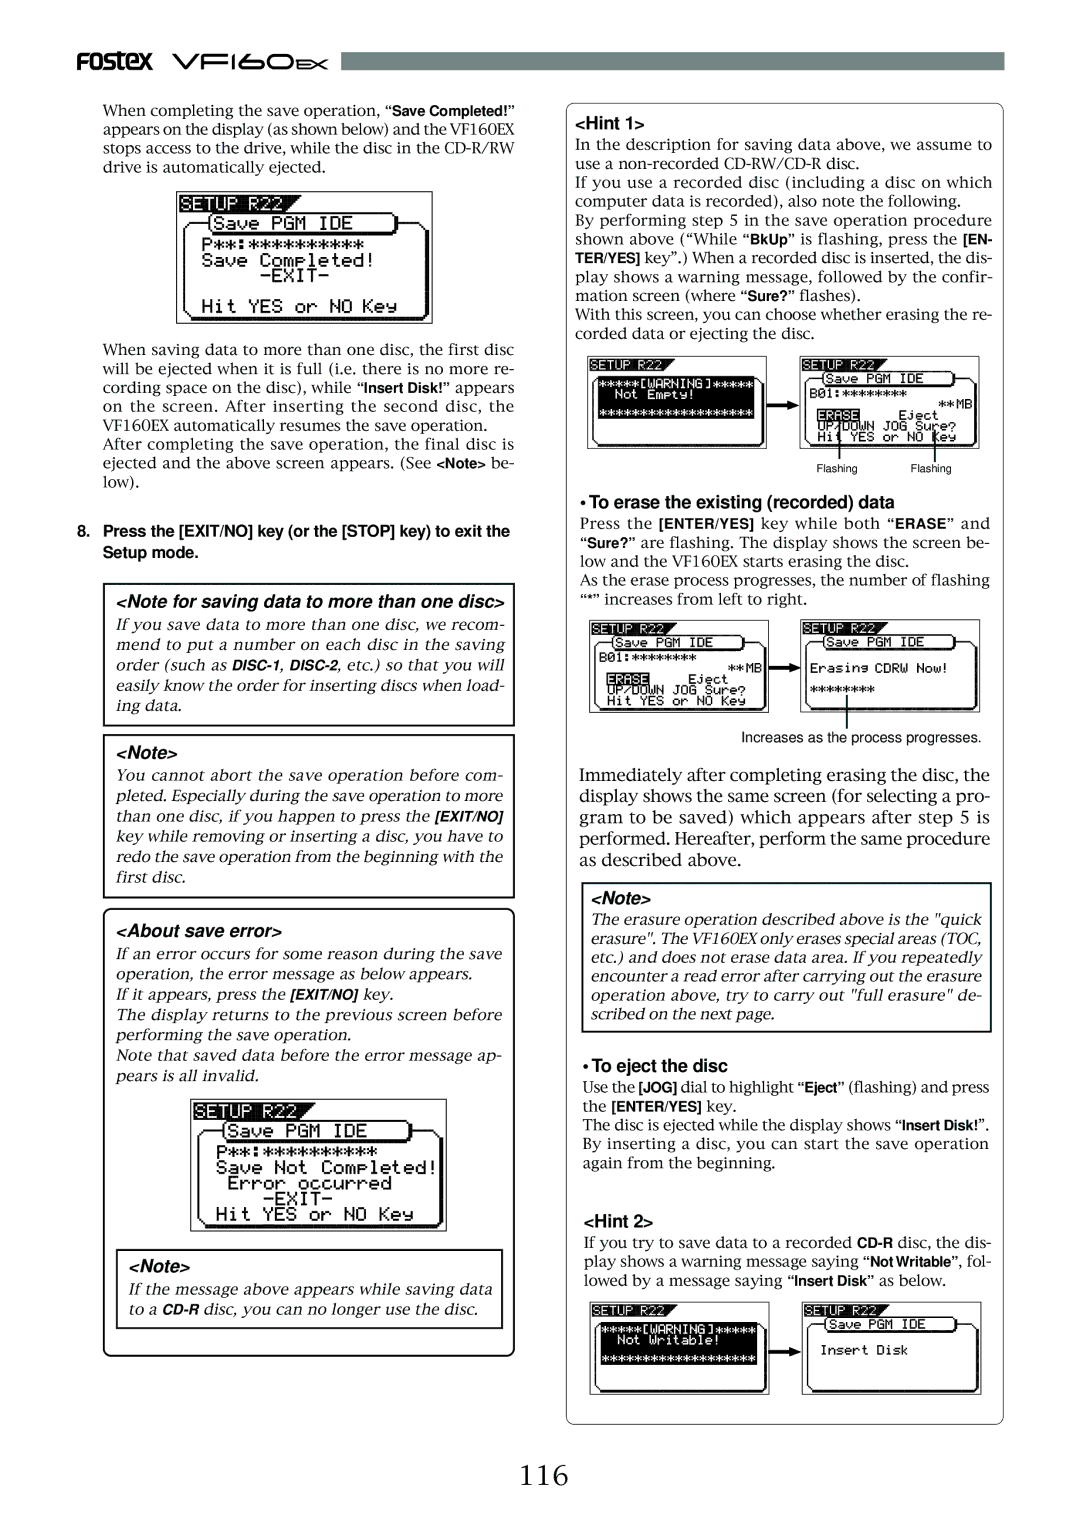
Save
Load
Creating an audio CD
115
To eject the disc
116
To erase the existing recorded data
How to full erase another disc
While the recorder is stopped, press the Setup key
Carrying out full erasure
117
118
While IDE is flashing, press the ENTER/YES key
While New PGM is shown, press the ENTER/YES key
About load error
119
Save/load of WAV files using a CD-RW/CD-R drive
Important notes for using a WAV file
About directory of a backup disc
120
121
About the Clipboard Export function
While Off is flashing, press the ENTER/YES key
While WAV is flashing, press the ENTER/YES key
122
To specify the desired tracks to From ** To
After entering the file name, press the ENTER/YES key
After selecting the tracks, press the ENTER/YES key
123
About WAV files saved
WAV file structure
WAV file structure which is saved over more than one disc
Overwrite? and Sure? appear
124
After selecting the desired tracks, press the ENTER/YES key
125
Copy protection setting
Save/load operation in the CD-DA format
Event Enable setting
126
Void In!, Void Out!, or Void Data
While CD-DA is flashing, press the ENTER/YES key
If you eject the disc
127
If you erase recorded data
Details of Event Enable setting
Event Enable should also be set to OFF in such a case
Event Enable should be set to on in such a case
128
129
While IED is flashing, press the ENTER/YES key
When selecting One or Select
When selecting All
130
Select the desired load type and press the ENTER/YES key
Hint
Press the EXIT/NO key to exit the setup mode
131
Changing the initial settings menu
132
Check menu
Execution menu
To enter the Setup mode
Time signature setting Signature Set
133
New Registering of Time Signature
134
Correcting the Registered Time Signature
Deleting a Time Signature
Clearing All Time Signature/Tempo Data
New Registering of Tempo
Setting a tempo Tempo Set
135
Setting the Metronome function Click
136
Correction of the Registered Tempo
Erasing of the Registered Tempo
Setting a preroll value PrerollTime
Setting Midi sync output signal Midi Sync Out
Setup mode
137
138
Setting an MTC frame rate Frame Rate
Setting an MTC offset value Mtc Offset Set
139
Setting MTC Offset mode Offset Mode
Setting the Slave mode Slave Mode
140
Setting the SlaveType SlaveType
Setting the Record Protect function Rec Protect
Setting Digital Input Digital
141
Select the desired digital in and press the ENTER/YES key
Select the desired digital in with the JOG dial
Setting Digital Output Digital Out
Setting BAR/BEAT Resolution mode Resolution
142
Select the desired digital out with the JOG dial
143
Setting the Midi device number Device ID
Checking the number of track events Number Of Event
144
Fader Fix Mode Setting Fader Fix
Drive Format Information Drive Information
Fader Recall Mode Setting Fader Recall
Initial setting
145
CH Channel
Pair Fader setting Pair Fader Set
146
On/Off of phantom power setting Phantom Power
Do the following before using the phantom power
Phantom power cannot be used with the following equipment
147
Compressor Channel Setting Comp. Channel
148
Select Comp. Channel in the menu selection display
13-14
Troubles at Recording?
149
Having trouble Editing?
150
Correctly register the Clipboard in and OUT points
Use the Align SEL function
Midi Implementation Chart
Midi Implementation Chart
151
Transmitted Recognized Remarks
MMC Command List
Command list Movement Recorder
MMC Response/Information Field List Command
Inquiry Message List
Maintenance
Specifications
153
Recording/Reproducing
General
Accessories
154
Block Diagram
155
Declaration of EC Directive
Affect of Immunity on This Equipment
Page
Fostex CO