3035 4035 5035
Page
Introduction to this Operation Guide
Contents
Making machine default settings
Making copies when copy management is turned on
Output management functions
Turning the copy management function ON/OFF
Auto magnification selection mode
Auto paper selection mode
Centering/Image shift mode
Preset zoom mode XY zoom mode
Book to Booklet mode
Booklet/Stitching mode
Sort/Finished mode
Invert mode
Shared data box
Copy management mode
Synergy print boxes
Language selection function
Printer Kit Printer/scanner Kit Fax Kit
Vii
Page
Symbols
Page
IMPORTANT! Please Read First
Installation Precautions
Precautions for USE
Precautions for USE
Page
Page
NEW 3035/4035/5035 Copier Limited Warranty
Mercury Warning
Main body
Main power switch
$ Waste toner box Cleaning shaft
Length adjustment plate
⁄ Width adjustment lever
Operation panel
Auto clear function
Automatic drawercassette switching function
Paper Size Set 11x8 1
Touch panel
SortOn
SortOnEnlarge
Òapsó key
Paper size keys Remaining paper volume icons
ÒBypassÓ key
ÒAuto ExposureÓ key
Metric specifications Asia Pacific
ÒProgramÓ tab
Register key
Names of Parts
Loading paper
Preparations
Loading paper into the drawercassette
Preparations
Loading paper into the multi-bypass tray
Setting envelopes
Acceptable envelope types Size
Copier
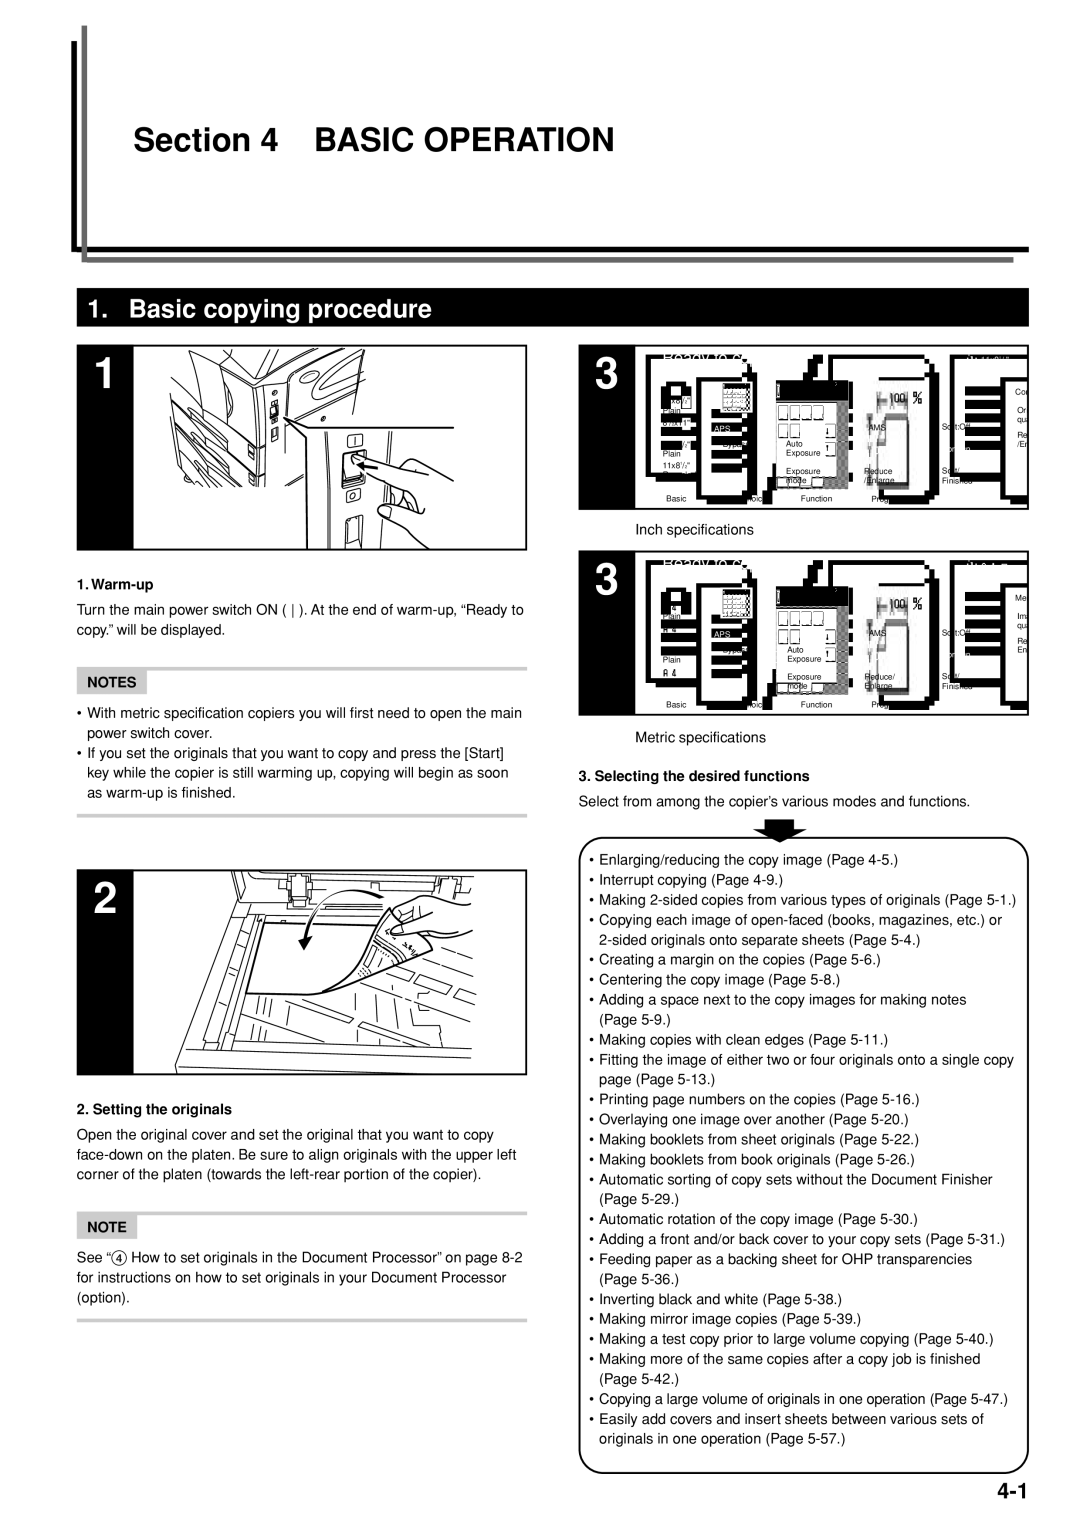
Setting the originals
Basic copying procedure
Warm-up
Selecting the desired functions
Selecting the paper size
Adjusting the copy exposure
11x81/2
11x81/2
Selecting the image quality
Setting the number of copies to be made
Paper Size
Start copying
At the end of copying
Press the Start key to begin the copying procedure
Auto magnification selection mode
Enlarging/reducing the copy image
SortOn
Zoom mode
Paper Size Set
Preset zoom mode
XY Zoom
XY zoom mode
Interrupt copying
A 1 2 a
Ready to copy. Job reservation
Job reservation
Ready to copy. Jobreservation
Touch panel will return to the screen in step
Energy-saving modes
Inch specification
Metric specification
Left/Right
Making 2-sided copies from a 2-sided original
Top
Book / Duplex
Sided/Separation
Making 2-sided copies from one-sided originals
Sided
Sided / Split Sided 1-sidedR1-sided R2-sided
To copy
Opy
Copy
Separation/Split copy from 2-sided originals
Separation/Split copy from book originals
Press the Start key. Scanning of the originals will start
Ady to copy To copy
Separation
Ided / Split
Making a margin space on the copies Margin mode
Separate front and back margin settings
Standard margin
Use the up/down and left/right cursor keys to select
Centering the copy image Centering/Image shift mode
Set the originals to be copied Metric specifications
Margin/Centering Margin/Image shift screen will be
11x81/2 Auto
Displayed Inch specifications
11x8 1 50% Memo pages
Layout a
Metric specifications Layout a
Erasing blemishes from edges of copies Sheet erase mode
Making copies with clean edges Border erase modes
Ready to copy
Go directly to step
Be displayed. Inch specifications
Paper size Set 11x8 1 Individual Border Erase
Individual Erase Mode
Other Convenient Functions
Merge copy None
Other Convenient Functions
Printing page numbers on copies Print page numbers mode
Style will be displayed. Inch specifications
Numbering
11x8 1 Setting 1st
Setting start #
Numbering
Key. The Setting denominator # screen will be displayed
Numbers printed on Inch specifications
If you want the last page number that is printed to be on a
Touch the + key or the key to select, counting from
Setting denominator #
Touch the Manual key
Book Duplex
Overlaying one image over another Form overlay mode
Place from first then press start
Set form Press Start Key
Screen in . Inch specifications
If ÒLeftÓ is selected as the binding direction
Making booklets from sheet originals Booklet/Stitching mode
If ÒRightÓ is selected as the binding direction
If ÒTopÓ is selected as the binding direction
Duplex Mode
Sided mode
Pape Set 100% Saddle Stitch
Metric specifications Duplex Mode
Close
Off Bind Fold
Other Convenient Functions
Making booklets from book originals Book to Booklet mode
With a cover
Without a cover
Set first Press Start button
Set first Paper size
Start key. Scanning of that next original will start
Touch the Bind & Fold key
When SortOFF and On Output each
When SortON and On 1 set are
Touch the SortON key Inch specifications
When there is paper loaded of the same
OFF on
Auto rotation function
Auto Rotation
Rotate
Back cover
No cover
11x8 1 Cover Mode
No cover Cover
Blank Cover
Other Convenient Functions
11x8 1 Select original size
Original size selection mode
Select
Size
11x 8 1
Leaving the backing sheet blank
Copying onto the backing sheet
OHP back
Register Back Close
Invert
Inverting black and white Invert mode
Mirror
Making mirror image copies Mirror image mode
Start
Making a test copy prior to large volume copying Proof mode
PaperSet 81/2x11
Proof Copy Off
Or ig .
Document management or with the form overlay mode
Registering a copy job for repeat copying
Modify Copy
For these originals. Inch specifications
Printing out with the repeat copy mode
Reprinting a registered copy job
Record of the security code
2Checking the contents of registered copy jobs
Print from 1st Head print key Inch specifications
Deleting a registered copy jobs
Check details / Reprint
Other Convenient Functions
Continuous scanning
Place originals then press Start key Paper Size
Set original Press Start key
Paper size Set Multiple scanning
Saving on toner use Eco print mode
11 x 8 1
Eco Print Register
Original set direction
Following procedure to perform that setting as well
11 x 81/2
Orig. set direction
Registering a program
Memorizing frequently used settings Program function
Changing a registered program name
Using programmed settings to make copies
Under that program
Yes key Touch panel will return to the screen in step
Deleting a registered program
Delete registration
Delete program
Registering a function or mode under a function key
Registration keys
Select item
Register present setting End
Register this function
Register this function Stop
Delete? will be displayed. Inch specifications
Deleting a registration key
Delete registration End
Delete registration.Stop
Ready to Job build
Using the job build mode
Place originals then press Start key Job Build
Set original. Press Start key Job Build-Step
Copy Left
Place originals then press Start key Sided/ 2 sided copy
Set original. Press Start key Sided / 2-sided Copy
Sided Left Copy Binding
Touch the Close key. The touch panel will return to
Scanning of the originals will start
Select paper Back Close
Select paper
Metric specifications Inch specifications
Scanning of the original will start
Scan next originals Set
Scanning finished key. Copying will start
Contains the desired size of copy paper, and then touch
Selecting the settings and functions
Original type
Set original. Press Start key Original type Sided 2-sided
Sided Open from Copy Left
Finished copies
Key or the Punch mode key, as appropriate
Set original. Press Start key Exposure mode
Originals Inch specifications
Set original. Press Start key Job Build
Place originals then press Start key Org. set direction
Screen will be displayed. Inch specifications
Desired border width. Inch specifications
Selecting the sheet erase mode
As appropriate
Explanation for the margin mode on page 5-6 or
Place originals then press Start key Modify Copy Off Set
Place originals then press Start key Margin/Centering
NoneP.1
Set Set original. Press Start key Numbering
Other Convenient Functions
Document management functions
What are the Òdocument managementÓ functions?
Form registration
2Checking registered forms and changing form names
Ready to register forms
Deleting a registered form
Check/Correct details
Check/revice details
1Storing documents in the box
Shared data box
Ready to register documents
Printing out stored documents
Document printing
3Checking stored documents and changing their names
Check/revise details
4Deleting stored documents
Synergy print boxes
Box will be displayed. Inch specifications
Storing documents in a box
ABCD0000101
2Combining and printing out stored documents
All be of the same size
Enter password
WED 1532
JOB005
3Printing out the full contents of a box
Touch the Document printing key or the Box Editing key
Checking stored documents and changing their names
Print box will be displayed
Box editing
End
Deleting stored documents from a box
6Deleting the full contents of a box
Check/ Rev Box Details
Screen to select the synergy print box will be displayed
7Registering a password for a box
Box Password
Box Password
Objective Procedure
Output management functions
What are the Òoutput managementÓ functions?
Print order Printing Contents Force-print
Check print Change Interrupt Cancel / Delete Check job
Display of the output management functions
Status
ÒPrint statusÓ screen
Copier Management Functions
Copy management mode
Copy management procedures Procedure
Description Reference
Register new department ID-codes
Accessing the copy management menu screen
Default setting / Counter
Enter the administrator number Close
ID-code screen will be displayed. Inch specifications
Editing copy management information
Register new department ID-codes
ID-code
ID-code 0007
Name to display 1st Sales Dept
Department ID-code Inch specifications
Touch the Close key
Copy limitation
Setting the restrictions for use
Copier Printer Scanning Fax Transmission Reference
Copier Printer Scanning Fax Reference Transmission
Is not permitted key Inch specifications
Or Change restrictions for use on Inch specifications
Copying privileges ON/OFF
Can use
Printer limitation
Printing privileges ON/OFF
ID-code, touch the Counter limit key and proceed to
Output limitation
Next step
To allow unlimited copying and printing, touch the No limit
Limit
Counter
Scanner limitation
999,999
Copying restrictions
Fax Transm. Limitation
Copy limitation No limit
Number of copies that can be made under this ID-code.
Printer limitation
Delete department ID-codes
Change registered information
If you want to delete another ID-code, repeat steps 3
Digits Inch specifications
Department inform. edit
Department info. Editing
Name to display
Change restrictions for use
Limit in use screen will be displayed Inch specifications
Check all departments
Checking the copy management counts
Management Total
Each Management Total
Check individual departments
Copier Management Functions
Changing the copy management default settings
Accessing the copy management default settings
Turning the copy management function ON/OFF
Copier function management ON/OFF
Managem. Def. Set
Copy management
Print. Managem
Printer function management ON/OFF
Off key Inch specifications
Printer error report
Printer error report
Department code mismatch Off line
Others Mgt. Reg. print
Non-standard printer driver printout Printer
Copy/Printer output management
Handled separately, touch the Each key Inch specifications
Copy/Printer output mgt
All
Scanner Managem
Scanner function management ON/OFF
Fax Management
Fax function management ON/OFF
Excess of limit Setting
Response to exceeded restriction
Stop job immediatly
Def. Val. of coun. limit
Default copy limit
Total count for specified paper size 1 to
Select size
Specify a paper type, proceed to step Inch specifications
Select paper type
With no
Enter ID-code
Making copies when copy management is turned
Machine default settings
Default settings
Folio 11 x 2 x 11 x 8 1/2
2 x 16K
Reference
Default setting Description Available Factory
Paper type
Plain Drawercassette No.1
46-2
40-1
40-2
Machine default
Accessing the machine default settings
Auto drawer switching On / All types of paper
Auto cassette switching On / All types of paper
Auto drawercassette switching ON/OFF
Making machine default settings
Auto cassette switching
Auto drawer switching
Paper size 1st cassette
Paper size drawercassette No.1 Ð No.4
Paper type1st drawer
Sizes
Paper type 1st cassette
Paper type drawercassette No.1 No
Paper type 1st drawer Plain
Paper type 1st cassette Plain
Multi-bypass tray settings display ON/OFF
Check bypass sizing
Check bypass sizing
Custom
Custom paper type for 2-sided copying
Select Adj. print Direction Inch specifications
Special paper action setting
Original set direction
Paper type 4th drawer Plain
Paper type 4th cassette Plain
Sleep mode changing time Minute
Sleep mode changing time
Sleep mode changing time
Auto sleep time
Minutes. Inch specifications
Auto low power time
Low power mode chng. time
Low power mode chng. time
Select Copy output mode
Copy eject location
Inner tray
Fax eject location
Select FAX output mode
Select the main mode
Default operation mode
Copy mode
Select main mode
Touch panel sound ON/OFF
Key sound ON/OFF
Key sound ON/OFF
Silent mode ON/OFF
Silent mode
Silent mode
Date/Time
Day & time
Time difference
Time difference
Time difference
Changing the management code
Change Mgmt code with #
Management code change
Auto sleep
Auto sleep ON/OFF
Date/Time 2001/10/30
Date/Time 30/10/01
Changing the energy-saving mode
Energy Saver key setting
Low power mode
APS
Copy default settings
Default setting
Description Available settings Factory Reference Setting
Auto Rotation mode Margin width
Default setting Description Available settings
Accessing the copy default settings
Copy default
Exposure mode Manual
Making copy default settings
Exposure mode
Exposure mode
Exposure steps
Exposure adjustment step
Exposure steps
Step
Image quality original
Original quality
Original image quality
Text + Photo
Eco Print
Eco print mode ON/OFF
Background exp. adj
Background exposure adjustment
Paper selection
Copy default
Paper type auto paper selection mode
Select paper typeAPS
Select paper typeAPS
Default cassette
Default drawercassette
Default drawer
1st paper
Cover drawercassette
Cassette for cover paper
Drawer for cover paper
Default magnification ratio
Default mode
Default magnification
Adjust auto exposure
Auto exposure adjustment
Adjust auto exposure Standard
Adjust auto exposure
Auto exposure adjustment OCR
Adjust auto exposure OCR
Adjust auto exposure OCR
Manual exposure adjustment text+photo mode
Adj. manual expo.Mixed
Adj. manual expo.Mixed
Manual exposure adjustment text mode
Adj. manual expo. Text
Adj. manual expo. Text
Manual exposure adjustment photo mode
Adj. manual expo. Photo
Adj. manual expo. Photo
Sort
Sort/Finished mode ON/OFF
Auto Rotation
Auto Rotation mode ON/OFF
Default margin width
Default margin width
Margin width
Default erase width
Desired Inch specifications
Default erase width
Erased border width
Preset limit
Preset limit
Copy limit
Preset limit 999 Set
Initial mode, touch the On key. Inch specifications
Repeat copying ON/OFF
Modify copy
Registration keys ON/OFF
Key Inch specifications
DisplayRegisterkey
Display register key
Customize screen layout Main functions
CustomizeMain function
CustomizeMain function
CustomizeAdd function
Customize screen layout Add functions
Margin None
CustomizeAdd function
Multi-bypass tray paper settings
Bypass setting
Paper size and type
Selecting other standard sizes
Paper size Paper type
Cardstock
Auto Centimeter Detection
Return to the contents of the Basic tab
Return to the screen in . Inch specifications
Paper Size Bypass setting
Others Standard
Register orig. size
Original size registration
Original size custom 2x2
Original size custom 50x50mm
User adjustment
Touch the User adjustment key. Inch specifications
User adjustment Close
Drum refresh
To cancel drum refreshing, press the Stop/Clear key
Now drum refreshing
Drum refresh Close
Counter check
Box management default settings
Box settings Setting Description Reference
Accessing the box management default settings
Want to print out the document list. Inch specifications
Making box management default settings
Will return to the contents of the Basic tab
Document Management
Panel will return to the contents of the Basic tab
Box name & password / Clear data in box
Name as desired Inch specifications
Password
Box
Document data save period
To the desired setting. Inch specifications
HDD management mode
HDD management mode
Hard disk management
HDD management
100
Print report
Report print out
Print report menu
Print report menu
Printing report
Language Stop
Changing the language used for messages
Language
English
Numeral/Symbol keyboard
Inch specifications
Entering characters
Character input screens
Symbol 1 keyboard
Symbol 2 keyboard
Symbol
Character input procedure
Touch the Letter key Inch specifications
Example ÒAbcdeÓ
Document Processor
Precautions for the use of Document Processor
Originals that can be used with the Document Processor
Document Processor part names
5How to set originals on the platen
4How to set originals in the Document Processor
Differing finished sizes Auto selection
Auto selection/Filing mode
Place originals in Document processor Paper size
Matching finished sizes Filing
Copying in the SortON mode
Paper Feeder
Document Finisher
2Copying in the SortOFF mode
Copying in the Staple mode
Previous one Inch specifications
Staple mode
11x81/2 Staple Mode
Touch the Punch mode key
4Copying in the Hole Punch mode optional
Inch specifications Metric specifications
Hole punching will be accomplished as shown
Built-in Finisher
Stacking mode
Place
1Refilling the Stapling Unit
Job Separator
Hard Disk
Clearing a staple jam
Key Counter
¥ Setting the Key Counter
Document Tray
Printer Kit
If one of the following messages is displayed
Message Procedure Reference
Troubleshooting
Indication Procedure Reference
If one of these indicators lights or flashes
Removal procedures
When paper misfeeds
Paper misfeed
Open the drawercassette
Close the left cover
Paper misfeed. Careful for Drum
¥ Misfeed in left cover 1 JAM
System error Main switch off / on
System error Disconnect power plug from the socket
¥ Misfeed in left cover 2 JAM 18
Open the left cover
¥ Misfeed in multi-bypass tray JAM14, 20, 21
Remove the misfed paper Close the left cover
Troubleshooting
2Misfeed in Document Processor optional JAM 70 to
Misfeed in Built-in Finisher optional JAM 80 to
4Misfed in Document Finisher optional JAM 80 to
Trouble Checkpoint Procedure Reference
If other trouble occurs
Is paper wet? Replace the paper with new paper
Open the front cover and pull and push back
On the copy Cleaning shaft
Cleaning the original cover
Cleaning the copier
Cleaning the platen
Cleaning the separator
Transfer roller
Cleaning the transfer roller
Replacing the toner container and waste toner box
Open the front cover
Add toner to resume copying
10-4
Cm, remove the grid cleaner and then push
Cleaning the related parts
10-6
Specifications
Metric specifications 220-240 V AC, 50 or 60 Hz, 6.5 a Max
Inch specifications 120 V AC, 60 Hz, 12 a Max
Specifications are subject to change without notice
Approx lbs
Power consumption
Environmental Specifications
Duplex 2-sided copying
Paper feed
Document
Installing the optional equipment
Original Cover
Key Counter
Paper Feeder
Document Processor
Document Finisher
Built-in Finisher
Appendix Functions and settings combination chart
10-13
10-14
Auto Rotation mode ON/OFF copy default setting
Auto drawercassette switching ON/OFF
Batch scanning mode
Book to Booklet mode Booklet/Stitching mode
Program function Proof mode
Multi-bypass tray settings display ON/OFF
Paper size drawercassette No.1 No.4
Paper type drawercassette No.1 No.4
Toner Container
Touch panel sound ON/OFF machine default setting
Memo
Memo
Page
Page
2003