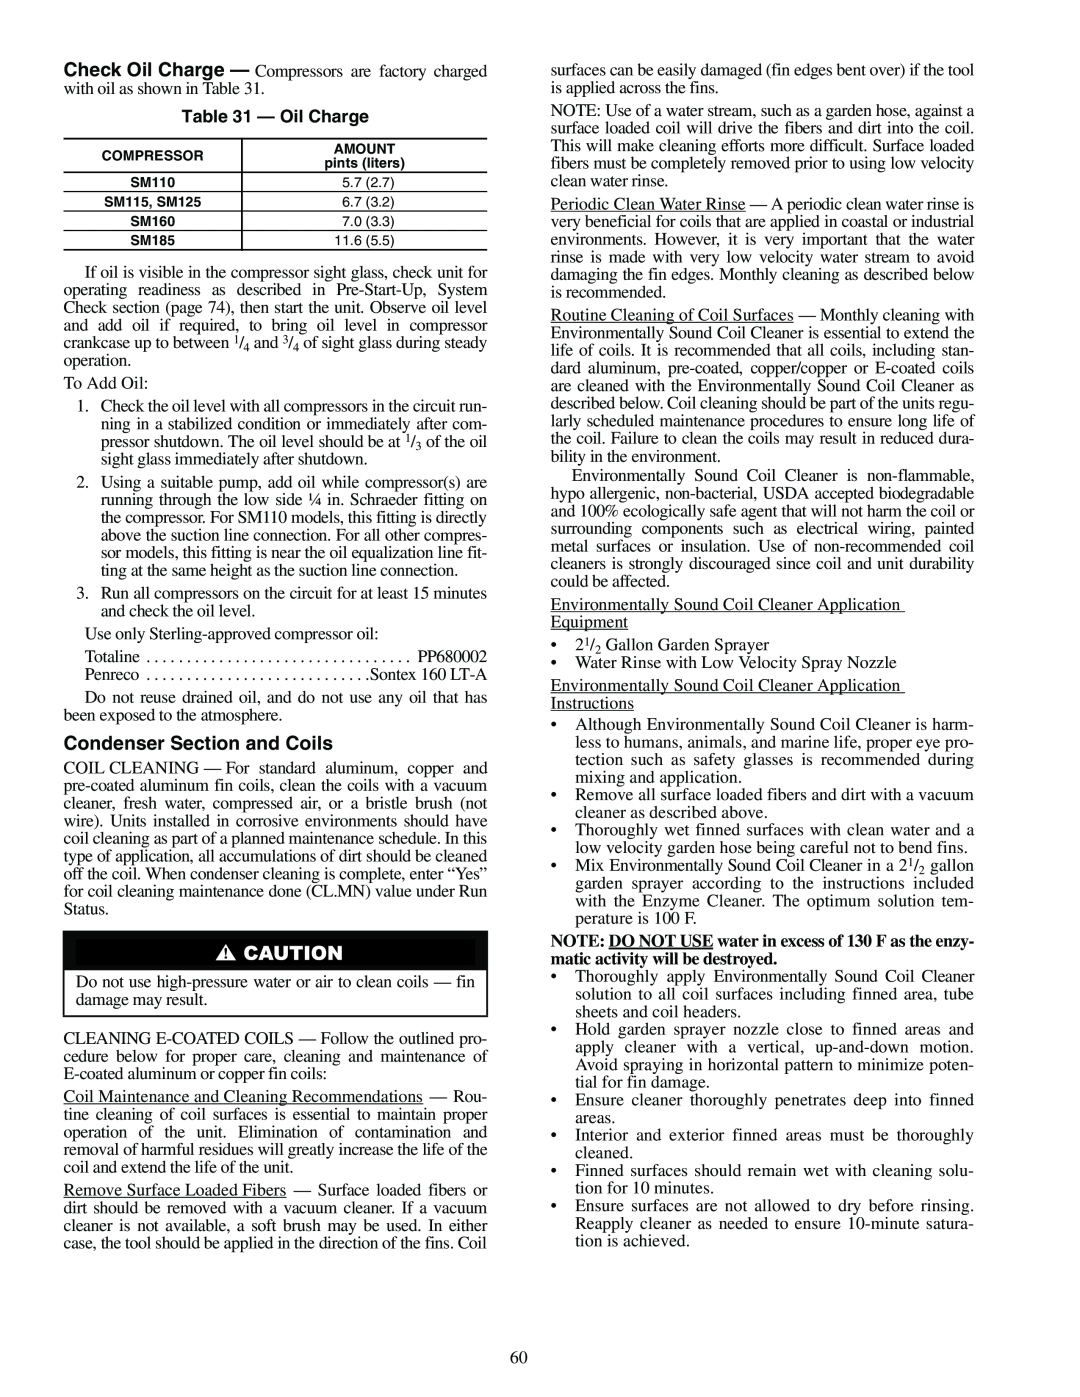
Check Oil Charge — Compressors are factory charged with oil as shown in Table 31.
Table 31 — Oil Charge
COMPRESSOR | AMOUNT | ||
pints (liters) | |||
| |||
SM110 | 5.7 | (2.7) | |
SM115, SM125 | 6.7 | (3.2) | |
SM160 | 7.0 | (3.3) | |
SM185 | 11.6 | (5.5) | |
If oil is visible in the compressor sight glass, check unit for operating readiness as described in
To Add Oil:
1.Check the oil level with all compressors in the circuit run- ning in a stabilized condition or immediately after com-
pressor shutdown. The oil level should be at 1/3 of the oil sight glass immediately after shutdown.
2.Using a suitable pump, add oil while compressor(s) are running through the low side ¼ in. Schraeder fitting on the compressor. For SM110 models, this fitting is directly above the suction line connection. For all other compres- sor models, this fitting is near the oil equalization line fit- ting at the same height as the suction line connection.
3.Run all compressors on the circuit for at least 15 minutes and check the oil level.
Use only
Totaline . . . . . . . . . . . . . . . . . . . . . . . . . . . . . . . . . PP680002 Penreco . . . . . . . . . . . . . . . . . . . . . . . . . . . .Sontex 160
Do not reuse drained oil, and do not use any oil that has been exposed to the atmosphere.
Condenser Section and Coils
COIL CLEANING — For standard aluminum, copper and
Do not use
CLEANING
Coil Maintenance and Cleaning Recommendations — Rou- tine cleaning of coil surfaces is essential to maintain proper operation of the unit. Elimination of contamination and removal of harmful residues will greatly increase the life of the coil and extend the life of the unit.
Remove Surface Loaded Fibers — Surface loaded fibers or dirt should be removed with a vacuum cleaner. If a vacuum cleaner is not available, a soft brush may be used. In either case, the tool should be applied in the direction of the fins. Coil
surfaces can be easily damaged (fin edges bent over) if the tool is applied across the fins.
NOTE: Use of a water stream, such as a garden hose, against a surface loaded coil will drive the fibers and dirt into the coil. This will make cleaning efforts more difficult. Surface loaded fibers must be completely removed prior to using low velocity clean water rinse.
Periodic Clean Water Rinse — A periodic clean water rinse is very beneficial for coils that are applied in coastal or industrial environments. However, it is very important that the water rinse is made with very low velocity water stream to avoid damaging the fin edges. Monthly cleaning as described below is recommended.
Routine Cleaning of Coil Surfaces — Monthly cleaning with Environmentally Sound Coil Cleaner is essential to extend the life of coils. It is recommended that all coils, including stan- dard aluminum,
Environmentally Sound Coil Cleaner is
Environmentally Sound Coil Cleaner Application Equipment
•21/2 Gallon Garden Sprayer
•Water Rinse with Low Velocity Spray Nozzle
Environmentally Sound Coil Cleaner Application Instructions
•Although Environmentally Sound Coil Cleaner is harm- less to humans, animals, and marine life, proper eye pro- tection such as safety glasses is recommended during mixing and application.
•Remove all surface loaded fibers and dirt with a vacuum cleaner as described above.
•Thoroughly wet finned surfaces with clean water and a low velocity garden hose being careful not to bend fins.
•Mix Environmentally Sound Coil Cleaner in a 21/2 gallon garden sprayer according to the instructions included with the Enzyme Cleaner. The optimum solution tem- perature is 100 F.
NOTE: DO NOT USE water in excess of 130 F as the enzy- matic activity will be destroyed.
•Thoroughly apply Environmentally Sound Coil Cleaner solution to all coil surfaces including finned area, tube sheets and coil headers.
•Hold garden sprayer nozzle close to finned areas and apply cleaner with a vertical,
•Ensure cleaner thoroughly penetrates deep into finned areas.
•Interior and exterior finned areas must be thoroughly cleaned.
•Finned surfaces should remain wet with cleaning solu- tion for 10 minutes.
•Ensure surfaces are not allowed to dry before rinsing. Reapply cleaner as needed to ensure
60