A S E R S H a R E N E T W O R K I N G
Page
PhaserShare Networking Manual
Page
Contents
TCP/IP Host Configuration Unix
TCP/IP Printer Configuration All Platforms
TCP/IP Configuration OS/2 Warp/LAN Server
Windows 95 and Windows 98 PhaserPort Software
Disabling Protocols
PhaserLink Printer Management Software
Printer Management
Getting Help
FTP Interface Index
Resetting the Printer
Chapter
Network Printing with Tektronix Color Printers
PhaserShare cards
PhaserShare Series B network interface
PhaserShare Networking Manual
Supported PC platforms
Environments supported
Workstations
Printer’s Configuration
Network installation overview
Printing a Configuration Page Phaser 780 front panel
Printing a Configuration Page Phaser 840 front panel
Printer’s networking software
How to tell which protocols are enabled
Environment Software
Obtaining networking software for Phaser 360 printers
Network administration software
Network administration software
Support for DOS systems
Tektronix PhaserPrint for Unix software
PhaserShare Series B Ethernet interface
PhaserShare Series B Network Interfaces
Printer’s built-in Ethernet connector
Ethernet connections and indicators
PhaserShare Series B Ethernet card
10Base5 Thick Ethernet
Ethernet cables and termination
10BaseT or 100BaseTx Twisted Pair
10Base2 Thin Ethernet
Token Ring connections and indicators
PhaserShare Series B Token Ring card
Mbps
Ring speed jumper
Token Ring configuration
Printer Menu Network Settings
Parameter Description Choices
Token Ring parameters
Using the config-TokenRingscript
How to configure Token Ring parameters
Ether printer-nam e Token-Ring-address for System
Using the PhaserShare Administrator to configure Token Ring
PhaserShare Networking Manual
LocalTalk connection
PhaserShare Series B LocalTalk card
Connecting to a single computer
LocalTalk connectors and cables
PhaserShare Networking Manual
Before you begin
EtherTalk, LocalTalk, and TokenTalk Configuration
Configuration overview
Finding the printer’s name in the Chooser
Changing the printer’s name optional
Changing the printer’s name Apple Printer Utility
Changing the printer’s EtherTalk/TokenTalk zone optional
Troubleshooting
Supported NetWare versions
Novell NetWare Configuration
Bindery mode and NDS NetWare Directory Services supported
Printer’s NetWare interface
Notify lists
Before beginning the configuration procedure
Other features
Passwords
NetWare configuration for Windows environments
Configuration software for NetWare
Printing the Configuration
Log on to the file server
Start the PhaserShare Administrator
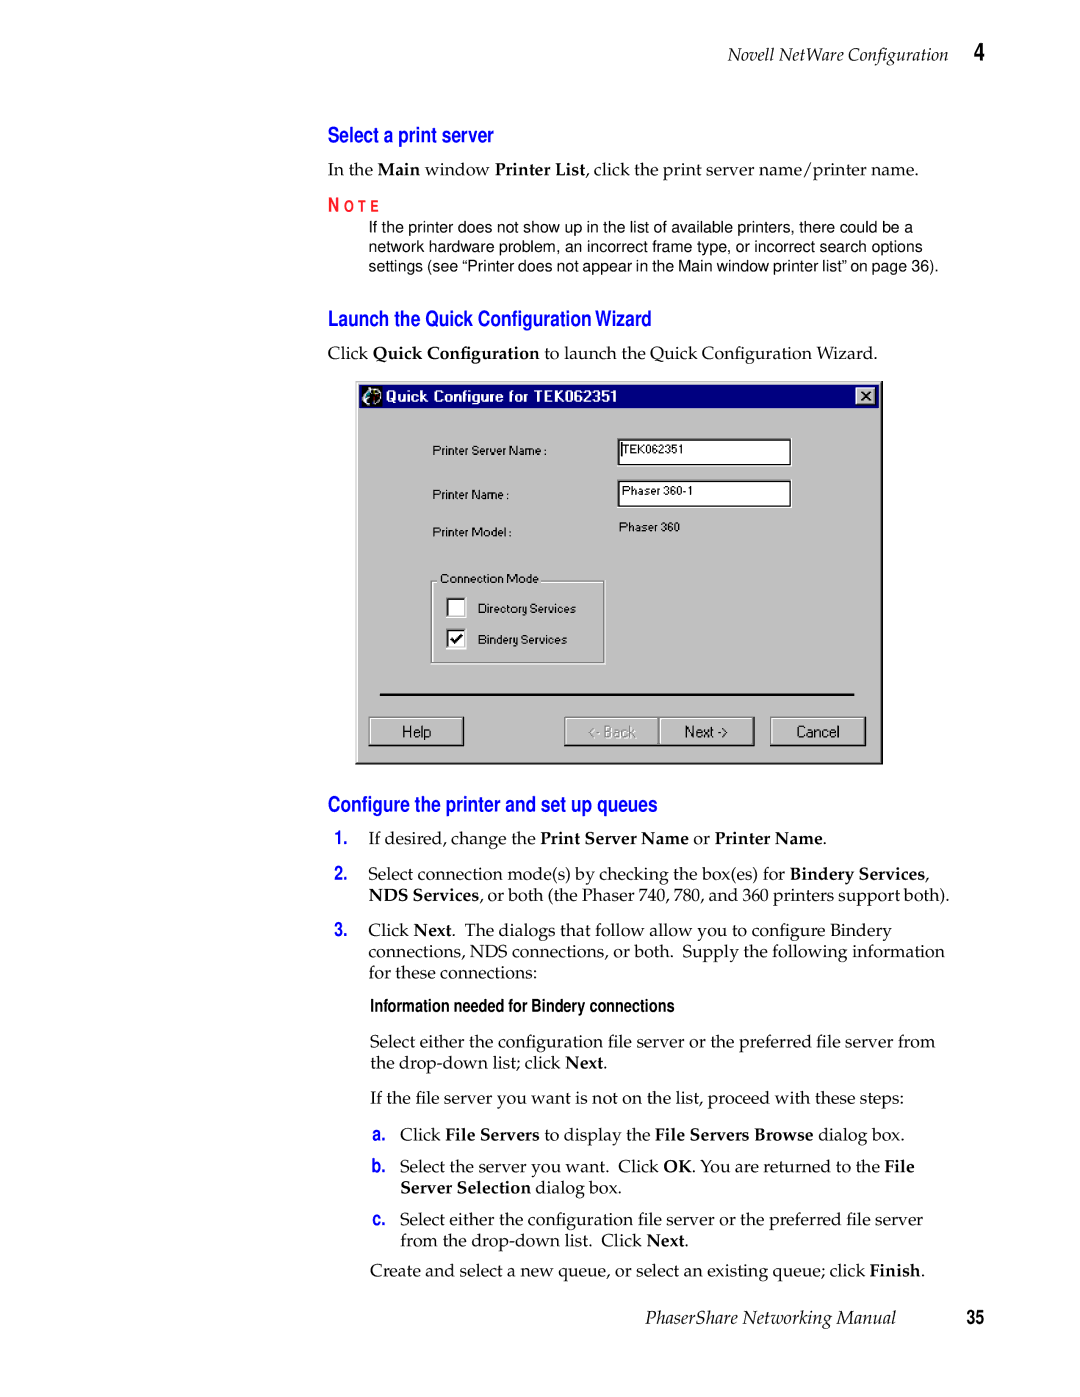
Select a print server
Configure the printer and set up queues
Launch the Quick Configuration Wizard
Verify information and finish the configuration
Troubleshooting Windows configurations
Printer does not appear in the Main window printer list
Testing the file server-to-printer connection
Testing from the PhaserShare Administrator
Cannot submit job to a queue
Job appears in queue, but printer does not service it
Job is serviced, but does not print
Setting IPX frame types Phaser
Setting IPX frame types from the front panel
Setting IPX frame types Phaser 740 and Phaser 360 printer
Setting IPX frame types Phaser 780 printer
PhaserShare Networking Manual
Introduction to the PhaserShare Administrator
PhaserShare Administrator Software for NetWare Networks
System requirements
Installation
Installation for Phaser 360 printers
Installation methods
Installation procedure
Installation for Phaser 840, 740, and 780 printers
Launching the PhaserShare Administrator
Using the PhaserShare Administrator
PhaserShare Networking Manual
Specifying search options the Search Options dialog box
Information Not Available in the Printer List
Printer Not Responding dialog box
PhaserShare Administrator on-line help
TCP/IP Configuration Overview
Extracting the files
Listing the contents of unix.tar
Extracting files from unix.tar
Printing the Configuration
Printer
TCP/IP configuration overview
PhaserShare Networking Manual
Information Comments
TCP/IP Printer Configuration All Platforms
Setting the printer’s IP addressing parameters
Information for TCP/IP configuration
TCP/IP Printer Configuration All Platforms
Printer defaults for network mask and broadcast address
Setting IP parameters Phaser 840 printer front panel
Set the IP address
Setting IP parameters Phaser 740 printer front panel
Press Select to display the IP address. For example
Setting IP parameters Phaser 780 printer front panel
Press Menu to display the IP address. For example
Gateway Address Menu
Press the Menu the front panel displays Help Pages
Setting IP parameters Phaser 360 printer front panel
PhaserShare Networking Manual
Setting IP parameters Rarp or Bootp
Installing the Dhcp server
Setting IP parameters Dhcp
Setting up a Dhcp server
Dhcp transactions
Control PanelServices, scroll down to Dhcp Server
Field Description Values
Supported BOOTP/DHCP fields
Phaser 740 and 360 printers
Enabling and disabling Rarp and BOOTP/DHCP front panel
Phaser 780 printer
Setting IP parameters PostScript utility file Unix only
Parameter Description
IP parameters
Setting IP parameters PhaserLink Printer Management Software
Domain Name Services DNS
Setting IP parameters arp table entry address gleaning
PhaserShare Networking Manual
LPR BSD systems
Controlling host access
AppSocket TCP Sockets
Controlling host access using a PostScript utility file
Send the file named in b to the printer using lp or lpr
Syslog Unix systems only
Receiving printer status
Priority Number Description
Config-syslog filename
Setting Syslog priorities using a PostScript utility file
Snmp Unix systems only
Setting Snmp parameters using a PostScript utility file
Assigning a print queue to the printer
TCP/IP Host Configuration Unix
Configuring a host
Adding the printer to the host table
Queue name Language
Assigning print queues with PhaserPrint for Unix
Required remote printer queue names
Unix model files
Example
Example installation for a typical BSD Unix system
Descriptions of printcap parameters
Sun Solaris
Configuration procedures for common System V Unix hosts
If Solaris 2.2/2.3 print jobs get stuck in the queue
Adding an LPD queue in Solaris
Irix 5.3 and Irix 6.x with Impressario Client
SGI Irix 5.3
Field name Description
IBM AIX 3.x
Irix 6.x with Impressario Server
AIX
Print server
Hewlett-Packard HP-UX 9.x
Field name Example entry Description
Ping printer-name
Testing the network connection
TCP/IP Configuration OS/2 Warp/LAN Server
TCP/IP Configuration OS/2 Warp/LAN Server
OS/2 client-to-server setup
Warp Server 4.0/Warp Connect
Windows NT
Setting the printer’s IP address
Add the printer
Click Start, Settings, and Printers
Creating an AppleTalk port
Creating an LPR port
101
Name the printer and set up sharing
Install the driver
103
Windows NT creates the printer
Adding the Windows NT 4.0 driver on a Windows NT 3.51 server
105
Install the driver
107
Enter the printer’s name and set up sharing
Windows NT creates the printer
109
Adding a Windows NT 3.x driver
Creating an LPR port
111
Set up sharing
Concept Description Unix term NT term
Windows NT network communication
TCP/IP connection
Basic concepts of TCP/IP printing
113
Windows NT network troubleshooting
Error messages in Print Manager
Printer PS on host IP-addressis rejecting your request
To fix this problem in Windows NT
Open the folder C\WINNT35\system32
115
Checking the IP address of the Windows NT server
Printing from the command line via lpr
TCP/IP configuration for the PC
Windows 95 PhaserPort Software
117
Using the installer
PhaserPort software installation
Create your first port and install the printer
Adding a port to an existing printer
Adding a port for a new printer
119
Changing a port’s IP address
121
PhaserLink Printer Management Software
System requirements
Multiple language support
Printer information pages
Accessing printer information from a browser
123
PhaserLink Printer Management Software navigation links
Link/Page Description
Printer status icons
Printer status display
IconDescription
125
PhaserLink Printer Management Software help files
To configure PhaserLink Printer Management Software Help
To access PhaserLink Printer Management Software Help
Disabling Information Forwarding
Information Forwarding
127
Job accounting PhaserShare Administrator
Printer Management
Job accounting
Job accounting PhaserLink Printer Management Software
129
Phaser 840 Intelligent Ready
PhaserLink Status Notification Email Notification
131
Usage Profile reports Phaser 840, 740 and 780 printers only
Phaser 740 printer
Phaser 840 printer
Printing Usage Profile reports from the front panel
133
Printing verbose Usage Profile reports from the front panel
Sending Usage Profile reports via email from the front panel
135
PhaserShare Networking Manual
137
Controlling Usage Profile email reporting
Email to Tektronix
To enable email to Tektronix
Specifying who receives reports
139
Reading Usage Profile reports
Full report format
Email report format
Field Number Field name Description
Report fields
Usage profile job report
Field Description
141
Notification Settings
Low , Replace , or Not Installed just as on
143
PhaserShare Networking Manual
Logs
Engine Error Log Phaser 840 printer
145
Code Description
Engine Error Log Phaser 740 and 780 printers
Postscript Error Log Phaser 840, 740 and 780 printers
Engine Error Log Phaser 740 and 780 printers contd
147
Postscript Error Log Phaser 840, 740 and 780 printers contd
Last jam logs
Last Jam Log Phaser 840 printer
149
Last Jam Log Phaser 740 printer
151
Last Jam Log Phaser 780 printer
PhaserShare Networking Manual
If you need help from Tektronix
Getting Help
153
Customer Support Centers
Getting Help
155
Using the automated fax systems
Country Numbers
Receiving email update notices
157
Disabling Protocols
Disabling protocols front panel
Phaser 840 printer
159
Phaser 740 printer
Press ---- the front panel displays EtherTalk
161
Phaser 780 printer
PhaserShare Networking Manual
163
Phaser 360 printer
PhaserShare Networking Manual
If the front panel is locked
Phaser 360 printer
165
Disabling protocols PhaserLink Printer Management Software
Disabling protocols PhaserShare Administrator
167
Resetting the Printer
Resetting your printer using the Apple Printer Utility
Request Description
Supported FTP commands
FTP Interface
169
Supported FTP commands contd
171
Index
129
Printcap file
173
PhaserShare Networking Manual
Page
Printed on recycled paper