User Guide
Page
Contents
Network Printing
About the Software Software and Documentation CD-ROM
Enabling Options for Macintosh Selecting Printing Options
Iii Contents
Printing a Configuration
Replacing Routine Maintenance Items
Maintaining the Printer Cleaning the Printer
Troubleshooting
Technical Specifications
Installing Options
User Safety Summary
Safety Specifications
Introduction
Getting Acquainted with Your Printer
Space Requirements
Getting Acquainted with Your Printer
Front View
Printer Parts
Rear View with Options
Front View with Options
Network Printing
Network Connection
Theory
Network Connection
Using Dhcp
Making the Connection
Ethernet Interface
Setting the Address Manually
Network Connection
Network Printing
Network Printing
Http
Port
Unicast, Multicast, and Broadcast
About the Software
Operating System Use/Benefit
PostScript Drivers
PPD Files
Software and Documentation CD-ROM
PCL Drivers
Utilities
Utility Use/Benefit
RAM
System Requirements
Selecting Driver Options/Defaults for Windows
Windows XP/Server 2003/2000/NT
Windows Me/98SE Xerox Phaser 6120 PostScript
Windows Me/98SE Xerox Phaser 6120 PCL6
Click Printing Preferences
Enabling Options for Macintosh
Selecting Printing Options
Selecting Printing Preferences Windows
Advanced Tab PostScript Printer Driver Only
Saved Settings
Selecting Options for an Individual Job Windows
Printing Options for the PostScript and PCL Printer Driver
Layout Tab
Cover Page Setting Tab
Selecting Printing Options
Basic Tab
Overlay Tab
Watermark Tab
Quality Tab
Graphics Tab
Printing Options for the Windows Me/98SE PostScript File
Version Tab
Paper Tab
Printer Control Panel Configuration Menu
About the Control Panel
Control Panel Indicators and Keys
No. Indicator Off
About the Control Panel
Toner Supply Indicators
JOB/ALL
Key Function
Printing the Menu Map
Delete Print Prints Hold
Secure Print PIN Prints Proof
Xxxx
Delete PIN Print Menu Xxxx Proof Prints
Entering the Password
Font List Postscript
Configuration
Menu MAP
Supplies
Tray Media
Input Tray
AUTO/CASSETTE
Mode
Length
Size
Type Letterhead
Custom Width
OFF/SHORTEDGE/LONGEDGE
Recovery
Tray
Duplex
Magenta
Toner Black
Removal
Cyan
CAL
Reset
Density Request
NO/YES
Dhcp
Network Setup TCP/IP Enable
Bootp
Default
Auto IP
Subnet
Mask
Http
Netzone
USB Setup Enable
Timeout
Setup Timeout
Quality
Emulatio Default
Postscrip Error
ENHANCED/STANDARD
Font Pitch
Symbol
PCL Line
Termina CR=CR LF=LF Tion CR=CRLF LF=LF CR=CRLF LF=CRLF
Energy
Security Configure Enable
Date
Time
Disk
Restore
Format
Flash
Language Menu
Using Media
Media Specifications
What types and sizes of media can I load?
Plain Paper
Media Types
Media Types
Thick Stock
Envelopes
Labels
Letterhead
Postcards
Transparencies
Glossy Stock
What Is the Guaranteed Imageable Printable Area?
Imageable Area-Envelopes
Margins
How do I load media?
Loading Media
Tray 1 Multipurpose Tray
Loading Media
Loading Plain Paper
Load the paper face up in the tray
Loading Envelopes
Other Media
Loading Media
Loading Media
Pull the lever, and then open the top cover
Loading Media
Loading Media
Lower both green fuser separator levers Close the top cover
Loading Media
Up to 50 sheets can be loaded into the tray at one time
Tray
Loading Media
Reattach the lid to Tray
Reinsert Tray 2 into the printer
How do I autoduplex?
Duplexing
Output Tray
Output Tray
How do I store media?
Media Storage
Replacing Supplies
About Toner Cartridges
Replacing Consumables
Toner Cartridge Type Part Number
Replacing Consumables
Away from salty air and corrosive gases, such as aerosols
Toner Removal
Replacing a Toner Cartridge
Printable Pages Menu
Quality Menu
Replace X Toner
Please Wait
Yellow, and K black
Do not touch or scratch the toner roller
Press down on the toner cartridge until it snaps into place
Close the front cover Carefully close the top cover
Replacing Routine Maintenance Items
Replacing the Imaging Unit
Replacing Routine Maintenance Items
Install the new imaging unit Carefully close the top cover
Maintaining the Printer
Cleaning the Printer
20.5 kg 45 lb
Exterior
Interior
Cleaning the Media Feed Roller and Laser Lens
Cleaning the Printer
Carefully close the top cover
Cleaning the Duplex Unit Feed Rollers
Carefully close the duplex cover
Cleaning the Media Feed Rollers for Tray
Cleaning the Printer
100 Storing the Printer
Storing the Printer
Troubleshooting
102 Introduction
Introduction
Avoid
Preventing Paper Jams
Preventing Paper Jams 103
Make sure that
104
Understanding the Media Path
Clearing Paper Jams 105
Clearing Paper Jams
Paper Jam Messages and Clearing Procedures
106
Paper Jam Message Reference
Clearing a Paper Jam in the Printer
Clearing Paper Jams 107
108
Clearing Paper Jams 109
110
Clearing a Paper Jam From Tray
Clearing Paper Jams 111
112
Clearing Paper Jams 113
Clearing a Paper Jam from the Duplex Unit
114
Solving Problems with Paper Jams
Solving Problems with Paper Jams 115
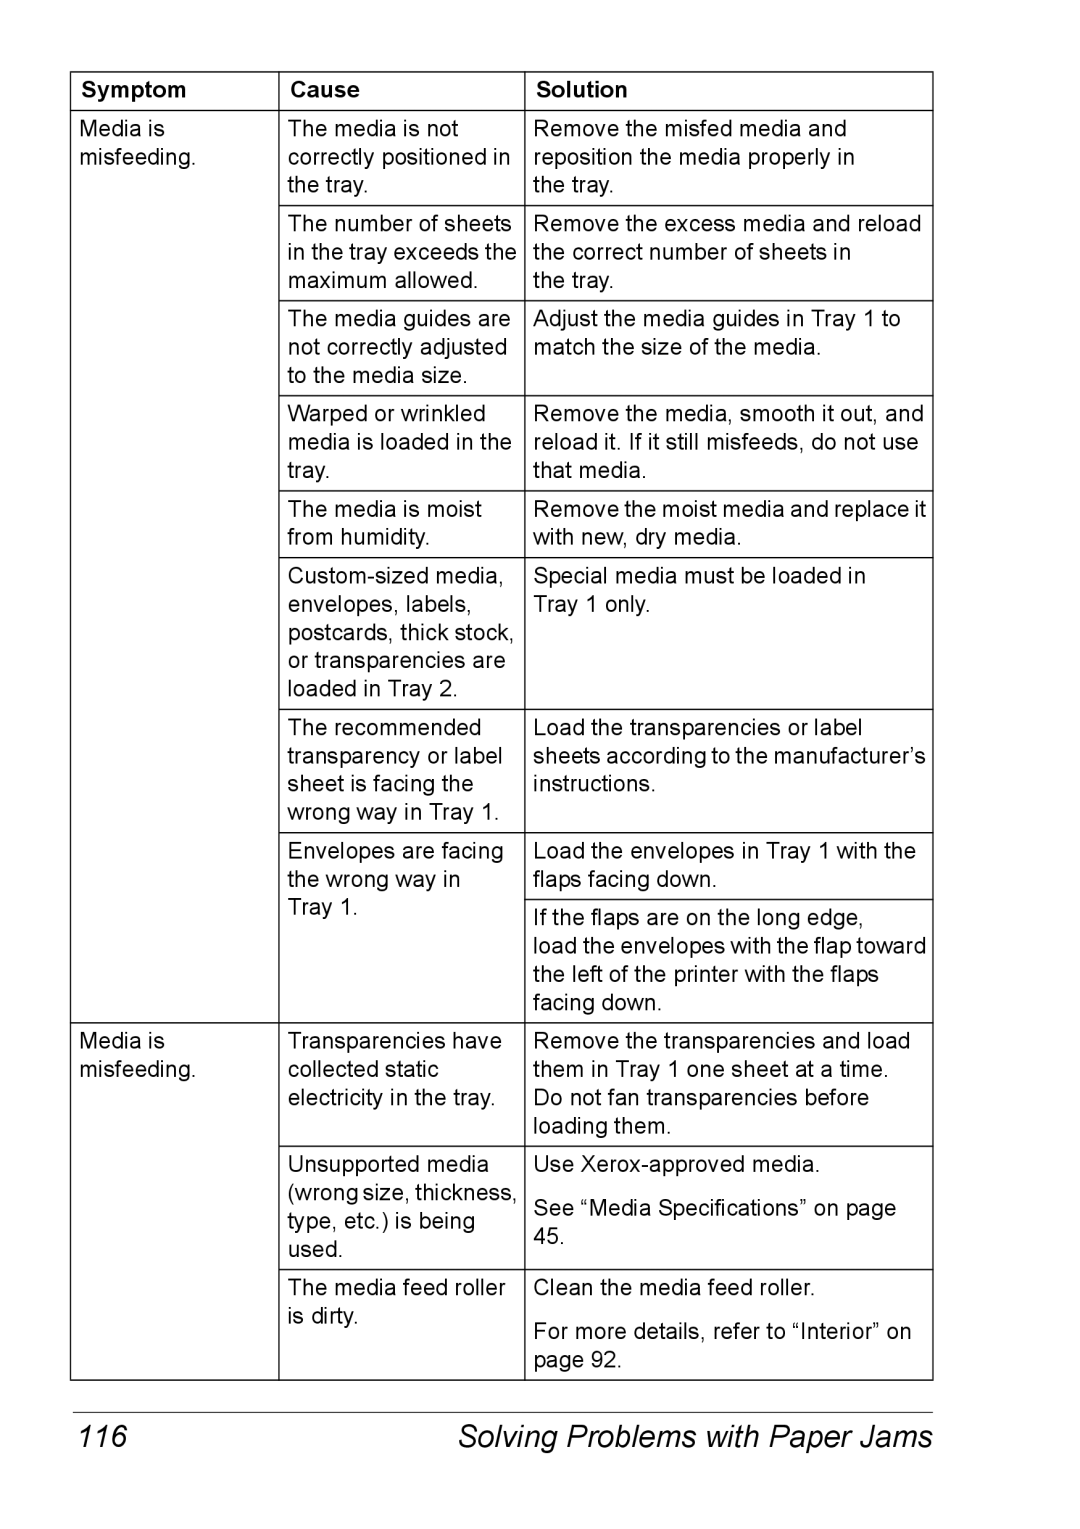
Symptom Cause Solution
116 Solving Problems with Paper Jams
Solving Other Problems 117
Solving Other Problems
Incorrect is
118
Solving Other Problems 119
CD-ROM
120
Solving Problems with Printing Quality 121
Solving Problems with Printing Quality
122 Solving Problems with Printing Quality
Solving Problems with Printing Quality 123
124 Solving Problems with Printing Quality
Solving Problems with Printing Quality 125
126 Solving Problems with Printing Quality
Status, Error, and Service Messages
Status, Error, and Service Messages 127
Standard Status Messages
Starting System Warming UP
128 Status, Error, and Service Messages
Phaser
Processing
Status, Error, and Service Messages 129
Error Messages Warning
130 Status, Error, and Service Messages
Status, Error, and Service Messages 131
Error Messages Operator Call
132 Status, Error, and Service Messages
Service Messages
Status, Error, and Service Messages 133
This service Means Do this Message
134 Status, Error, and Service Messages
Web Links
Resource Link
Installing Options
Antistatic Protection
136 Introduction
Dual In-Line Memory Module
Installing a Dimm
Dual In-Line Memory Module Dimm
Dual In-Line Memory Module Dimm 137
Dual In-Line Memory Module Dimm
138
Dual In-Line Memory Module Dimm 139
If you removed the duplex unit in , reinstall it
Installing a Hard Drive
Hard Drive
140 Hard Drive
Hard Drive 141
142 Hard Drive
Hard Drive 143
Installing the Duplex Unit
Duplex Unit
144
Duplex Unit 145
146
Make sure that both knobs are securely locked
Duplex Unit 147
Installing Tray
Tray
148 Tray
Tray 149
Appendix
User Safety Summary
Electrical Safety
User Safety Summary 151
Laser Safety
Maintenance Safety
152 User Safety Summary
Operational Guidelines
Operational Safety
User Safety Summary 153
Printing Safety Guidelines
Moving the Printer
154 User Safety Summary
Printer
Safety Specifications
Technical Specifications
Safety Specifications 155
156
Technical Specifications
CPU
Technical Specifications 157
158
Consumable Life Expectancy Chart
Material Safety Data Sheet
Symbols Marked on Product
Material Safety Data Sheet 159
160
Product Recycling and Disposal
All Countries
European Union
North America Other Countries
Product Recycling and Disposal 161
Professional/Business Environment
Appendix
European Union Declaration of Conformity
Regulatory Information English Only
United States FCC Regulations
Canada Regulations
164 Regulatory Information English Only
Index 165
Jams
Hard drive Http Imageable area IP address Manual setting
Message window, 25 Messages, 127 Misfeed problems
166 Index
Index 167