MultiPASS
Copyright
Trademarks
Users in U.S.A
Rights of the Telephone Company
Order Information
Power Requirements
Location
Quebec & Maritime Provinces
Canon Canada Inc
Viii
Contents
Preparing Documents and Making Copies
Using the Telephone, an Answering Machine
Xii
Chapter
Xiv
Chapter Before You Begin
2Before You Begin
Features and Benefits
Telephone features
PC fax features
Scanner features
Copier features
Software User’s Guide
Using Your Documentation
Quick Start Guide
User’s Guide
Canon U.S.A. Consumer Information Center
Customer Support
Canon U.S.A
Canon Canada
Important Safety Instructions
8Before You Begin
Chapter Getting Started
2Getting Started
Selecting a Location for Your MultiPASS
15.5
4Getting Started
Unpacking the MultiPASS
Miscellaneous
6Getting Started
Removing the Shipping Materials
From the Front
Learning the MultiPASS 1000 Controls and Connections
8Getting Started
From the Side
Handset
Ringer volume switch
10Getting Started
Operation Panel
Numeric Keypad
12Getting Started
Function Buttons and Lights
One-touch Speed Dialing Keypad
14Getting Started
Fax/Telephone Operation Buttons
Attaching the Handset
Setting Up the MultiPASS
16Getting Started
Installing the Paper Cassette
Open the cover on the paper cassette
18Getting Started
Handle
20Getting Started
Connecting the Telephone Line
Attaching the Parallel Cable
Chapter Getting Started
22Getting Started
Attaching the Power Cord
Installing the Ink Cartridge
24Getting Started
Chapter Getting Started
26Getting Started
Cleaning the print head
Attaching the Document Supports
28Getting Started
Attaching the One-touch Speed Dialing Faceplate
30Getting Started
Testing the MultiPASS
Printing the Help List
Guidelines for Registering Information
Chapter Registering Information MultiPASS
2Registering Information in the MultiPASS
Using the Menu System
Entering a Number
4Registering Information in the MultiPASS
Entering a Name
# ! , `
6Registering Information in the MultiPASS
Personalizing Your MultiPASS
Identifying Your Documents
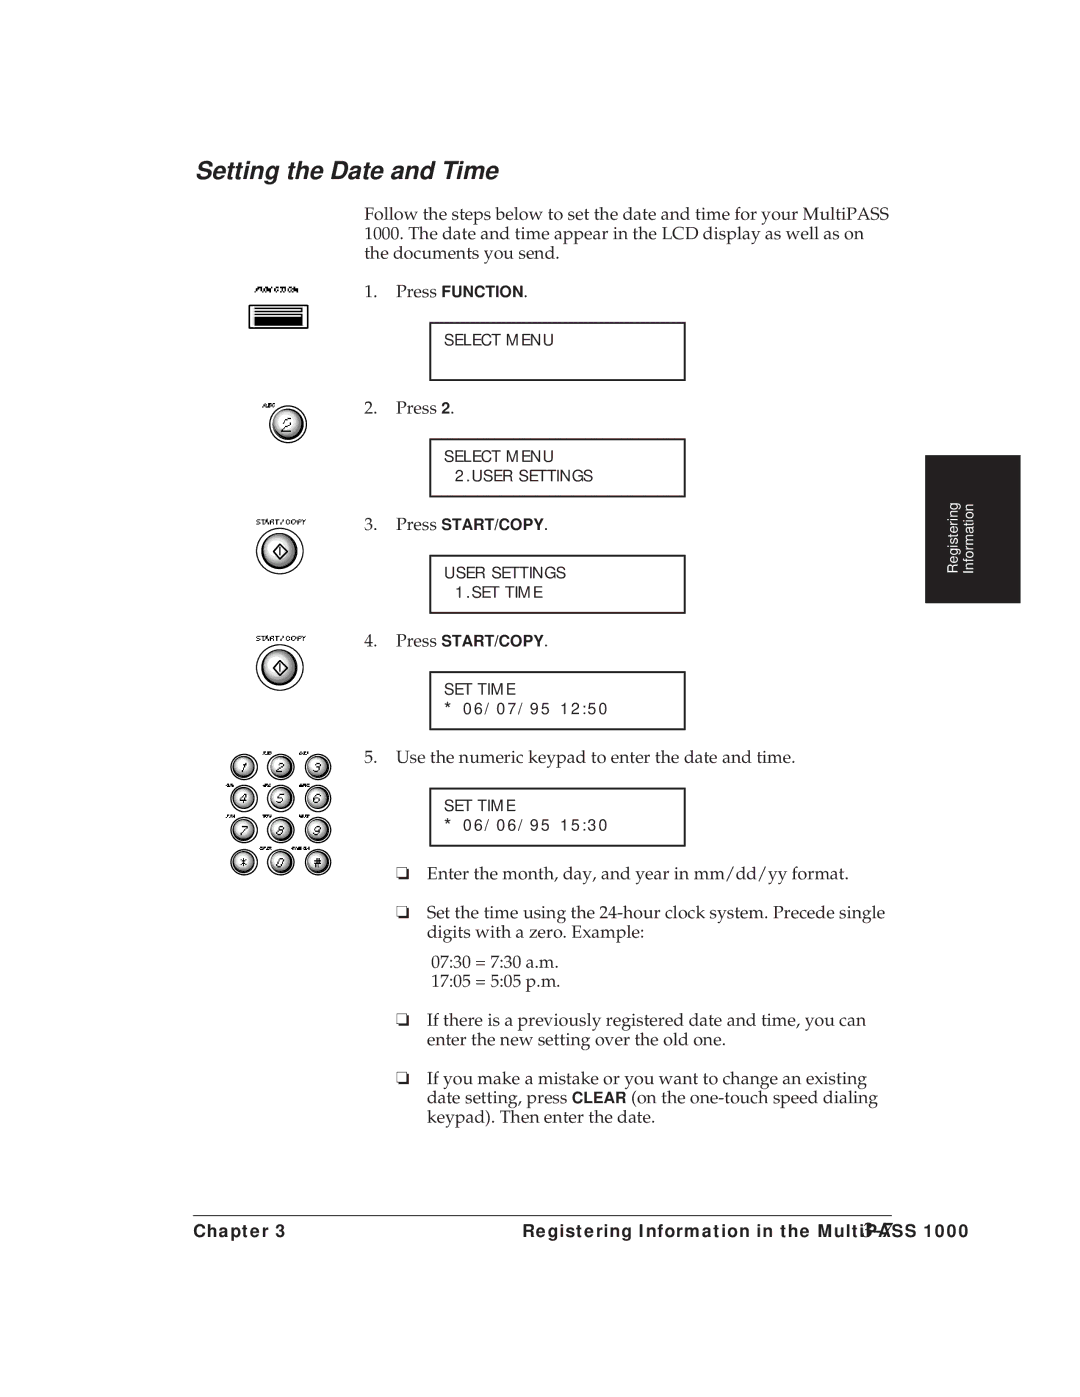
Setting the Date and Time
8Registering Information in the MultiPASS
Registering Your Fax Number
Press the arrow buttons until the following appears
Use the numeric keypad to enter your fax number
10Registering Information in the MultiPASS
Registering Your Name
Press To enter This key
12Registering Information in the MultiPASS
Customizing Your ID
Customizing the MultiPASS 1000 Operations
14Registering Information in the MultiPASS
Customizing the LCD Display
16Registering Information in the MultiPASS
Press the arrow buttons to select a setting. For example
Customizing MultiPASS 1000 Sounds
You’ll find the following items in the User Settings menu
18Registering Information in the MultiPASS
Preparing Documents
Chapter Preparing Documents Making Copies
2Preparing Documents and Making Copies
Feeding Documents
4Preparing Documents and Making Copies
Adding Pages While Sending
6Preparing Documents and Making Copies
Making Copies
If you want to stop copying, press Stop
8Preparing Documents and Making Copies
Receiving a Fax While Making a Copy
Adjusting the Paper Cassette for Legal-size Paper
10Preparing Documents and Making Copies
Chapter Preparing Documents and Making Copies
12Preparing Documents and Making Copies
Sending Fax Documents
2Sending Fax Documents
Sending a Document Using Regular Dialing
Press the arrow keys to change the density
4Sending Fax Documents
Sending a Document Directly
Press the arrow keys to change the density
6Sending Fax Documents
Sending a Document from Memory
Press Memory Transmission
8Sending Fax Documents
Sending Fax
10Sending Fax Documents
Sending Procedures
Customizing the Transmission Mode
Sending Large Documents
Transmitting the Document
12Sending Fax Documents
Selecting Document Settings
Type of Document
Press the arrow buttons until the following display appears
14Sending Fax Documents
Density Control
ECM Sending
Setting Up Special Transmission Procedures
16Sending Fax Documents
Changing the ECM sending option
Auto Redial
Changing the Auto Redial feature
18Sending Fax Documents
Customizing the Transmission Speed
20Sending Fax Documents
Registering Your Most Frequently Called Fax Numbers
Using One-touch Speed Dialing
2Using Automatic Dialing
Sending a Document Using One-touch Speed Dialing
Registering Your Most Frequently Called Telephone Numbers
4Using Automatic Dialing
Dialing number for which you want to register a telephone
Making a One-touch Speed Dialing Telephone Call
6Using Automatic Dialing
Registering Coded Speed Dialing Numbers
Using Coded Speed Dialing Numbers
8Using Automatic Dialing
Using Coded Speed Dialing for Telephone Numbers
Using Coded Speed Dialing for Fax Numbers
Registering Group Dialing Numbers
Using Group Dialing
10Using Automatic Dialing
Group Dial F01=1-TOUCH SPD Dial
12Using Automatic Dialing
Sending a Document Using Group Dialing
Changing a Group Dialing Number
14Using Automatic Dialing
Registering Expanded Dialing Numbers
Using Expanded Dialing
16Using Automatic Dialing
Sending a Document Using Expanded Dialing
Using Directory Dialing
18Using Automatic Dialing
Chapter Receiving Fax Documents
2Receiving Fax Documents
Setting Up the MultiPASS 1000 for Dedicated Receiving
Receiving Documents Over a Dedicated Fax Line
Receiving Documents Automatically Over a Dedicated Fax Line
4Receiving Fax Documents
Setting Up the MultiPASS 1000 for a Shared Line
Make sure both the ANS Hook UP and Manual lights are off
Press the arrow buttons to change the setting to on
6Receiving Fax Documents
LCD display Action
8Receiving Fax Documents
Receiving a PC Fax Document in Memory
Receiving Documents Manually
10Receiving Fax Documents
Press the arrow buttons until on appears
12Receiving Fax Documents
Receiving Documents Manually Using an Extension Telephone
Press the arrow buttons unti the following display appears
Remote RX OFF
14Receiving Fax Documents
Receiving a Document Manually Using Extension Telephone
Receiving Oversized Documents
Customized Receiving Operations
16Receiving Fax Documents
Press the arrow buttons to select the setting. For example
Setting Up Special Receiving Features
18Receiving Fax Documents
Incoming ring
RX Settings 3.INCOMING Ring
20Receiving Fax Documents
Customizing the FAX/TEL Switch Feature
Switch Action
22Receiving Fax Documents
Restricting Incoming Documents
Customizing the Receiving Speed
24Receiving Fax Documents
Making a Regular Dial Telephone Call
Using the Telephone
Making a One-touch Speed Dial Telephone Call
2Using the Telephone, an Answering Machine, and a Modem
Placing a Call on Hold
4Using the Telephone, an Answering Machine, and a Modem
Using an Answering Machine Connected to the MultiPASS
Connecting the Answering Machine
Turning on Automatic Receiving for Messages and Documents
6Using the Telephone, an Answering Machine, and a Modem
Press the arrow buttons until this display appears
8Using the Telephone, an Answering Machine, and a Modem
Connecting the Extension Telephone
Using an Extension Telephone Connected to the MultiPASS
Calling with the Extension Telephone
Using a Data Modem with the MultiPASS
Connecting the Data Modem
10Using the Telephone, an Answering Machine, and a Modem
Avoiding Conflict Between Fax and Data Communications
12Using the Telephone, an Answering Machine, and a Modem
Chapter Using Special Dialing
Changing Dialing Systems
Switching to Pulse Dialing
2Using Special Dialing
TEL Line Type Rotary Pulse
Dialing or Registering Long Distance Numbers
Using the Pause Button
Connecting Through a Switchboard
4Using Special Dialing
Changing the Length of the Pause Time
6Using Special Dialing
Setting the MultiPASS 1000 for DRP Use
RX Settings 10. Drpd
8Using Special Dialing
MultiPASS 1000 set for manual receiving Manual light on
10Using Special Dialing
Sending to More than One Location Broadcasting
Chapter Special Sending Procedures
10-2Special Sending Procedures
Sending Documents at a Preset Time
Transmitting the Document on page 5-11 for details
10-4Special Sending Procedures
Canceling Preset Sending
Sending Documents to a Relay Fax
10-6Special Sending Procedures
Sending Through a Relay Fax
Document Ready Relay
10-8Special Sending Procedures
You must set the transmission mode, so press to choose YES
10-10Special Sending Procedures
Using One-touch or Coded Relay Sending
Sending a Confidential Document
10-12Special Sending Procedures
Press the arrow buttons to display Confidential TX
10-14Special Sending Procedures
Using one-touch or coded confidential sending
Registering Your Polling ID
10-16Special Sending Procedures
Requesting Documents from Other Fax Machines Polling
System Settings 2.PASSWORD
Polling Other Fax Machines
10-18Special Sending Procedures
Allowing Others to Poll Your MultiPASS
Polling at a Preset Time
10-20Special Sending Procedures
Canceling Preset Polling
10-22Special Sending Procedures
Chapter Printing Fax Reports
11-2Printing Fax Reports
Printing a Fax Cover Sheet
Printing a Single Transaction Activity Report
Printing Activity Reports
11-4Printing Fax Reports
TX Confirmation REP Data Entry OK
11-6Printing Fax Reports
Printing an Activity Management Report
Activity Report
Printing Selective Activity Management Reports
11-8Printing Fax Reports
Press the arrow buttons to make your selection. For example
Receiving a Memory Clear Report
Receiving a Relay Broadcast Report
11-10Printing Fax Reports
Printing Lists of Registered Information
Printing Automatic Dialing Lists
Following sample shows a one-touch speed dialing list
Printing a User’s Data List
11-12Printing Fax Reports
Following sample shows the first page of a user’s data list
Customizing Reports and Lists
11-14Printing Fax Reports
Miscellaneous Printer Operations
Changing Printer Settings
12-2Miscellaneous Printer Operations
Printer Settings 4.PRINTING Density
12-4Miscellaneous Printer Operations
Maintaining the MultiPASS
Cleaning the MultiPASS
13-2Maintaining the MultiPASS
Cleaning the Scanner Components
Maintaining
13-4Maintaining the MultiPASS
Cleaning the Printer Area
13-6Maintaining the MultiPASS
Cleaning the Print Head
Starting Print Head Cleaning
Ink Cartridge Guidelines
13-8Maintaining the MultiPASS
Ink Cartridge Maintenance
Replacing the Ink Cartridge
13-10Maintaining the MultiPASS
Cartridge Slot Yellow Post
13-12Maintaining the MultiPASS
Canon U.S.A. Consumer Information Service
Chapter Troubleshooting
Removing Jammed Paper from the Cassette Area
14-2Troubleshooting
Clearing Paper Jams
Removing Jammed Paper from the Printer Area
Removing Jammed Paper from the Bottom of the MultiPASS
14-4Troubleshooting
Sending Problems
Problems and Solutions
14-6Troubleshooting
Receiving Problems
You cannot poll other units
Other Problems
14-8Troubleshooting
You cannot make a phone call using regular dialing
Alarm Light is Flashing but No Message Appears
Display Messages and Actions
Error Message Code Cause Action
14-10Troubleshooting
Printer cover is Close the cover Open
14-12Troubleshooting
# 022 The automatic one
14-14Troubleshooting
Transmission time
Scanning sheet size
Effective image size
Printing paper size
Applicable lines
Power source
Power consumption
Dimensions
Document Sizes
Data transmission
Interface Specifications
Interface type
Input circuit Output circuit
Signal voltage levels
Interface connectors
Interface cable
Pin assignments
No. Signal
Strobe
Auto Feed XT
Timing Chart
Timing chart in Epson LQ mode
Timing chart in BJ-10 mode
10Specifications Appendix a
Appendix B Menu System Summary
If YES Mode 1 choose one
Appendix B Menu System Summary B-3
4Menu System Summary Appendix B
Appendix B Menu System Summary B-5
6Menu System Summary Appendix B
Appendix B Menu System Summary B-7
8Menu System Summary Appendix B
Appendix B Menu System Summary B-9
10Menu System Summary Appendix B
Baud rate
Auto fax/tel switching
Activity report
Automatic dialing
Broadcasting
Ccitt #1 Chart
Bi-directional printing
Bps
Confidential sending
Default
Delayed transmission
Confidential mailbox number
Extension
FAX/TEL switching
Emulation
Expanded dialing
Interface
Group dialing
Group number
Ink detector
Manual redialing
Jacks
Manual dialing
Manual receiving
Polling ID
Noise
Pause
Polling
Registering
Reduction mode
Redialing-automatic
Redialing-manual
Rotary pulse
Resolution
Switchboard
Restricted reception
Unidirectional printing
Tone/pulse setting
Timed sending
Index
Message
Consumer Information Center
Feeder
Does not switch from fax to phone communication Double ring
Hanging up Hardware Help button 2-13 Help list
One-touch speed dialing Manual light 2-12, 4-8, 7-3
Memory sending 1-4, 5-6-9, 10-1, 10-7, 10-10 capacity 5-6
Print Error only setting
Pstn A-2
See also Document button Restricting, incoming
Routine maintenance
Print head cleaning
See also Sending Index
Volume Control option
Index