Edition July
User Guide English
Comments… Suggestions… Corrections…
Copyright and Trademarks
Certified documentation according to DIN EN ISO
Contents
Configuring and using the serial interface IRMC S2/S3
Contents
Menus of the AVR window
Structure of the user interface
System Event Log and Internal Event Log
Remote Storage
354
Appendix Ipmi OEM Commands supported by the iRMC S2/S3
Preface
Purpose and target groups of the manual
Service
Purpose and target groups of the manual
Other information
Functions of the iRMC S2/S3 overview
Power management
Functions of the iRMC S2/S3
Standard functions of the iRMC S2/S3
Functions of the iRMC S2/S3
LAN
DNS / Dhcp
Extended functionality of the iRMC S2/S3
CD ROM DVD ROM
Communication interfaces of the iRMC S2/S3
Communication interfaces of the iRMC S2/S3
IRMC S2/S3 provides the following communication interfaces
IRMC S2/S3 web interface web interface
Communication protocols used by the iRMC S2/S3
Communication protocols used by the iRMC S2/S3
Ipmi technical background
Ipmi technical background
Intelligent Platform Management
Objective
Ipmi and other management standards
Ipmi technical background Advantage
Page
Ipmi technical background
Ipmi technical background
IPMI-over-LAN
BMC and LAN controller
Serial Over LAN interface SOL
BMC and SOL
Channel concept under Ipmi
Dcmi Data Center Management Interface
Data Center Management Interface Dcmi User identifications
References
Changes compared with the previous version
Changes since the previous versions of the manual
Power Consumption Options iRMC S3 only
Changes compared with the previous version
ServerView Suite link collection
Access to the link collection
Documentation for the ServerView Suite
Documentation for ServerView Suite
Notational conventions
Notational conventions
VWarning
Notational conventions
Requirements
On the remote workstation
Your network
IRMC S2/S3 factory defaults
IRMC S2/S3 factory defaults
Default administrator ID
Default Dhcp name of the iRMC S2/S3
Logging into the iRMC S2/S3 web interface
Logging into the iRMC S2/S3 web interface
Page
Following tools are available for configuring the iRMC S2/S3
Configuring the LAN interface of the iRMC S2/S3
Configuring the LAN interface of the iRMC S2/S3
Prerequisites
Connected to the correct LAN port?
Access from a different subnet
Configuring the LAN interface Configuration tools
Configuring the LAN interface of the iRMC S2/S3
Set the value to Enabled
Configure the following settings
IRMC LAN Parameters Configuration Menu IRMC S2/S3
Testing the LAN interface
Test the connection to the iRMC S2/S3 with a ping command
You can test the LAN interface as follows
Configuring text console redirection via LAN
Settings in the Peripheral Configuration menu
Configuring text console redirection for the iRMC S2
Call the Peripheral Configuration menu
Accept the first value pair proposed
Specify the baud rate
Set the value to Serial
Set the value to On-board COM a
Console redirection is terminated after the Bios Post phase
Exiting the Bios / TrustedCore setup utility
Configuring text console redirection for the iRMC S3
Make the following settings
Set the value to iRMCS3
Make the following settings in the Console Redirection menu
Exiting the Uefi setup utility
Save your settings and exit the Uefi setup utility
Windows Server 2003
DOS
Settings required
Configuring text console redirection via LAN Linux
Settings may differ between program versions
Add the following line to the end of the file /etc/inittab
Configuring and using the serial interface of the iRMC S2/S3
Configuring the serial interface of the iRMC S2
Data bits Parity None Stop bits Flow Control
Configuring the serial interface using of the iRMC S3
Serial Port
Prerequisites
Using the Remote Manager Serial interface
On the managed server
Set the value to
Configuring the LAN settings
Configuring the LAN parameters
Configuring ports and network services
Configuring DHCP/DNS Dynamic DNS
Configuring text console redirection
Configuring alerting
Configuring alert forwarding over Snmp
Configuring email notification email alerting
User management for the iRMC S2/S3
Concept
User management concept for the iRMC S2/S3
Concept
User permissions
User permissions
Configure iRMC S2/S3 Settings
Configure User Accounts
Video Redirection Enabled
Remote Storage Enabled
Showing the list of configured users
Local user management using the iRMC S2/S3 web interface
Local user management for the iRMC S2/S3
Local user management for the iRMC S2/S3
Modifying the configuration of a user
Local user management via the Server Configuration Manager
Deleting users
Prerequisite
Public key authentication
SSHv2 public key authentication for iRMC S2/S3 users
Creating the public and private SSHv2 keys with PuTTYgen
Bild 21 PuTTYgen Creating a new key pair progress bar
Proceed as follows
Local user management for the iRMC S2/S3
IRMC S2/S3
Click Upload to load the public key onto the iRMC S2/S3
Bild 25 PuTTY Selecting and loading an SSH session
Bild 26 PuTTY Loading an SSH session
IPlease note
Local user management for the iRMC S2/S3
User
Example Public SSHv2 key
Public SSHv2 key in RFC4716 format
Public SSHv2 key in OpenSSH format
Advanced Video Redirection AVR
Requirements Check the AVR settings
Graphics mode settings on the managed server
Resolution Refresh rates Maximum Color depth Bits
Keyboard settings
Prerequisites Supported text mode
Using AVR
Using AVR
Parallel AVR sessions
Using a low bandwidth
Local monitor is on, but can be switched off
Local monitor is off, but can be switched on
Local Monitor Off function
Special key combinations
Redirecting the keyboard
Integrated special keys
Left Ctrl key corresponds to the Ctrl key on your keyboard
Virtual keyboard
Caps lock corresponds to the Caps Lock key on your keyboard
Using AVR Secure Keyboard
Redirecting the mouse
Synchronizing the mouse pointer
Using AVR
Proceed as follows Open a DOS prompt window
Click the OK button to save the settings
Proceed as follows to adjust the mouse pointer Choose
This opens the following window
Set the Pointer Speed to a medium value
Properties ... Troubleshooting Hardware acceleration
KDE
Mouse Control Center window IRMC S2/S3
You make permanent settings as follows for KDE
Set the following values in the Mouse Control Center window
Menus of the AVR window
Menus of the AVR window
101
You can select the following functions in the Extras menu
Extras menu
Virtual Keyboard window opens see on
Refreshes the display of the local monitor state
103
Refreshes the AVR window
Terminate another AVR session
List of current AVR sessions appears
Terminate your own AVR session 104
105
Remote Storage menu
Switches the server on
Power Control menu
107
Languages menu
Preferences menu
Default setting Absolute Mode 108
Bpp color depth 8 colors
Default No lower bandwidth
Bpp color depth 256 colors
109
Page
111
Remote Storage
IRMC S2/S3
Providing remote storage at the remote workstation
Providing remote storage at the remote workstation
113
This opens the AVR window Menu bar in the AVR window, choose
Starting Remote Storage
Storage Devices dialog box
115
Storage Devices dialog box
117
Provision of storage media for emote Storage
Add Storage Device dialog Selecting the storage medium
118
119
120
121
Connecting storage media as remote storage
122
123
Connection Type dialog Assignment to USB 1.1 and USB
Clearing Remote Storage connections
Click Disconnect to clear all Remote Storage connections
125
Storage Devices dialog Removing a Remote Storage medium
Removing the storage medium
Providing remote storage via a Remote Storage server
Booting from WinPE 2.x-based ISO images
Providing remote storage via a Remote Storage server
Remote Storage server is available for Windows systems
Installing the Remote Storage server
Executing the Remote Storage server as a service
Remote Storage server execution modes
129
Configuring, starting and exiting the Remote Storage server
Calling the Remote Storage server’s raphical user interface
130
131
Click the Apply button to activate your settings 132
133
Exiting the Remote Storage server
134
135
IRMC S2/S3 web interface
Logging into the iRMC S2/S3 web interface
137
User configuration details on
Required user permissions
Required user permissions
138
Set firmware selector
139
140
Open/edit the Email Alerting Open/edit the iRMC S2/S3 User
141
142
Structure of the user interface
Structure of the user interface
IRMC S2/S3 web interface is structured as follows
143
144
Navigation area
145
146
System Information Information on the server
147
System Overview General information on the server
Informs about the server’s CSS Customer Self Service LED
Informs about the server‘s Global Error LED
System Information Information on the server System Status
148
149
Asset Tag Configuration
Operating System Information
System Information lists information on the managed server
Current Overall Power Consumption
This option is not supported for all Primergy servers
151
152
153
System CPU Information
Selects all memory modules
Cancels your selection
Applies the selected action to the selected memory modules
154
Bios Backing up/restore Bios settings, flashing Bios
Bios Backing up/restore Bios settings, flashing Bios
Bios entry contains the links to the following pages
155
Edit Filename
157
Request Bios Parameter Backup
Apply
159
Bios Updating Bios via upload from file or via
Updating Bios Tftp download successfully finished
161
Bios Information
Bios Update Settings page Bios Update from File
File in which the Bios image is stored
163
Vcaution
IRMC S2/S3 Information, firmware and certificates
IRMC S2/S3 Information, firmware and certificates
IRMC S2/S3 entry contains the links to the following pages
164
165
IRMC S2/S3 Information Information on the iRMC S2/S3
166
Active Session Information
You can purchase the license key
Miscellaneous iRMC S2/S3 Options
167
Temperature Units
Save iRMC S2/S3 Firmware Settings Save firmware settings
Always save the setting using
169
Save iRMC S2/S3 firmware settings
Click Save to save the selected settings
Click Save All to save all the settings 170
171
IRMC S2/S3 Information, firmware and certificates
Certificate Upload IRMC S2/S3
173
174
175
Loading a CA certificate from a local file
177
You do this using the group
Entering the DSA/RSA certificate/private Dsarsa key directly
Generate a self-signed RSA Certificate IRMC S2/S3
179
Certificate Creation
No explicit reset of the iRMC S2/S3 is required 180
181
IRMC S2/S3 Firmware Update
Least recently updated firmware image is selected
Most recently updated firmware image is selected
Low firmware image is selected
High firmware image is selected
Low firmware image firmware image 1 is selected
Inactive firmware is automatically selected
High firmware image firmware image 2 is selected
183
Updates the runtime firmware
Updates the SDR record
IRMC S2/S3 Tftp Settings
185
Power Management
Power Management
186
Power On/Off power the server up/down
Power Status Summary
187
Power Management Boot Options
Power Management Boot Options
189
Power On/Off page, Restart server is powered up
Graceful Power Off Shutdown
191
Power Options Configuring power management for the server
Server is always powered up again after a power outage
Server always remains powered down after a power outage
193
Power Options page, Power On/Off Time IRMC S2/S3
194
Power Management Watt Technology Please note
195
ASR&R
Defines the beginning hhmm of the time interval 196
Power Options page, 0 Watt Technology Administration window
197
198
Power Supply Info
Power Consumption
Power Consumption
199
Power Consumption Configuration
Power Limit Options group is also displayed see 200
Power Consumption Power Consumption Options
Unit of electrical power used to display power consumption
201
Scheduled Power Consumption Configuration
203
Power Consumption Configuration page scheduled
Maximum power consumption in Watts 204
Power Limit Options
Shut down the system gracefully and power it down
No action is performed
205
206
Current Power Consumption Show the current power consumption
207
Power Consumption History Show server power consumption
Power History Options
Power Consumption Current Power Consumption
209
210
Power History Chart
Sensors Check status of the sensors
Sensors Check status of the sensors
Value range
Risk of loss of data integrity
Fans Check fans
Fans page provides information on fans and their status
212
Sensors Check status of the sensors Fan Test Test fans
Selects all fans
213
Sensors Check status of the sensors
215
Temperature Report the temperature of the server components
Selects all temperature sensors
217
Voltages Report voltage sensor information
218
Power Supply Check power supply
219
This functionality is not available with all servers
220
Component Status Check status of the server components
Status display for individual HDDs IRMC S2/S3
221
Sensors Check status of the sensors
System Event Log and Internal Event Log
System Event Log and Internal Event Log
223
224
System Event Log Content
225
System Event Log Content page, System Event Log Information
Show Resolutions
227
InternalEvent Log Content IRMC S2/S3
Clear Internal Event Log
229
230
Event Log Configuration
231
Event log is organized as a ring buffer
Helpdesk Information
Helpdesk Information
Server Management Information IRMC S2/S3
233
Retry counter 0 Max
Enables/disables the Bios recovery flash bit
Server Management Information page, Watchdog Options
235
Server management software triggers a system reset
Server Management Information HP SIM Integration Options
237
Network Settings Configure the LAN parameters
Network Settings Configure the LAN parameters
238
Network Interface IRMC S2/S3
239
MAC address of the iRMC S2/S3 is displayed here
Network Interface Settings
IPv4 address of the default gateway in the LAN
IPv4 configuration
Subnet mask of the iRMC S2/S3 in the LAN
241
This option is disabled by default
IPv6 configuration
Vlan Configuration
Max TCP Segment Lifetime
245
Ports and Network Services
246
Session Timeout
247
Ports for text-based access
Network Settings Configure the LAN parameters VNC ports
Click Apply to store the configured settings 248
Remote Storage Ports
249
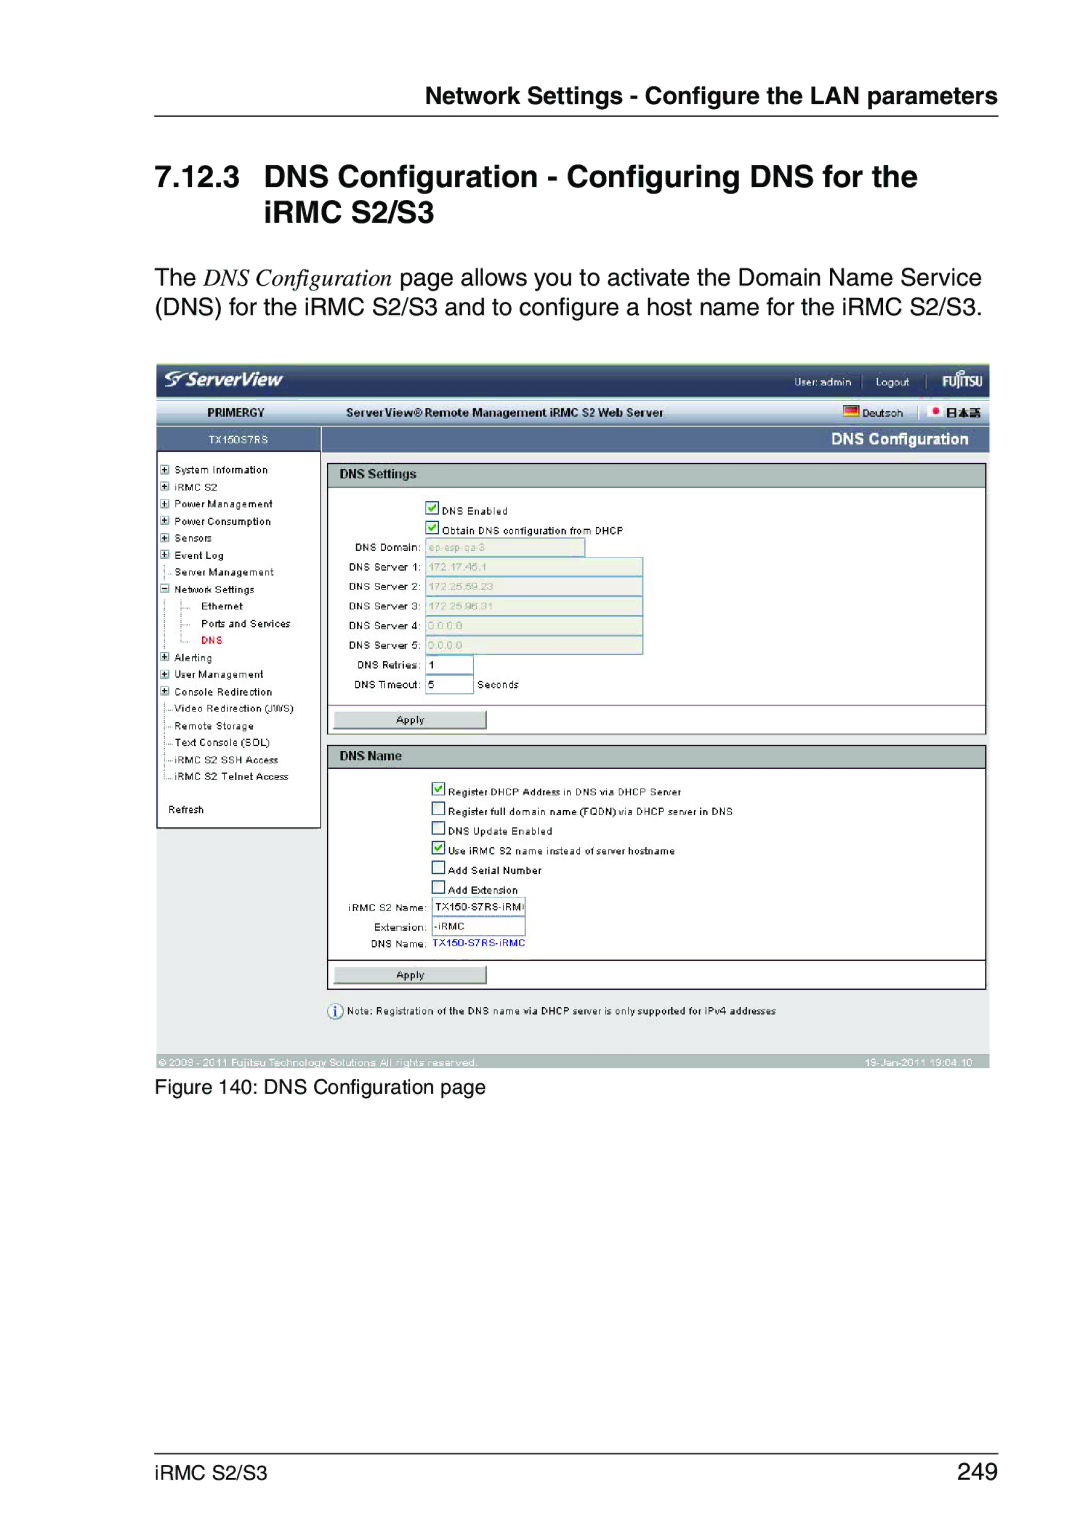
DNS Configuration Configuring DNS for the iRMC S2/S3
Network Settings Configure the LAN parameters DNS Settings
Enables/disables DNS for the iRMC S2/S3
Number of DNS retries
Network Settings Configure the LAN parameters DNS Name
Enables/disables update of DNS records via Dynamic DNS
251
Name extension for the iRMC S2/S3
Alerting Configure alerting
Alerting Configure alerting
253
Snmp Trap Alerting
Snmp Trap Alerting Configure Snmp trap alerting
Enables or disables serial / modem alerting
Serial / Modem Alerting Configure alerting via modem
This entry will depend on the type of connection you have
255
Enter the name of the mobile phone
Enter the name of the SMS server
DoCoMo
You can choose between 80 or 140 as the maximum length
257
Email Alerting Configure email alerting
Activate this option
Number of Smtp retries
Time in seconds between Smtp retries
User name for authentication on the mail server
No authentication for the connection
Password for authentication on the mail server
Smtp port of the mail server
Email Alerting page Secondary Smtp Server Configuration
261
Some entry fields are disabled depending on the mail format
Admin Name
IRMC S2/S3 User local user management on the iRMC S2/S3
User Management
User Management
263
Delete
265
You can see the configuration of a user with the name User3
266
User Management User name Configuration
Enter the user password
Disable this option to lock the user
Confirm the password by entering it again here
Enter a general description of the configured user here
Permission to configure local user access data
Assign a privilege group for a LAN channel to the user here
Permission to use the Remote Storage functionality 268
269
User SSHv2 public key upload from file
270
Following email formats are available
Errors sending email are recorded in the event log
Email address of recipient
271
Notification function is deactivated for this paging group
273
Ldap Enabled
275
IRMC S2/S3
Ldap port of the Backup Ldap server
IP address or DSN name of the Backup Ldap server
Secure Ldap port of the Backup Ldap server
Ldap directory server that is to be used
Complete DNS path name of the directory server
Base DN is automatically derived from Domain Name
User name the iRMC S2/S3 uses to log onto the Ldap server
279
Enables global email alerting
IRMC S2/S3
281
User Search Context
283
Repeat the password you entered under Ldap Auth Password
284
Enhanced User Login
285
286
Centralized Authentication Service CAS Configuration
287
User Management CAS Generic Configuration
Always Display Login
DNS name of the CAS service
Port of the CAS service Default port number
Login URL of the CAS service
Logout URL of the CAS service
Permission to configure local user access data 290
CAS User Privilege and Permissions
Assign a privilege group to the user here
291
Console Redirection Redirecting the console
Console Redirection Redirecting the console
Following pages are available for console redirection
292
293
Console Redirection Mode
Flow control is disabled
Following settings are possible
Flow control is handled by the software
Flow control is handled by the hardware
Start text console redirection via Serial over LAN SOL
295
296
Power management and text console redirection Login window
297
Console Redirection Redirecting the console
299
To close the connection to the console, click Leave Console
Windows Server 2003 SAC console
301
Console Redirection Redirecting the console
Advanced Video Redirection IRMC S2/S3
303
Takes a new video screenshot
View Screenshot
305
This function is not supported for all Primergy servers
306
No USB port will be disabled
307
Parallel AVR sessions
308
You start AVR under Video Redirection
309
AVR window full-control mode
AVR window with two active AVR sessions
311
AVR window when the server is powered down IRMC S2/S3
Remote Storage
Remote Storage
313
Remote Storage Connection Status
Remote Storage Server
Operating iRMC S2/S3 via Telnet / SSH Remote Manager
Operating iRMC S2/S3 via Telnet / SSH Remote Manager
Requirements on the managed server
315
Establishing an SSH connection to the iRMC S2/S3
316
SSH connection Logging in to the Remote Manager
317
Telnet connection Logging in to the Remote Manager
Remote Manager login window is displayed
319
Closing a Telnet / SSH connection
320
321
IRMC S2/S3 via Telnet/SSH Remote Manager
Requirements on the managed server
Operating Remote Manager
Operating Remote Manager
323
Overview of menus
Overview of menus
System Information
Enclosure Information
325
Service Processor
Logging
Logging
326
Remote Manager Main menu window without system information
327
Main menu of the Remote Manager
Main menu of the Remote Manager
S2/S3 e.g. update firmware or
Configure the iRMC S2/S3iRMC
Change the password
Start a command line shell
330
331
Change the password
Change the password
System Information Information on the managed server
System Information Information on the managed server
Sets a customer-specific asset tag for the managed server
333
Powers it up again after a configured period
Powers the server down completely and then
Graceful shutdown and power off
Agents are installed and signed onto
Remote Manager Enclosure Information menu IRMC S2/S3
335
Display information on the power supplies and their
Display information on the temperature sensors
Housing are open
Primergy diagnostic LED
Enclosure Information System Eventlog
Enclosure Information Internal Eventlog
Clear the contents of the internal event log
For details in the individual settings
Configure the IPv4 / IPv6 address settings
Display the IP settings
Switch the Primergy identification LED on/off
Console Redirection EMS/SAC Start text console redirection
Start a Command Line shell... Start a Smash CLP shell
Continuous mode
Show the console log in fast mode
Show and change the logging run state
For a more detailed description, see
Console Logging Console Logging Run State Menu
Command Line Protocol CLP
Command Line Protocol CLP
Smash CLP syntax
343
Command Line Protocol CLP
Hierarchy of the CLP commands
Command Line Protocol CLP User data in the CLP overview
An overview of the CLP command hierarchy is shown in on
345
346
347
Requirements
348
Configuring via Server Configuration Manager
349
Applying settings
Operations Manager Start window
350
351
Configuring via Server Configuration Manager
353
Firmware update
IRMC S2/S3 firmware overview
IRMC S2/S3 firmware overview
Active and passive firmware image
Structure of the iRMC S2/S3 Eeprom
355
IRMC S2/S3 firmware overview Firmware selector
Setting up the USB memory stick
Setting up the USB memory stick
Proceed as follows
Connect the USB memory stick to your computer
Setting up the USB memory stick
359
Updating firmware images
Update via the iRMC S2/S3 web interface
Updating firmware images
Downgrading the firmware to the previous version
361
Update using the ServerView Update Manager
When downgrading the firmware, please note
Online update using ServerView Update Manager Express or ASP
363
Update using the operating system flash tools
Updating firmware images Proceed as follows
Update via the lashDisk menu
Firmware downgrade is only possible via recovery flash
365
An iRMC S2/S3 warm start is performed
Readme file is opened
Emergency flash
Emergency flash
367
Flash tools
Flash tools
Syntax
Options
Emulation mode for debugging purposes only
Updates the bootloader firmware
Update the inactive firmware
Flashing operation
Flash tools Return values
371
Remote installation of the operating system via iRMC S2/S3
General procedure
373
Remote Storage connections
Connecting a storage medium as remote storage
375
Storage Devices dialog box ServerView Suite DVD
377
Booting from DVD
Choose Standard mode as the Installation Manager mode
379
Booting from DVD Starting local deployment
380
Installing the operating system
381
382
383
Installing Linux on the managed server after configuration
Installing the operating system
SCCI-compliant communication commands
Ipmi OEM Commands supported by the iRMC S2/S3
SCCI-compliant signaling commands
Overview
BIOS-specific command
F109 Get Bios Post State F115 Get CPU Info
IRMC S2/S3-specific commands
Ipmi OEM Commands supported by the iRMC S2/S3
Description of the Ipmi OEM commands
Description format
387
388
Power on Description Source
389
390
391
Time LSB first
02 06 System OS Shutdown Request and Reset
02 05 System OS Shutdown Request
393
This command checks whether the agent is active
02 09 Shutdown Request Cancelled
394
Attribute
395
396
397
This command returns the current firmware selector setting
398
399
BIOS-specific commands F1 09 Get Bios Post State
This command provides information whether Bios is in Post
400
401
Bit Watchdog active Agent connected Post State 402
Bit System on
Notifications
Ipmi OEM Commands supported by the iRMC S2/S3 Signaling
EEPROM# 00=EEPROM 1 01=EEPROM
404
CSS and Physical LED available
405
406
This command translates a given SEL entry into long text
407
408
F5 B1 Get Identify LED
409
State of Error LED
410
F5 E0 Reset ConfigSpace variables to default
411
Overview
IRMC S2/S3 configuration data
413
Cmdseq
415
Integer value
Transferring an encrypted password
Transferring a password as clear readable text
Transferring the string Hello World
416
417
Transferring the IPv4 address
IRMC S2/S3
419
Scripted configuration of the iRMC S2/S3
List of Scci commands supported by the iRMC S2/S3
420
421
422
USERNAME, Password
423
IRMCPWD standard command line options
Generating encrypted passwords with iRMCPWD.exe
Default in Batch mode iRMCpwd.pre
IRMCPWD command line output options
Creates the output file as a WinSCU Batch file Output File
425
426
Contents of the generated .pre file