About this manual
Thank you for purchasing this projector
Trademark acknowledgment
Typical Symbols
Projector
Thank you for purchasing this projector
Never use the projector if a problem should occur
Use special caution for children and pets
Do not insert liquids or foreign object
Never disassemble and modify
Be cautious of High temperatures of the projector
Never look through the lens or openings when the lamp is on
Be cautious of the power cord connection
Be sure to connect with ground wire
Be careful in handling the battery of the remote control
Be careful in handling the light source lamp
Avoid a high temperature environment
Be careful in moving the projector
Do not put anything on top of the projector
Avoid a smoky, humid or dusty place
Remove the power cord for complete separation
Do not give the remote control any physical impact
Take care of the cabinet and the remote control
Take care of the lens
About displaying characteristic
Turn the power on/off in right order
Connecting with notebook computer
About consumables
Lamp
FCC Statement Warning
For the Customers in Canada
Contents
Features
Checking the contents of package
Part names
Projector
HOT
Control panel STANDBY/ON button
18, 98
Buttons Focus +/- buttons
21, 57
Setting up
Arrangement
On next
Arrangement
Connecting with your devices
Setting up
VCR/DVD/Blu-ray Disc Player
Connecting with your devices
Microphone system
Monitor
USB storage Device
Computer Access point
Hdmi
Connecting to a power supply
Using the security bar and slot
Using the cable cover
Remote control
Installing the batteries
About the remote control signal
Remote control works with the projector’s remote
Changing the frequency of remote control signal
Using as a simple PC mouse & keyboard
USB Type B port
Power on/off
Turning on the power
STANDBY/ON button Power indicator
Turning off the power
Adjusting the volume
Selecting an input signal
Operating
Temporarily muting the sound
Selecting an input signal
Press the MY Source / DOC. Camera button on
Searching an input signal
€ For a computer signal
€ For an Hdmitm signal
Selecting an aspect ratio
Adjusting the projectors elevator
Adjusting the zoom and focus
Zoom button
Zoom + button
Using the automatic adjustment feature
Press Auto button on the remote control
€ For a video signal and s-video signal
€ For a component video signal
Adjusting the position
Correcting the keystone distortions
Position button
Keystone button
Using the magnify feature
Times Æ 2 times Æ 3 times Æ 4 times Æ 1 time
Magnify ON/OFF button
Temporarily freezing the screen
Temporarily blanking the screen
Freeze button
Blank button
Using the menu function
ESC button Reset button
Advanced Menu
Enter button
Using the menu function
Indication in OSD On Screen Display
Description
Aspect
Zoom
Keystone
Picture Mode
ECO Mode
Reset
Mirror
Picture menu
Brightness
Contrast
Gamma
High Ù 1 Custom Ù 2 MID Ù
Custom
Color Temp
Color
Sharpness
Active Iris
For a computer signal
For an Hdmitm signal
Image menu
Position
USB Type B or Hdmi port
Automatically set to the default
Adjusted
Input menu
Progressive
Video NR
Video Format
Hdmi Format
Hdmi Range
Auto Ù Sync on G OFF
Computer
Frame Lock
On Ù OFF
Resolution
Setup menu
Shift
TOP Ù MID Ù Bottom
No Input is Detected Sync is OUT of Range Invalid Scan Freq
Perfect FIT
Bright Ù Normal
Normal Ù Hinvert Ù Vinvert Ù H&VINVERT
Normal Ù Saving
Volume
Audio menu
Speaker
Audio Source
MIC Volume
Hdmi Audio
MIC Level
High Ù LOW
Screen menu
English Ù Français Ù Deutsch Ù Español
Capturing error has occurred. Please try again
MyScreen
MyScreen registration is finished
MyScreen Lock
Message
Source Name
Template
Description Closed Caption
Display
Mode
Channel
Direct Power
Option menu
Auto Power
OFF
Mouse Ù USB Display
USB Type B
Cancel Ö OK
Lamp Time
Description
MY Button
Service
FAN Speed
Ghost
Filter Message
KEY Lock
Lens Door Lock
Lens Door Open
Lens Door Close
Remote Freq
1NORMAL Ù 2HIGH
Control port
Serial Settings
Communication Type
Baud Rate
Parity
Response Limit Time
Transmission Method
Factory Reset
Information
Setup
Network menu
Dhcp
Default
Setup Gateway
IP Address
Subnet
Projector Name
MY Image
AMX D.D
Quit
Presenter
Presentation
Section Switching
Multi PC
User Name
Guide
Password
Security menu
Enter to the Security menu
Security
Turning on the MyScreen Password
Turning off the MyScreen Password
MyScreen
PIN Lock
Turning on the PIN Lock
Turning off the PIN Lock
If you have forgotten your PIN code
Transition Detector
Turning on the Transition Detector
Turning off the Transition Detector
MY Text Password
Turning on the MY Text Password
Turning off the MY Text Password
MY Text
Writing
Presentation tools
PC-LESS Presentation
Supported storage media
Supported format
Thumbnail mode
PC-LESS Presentation
Setup menu for the selected image
Operating by buttons or keys
Down
Enter Input
Operating by the menu on the Thumbnail screen
PC-LESS Presentation
Full Screen Mode
Slideshow mode
Returns to the thumbnail mode
Select the Slideshow mode
Play the Slideshow
Set the beginning number
Playlist
Example of playlist.txt files
USB Display
Hardware and software requirement for computer
Please check and get the latest version at Hitachi Web site
USB Port USB cable 1 piece
Right-Click menu
USB Display
Keep PC resolution
Optimize Performance
Transmission speed
Image quality
Maintenance
Replacing the lamp
Type number DT01181
Replacing the lamp
Lamp warning
Replacing the lamp
Replaced even if the bulb is not broken
Screws could result in damage or injury
Cleaning and replacing the air filter
Type number UX37191 Filter set
Cleaning and replacing the air lter
Replacing the internal clock battery
Hitachi MAXELL, part number CR2032 or CR2032H
Caring for the mirror and lens
Caring for the cabinet and remote control
Other care
Inside of the projector
Troubleshooting
There is no input signal
An improper signal is input
Related messages
Internal temperature is rising
Related messages
Button operation is not available
Regarding the indicator lamps
Regarding the indicator lamps
Resetting all settings
Signal cables are not correctly connected
Volume is adjusted to an extremely low level
Audio SOURCE/SPEAKER setting is not correct
Mode selected for Hdmi Audio is not suitable
Color settings are not correctly adjusted
Color Space setting is not suitable
Projector is operating in Eco mode
Frame Lock function cannot work on the current Input signal
Saving function is working
Network Bridge function is turned off
Is working properly
Forced to shut down
Specications
End User License Agreement for the Projector Software
Thank you for purchasing this product
Trademark acknowledgment
Connection to the Network
Network Presentation
Troubleshooting Warranty and after-sales service
Web Control
My Image Function Messeger Function Network Bridge Function
Other Functions
Connection to the Network
System requirements
Required equipment preparation
CD-ROM drive
System requirements
Installing the LiveViewer
Installing the LiveViewer
Installing the LiveViewer
Updating the LiveViewer
Process to connect the network
Process overview
Process to connect the network
Starting the LiveViewer
Selecting the network connection mode
Selecting either the wireless LAN or wired LAN
Selecting the network connection mode
Selecting My Connection
Selecting the network connection mode
Selecting the network connection method
Enter PassCode
Proceed to item 1.5.1 Passcode connection Configure Manually
Select From List
Selecting the network connection method
Passcode connection
Getting the Passcode
Method
Selecting the network connection method
Entering the Passcode
Selecting the network connection method
Selecting the network connection method
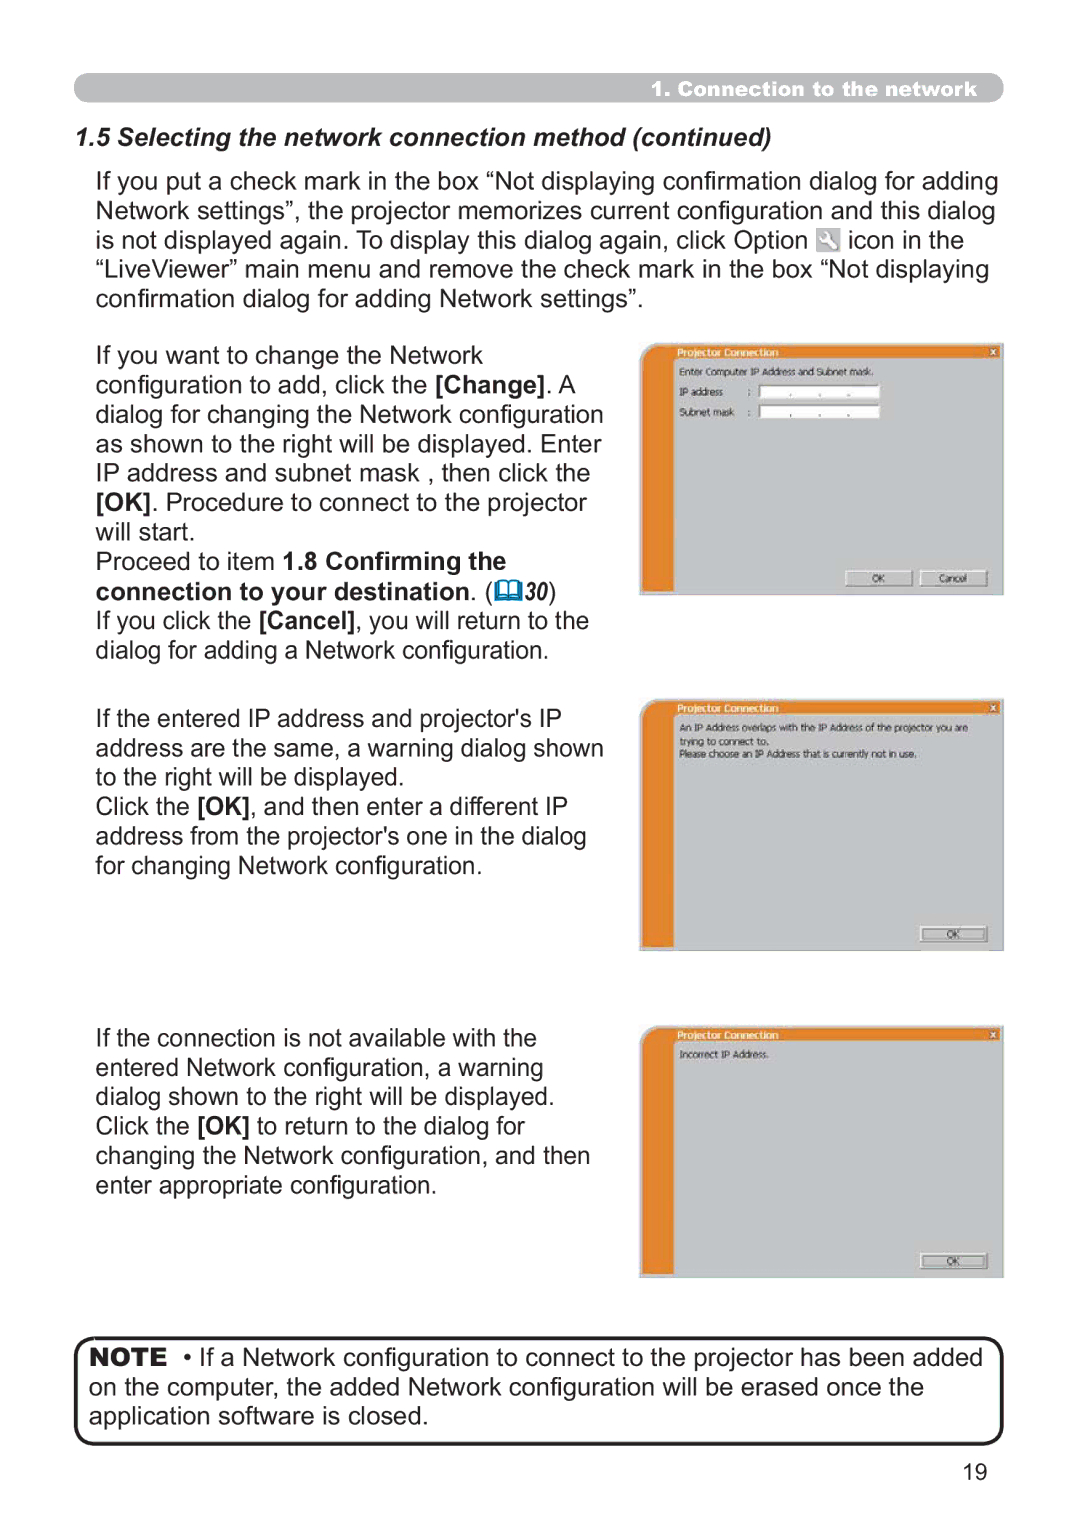
Confirming the connection to your Destination
To item 1.5 Selecting the network connection method
Wireless LAN
Configuring manually
Wired LAN
Network settings manually 1 Profile connection
Manual configuration
Manual conguration
History connection
Configuring the network settings manually
Select the Configure NetZork Settings Manually
If you use the wired LAN, go to
Conguring the network settings manually
Troubleshooting
Conguring the network settings manually
Confirming the connection to your Destination
Confirming the connection to your destination
Connection and transmission
Conrming the connection to your destination
Connection error
Profile data
Outline of Profile data
Making Profile data
Prole data
Editing Profile data
Registering My Connection
Click the My Connection
Prole data
Using the LiveViewer
Network Presentation
Using the LiveViewer
Indicator Indicator shows the following status
Indicator Status
Displaying the status
Status Status icon
Switching the display mode
Option menu
$ Presenter Mode
Display User Name
Display mode
Starting the Network Presentation
Presenter mode
Starting the Network Presentation
Web Control
Logon
User name Password
Logon
Projector Name Displays the projector name settings
Displays the Dhcp conguration settings
Network Information
Network Settings
Displays and congures network settings
Dhcp on
Dhcp OFF
Port Settings
Displays and congures communication port settings
Port Settings
Click the Apply button to save the settings
Mail Settings
Displays and congures e-mail addressing settings
Send Test Mail
Alert Settings
Displays and congures failure & alert settings
Alert Settings
Alert Items are shown below
Schedule Settings
Displays and congures schedule settings
Schedule Settings
Schedule settings are shown below
Schedule Settings
Date/Time Settings
Displays and congures the date and time settings
Date/Time Settings
Time difference
Sntp
Sntp Server Address
Security Settings
Snmp
Projector Control
Projector Control
Setup Zoom
Auto ECO Mode
Standby Mode
Shift H
Audio Volume
LAN
USB Type a
Screen Language
Direct Power on
Auto Power OFF
Option Auto Search
MY BUTTON-1
Service
Remote Control
Menu
Enter
Slideshow
Projector Status
Displays and congures the current projector status
Network Restart
Restarts the projector’s network connection
Description Restart
My Image Function
Operating Guide
My Image Function
Messenger Function
Messenger Function
Connecting devices
Network Bridge Function
LAN port
Communication setup
Communication port
Condition
Baud Rate
Transmission method
HALF-DUPLEX
Transmission method
FULL-DUPLEX
Mail Settings
Other Functions
Mail Alerts
Mail Alerts
Projector Management using Snmp
Snmp Settings
Event Scheduling
Schedule Settings
Event Scheduling
Date/Time Settings
Command Control via the Network
Following two ports are assigned for the command control
Communication Port
Command Control via the Network
Command Format
Reply Error code
Header Data length RS-232Ccommand Check Sum Connection
TCP #9715
Reply Data format
Authentication
Automatic Connection Break
Problem Likely Cause Things to Check
Troubleshooting
Problem Likely Cause Things to Check Reference Number
User’s Manual Operating Guide
Warranty and after-sales service
Example of computer signal
Vesa Text
Vesa
Initial set signals
Connection to the ports
Computer IN1, B Computer IN2, C Monitor OUT
Video
Audio IN1, H Audio IN2
RTS
CTS
TX+ RX+
To input component video signal to Computer in ports
Connection
RS-232C Communication
Communicaion settings
Type Setting code
Header code Packet Data size
CRC flag
Error reply 1Ch + 0000h
ACK reply 06h
NAK reply 15h
Data reply 1Dh + xxxxh
Command Control via the Network
LAN
Communicaion Port
Command control settings
Authentication
Automatic Connection Break
ACK reply 06h + ××h
××h connection ID
Network Bridge Communication
This projector is equipped with Network Bridge function
Communication settings
HALF-DUPLEX/FULL-DUPLEX
RS-232C Communication / Network command table
Names Operation Type Header Command Data
Gamma
Gain R
Offset B
Phase
Frame Lock
Perfect
ECO Mode
Volume Hdmi
Audio Source USB Type B Hdmi Video
Menu Position H
Display
MY BUTTON-1
Remote Freq
PJLink command
Erst ?
Lamp ?
Inst ?
Name ?
Contents
Entries and graphical symbols explanation
Important safety instruction
First of all
US and places where the FCC regulations are applicable
Regulatory notices
Canada
Contents of package
Mounted on the wall or ceiling Screen size
Connecting with your devices
This is not a failure or malfunction
Computer VCR/DVD/Blu-ray Disc player
Microphone
Connecting power supply
Combine parts as shown in gure Assemble the cable cover
Preparing for the remote control
Holding the hook part of the battery Cover, remove it
Turning on the power
Make sure that the power cord is rmly
STANDBY/ON button
Adjusting the projectors elevator
Displaying and switching the image
Operation
Input button Focus button Focus + button
Focusing
Adjusting the picture position
Adjusting the volume
Selecting an aspect ratio
Turning off the power
Replacing the lamp
High Voltage High Temperature
Cleaning and replacing the air filter
Come together with a replacement lamp for this projector
Replacing the internal clock battery
Caring for the mirror and lens
Using the CD manual
Macintosh
Display
Applications
Specifications
Specification
Troubleshooting Warranty and after-service
Userguides.htm
Son contenu est interdite sauf autorisation spéciale écrite
Hitachi Europe AB
Department
Hitachi Europe S.A.S., Digital Media Group
Hitachi Europe GmbH Hitachi Sales Malaysia Sdn. Bhd