INSTALLATION
Return to Section TOC
Return to Section TOC
Return to Section TOC
Return to Section TOC
Return to Master TOC
Return to Master TOC
Return to Master TOC
Return to Master TOC
When these parameters are identical, the pulsing fre- quency will be the same, helping to stabilize the arcs.
Every welding gun requires a separate shielding gas regulator for proper flow rate and shielding gas cover- age.
Do not attempt to supply shielding gas for two or more guns from only one regulator.
If an
ELECTRODE AND WORK CABLE CONNECTIONS
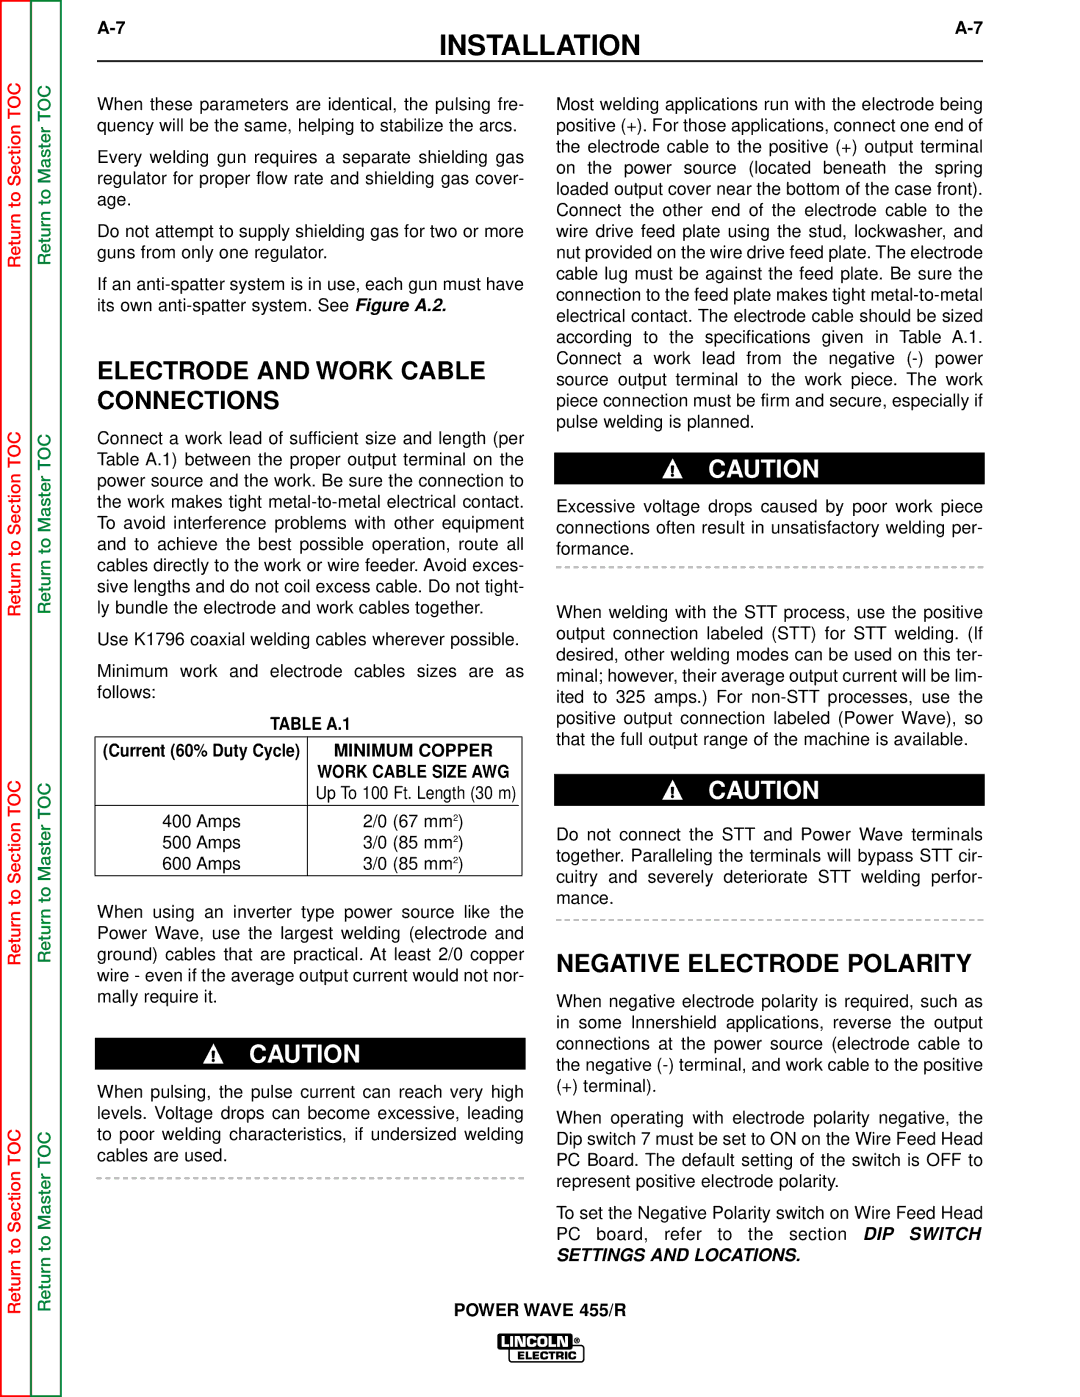
Connect a work lead of sufficient size and length (per Table A.1) between the proper output terminal on the power source and the work. Be sure the connection to the work makes tight
Use K1796 coaxial welding cables wherever possible.
Minimum work and electrode cables sizes are as follows:
TABLE A.1
(Current (60% Duty Cycle) | MINIMUM COPPER | |
| WORK CABLE SIZE AWG | |
| Up To 100 Ft. Length (30 m) | |
|
|
|
400 Amps | 2/0 (67 mm2) | |
500 Amps | 3/0 (85 mm2) | |
600 Amps | 3/0 (85 mm2) | |
When using an inverter type power source like the Power Wave, use the largest welding (electrode and ground) cables that are practical. At least 2/0 copper wire - even if the average output current would not nor- mally require it.
CAUTION
When pulsing, the pulse current can reach very high levels. Voltage drops can become excessive, leading to poor welding characteristics, if undersized welding cables are used.
Most welding applications run with the electrode being positive (+). For those applications, connect one end of the electrode cable to the positive (+) output terminal on the power source (located beneath the spring loaded output cover near the bottom of the case front). Connect the other end of the electrode cable to the wire drive feed plate using the stud, lockwasher, and nut provided on the wire drive feed plate. The electrode cable lug must be against the feed plate. Be sure the connection to the feed plate makes tight
CAUTION
Excessive voltage drops caused by poor work piece connections often result in unsatisfactory welding per- formance.
When welding with the STT process, use the positive output connection labeled (STT) for STT welding. (If desired, other welding modes can be used on this ter- minal; however, their average output current will be lim- ited to 325 amps.) For
CAUTION
Do not connect the STT and Power Wave terminals together. Paralleling the terminals will bypass STT cir- cuitry and severely deteriorate STT welding perfor- mance.
NEGATIVE ELECTRODE POLARITY
When negative electrode polarity is required, such as in some Innershield applications, reverse the output connections at the power source (electrode cable to the negative
(+) terminal).
When operating with electrode polarity negative, the Dip switch 7 must be set to ON on the Wire Feed Head PC Board. The default setting of the switch is OFF to represent positive electrode polarity.
To set the Negative Polarity switch on Wire Feed Head PC board, refer to the section DIP SWITCH
SETTINGS AND LOCATIONS.
POWER WAVE 455/R
