GUIDE TO COMPONENTS
19
~~ | ), |
rge |
|
‘h@h.8’hX14
,..11 .11 .17~n..,mm
E.KF% | mm | u |
|
|
|
| Id | “ |
| ||
J2. | II | 1 |
|
|
| IJlle | |||||
|
|
|
|
|
|
|
|
|
| u | |
17.8VI*1 |
| 178’h | c*&& |
|
| a ti*Ba |
|
| LMmmOlo | ||
|
|
|
|
| ..! | .0..1..2 |
|
| |||
|
| Full | Sm. |
| II | In | II | II |
|
| Pk.t.a |
|
|
|
|
| .2 | .4 |
| ||||
|
|
|
|
|
|
|
|
|
| ||
- | Full | SIZe |
|
| Image | Posltl.an |
| M“nl | COPY |
| |
| ID |
|
|
|
| = |
|
| |||
|
| J |
| [ml |
| Im 1 | ) |
|
| ||
|
|
|
|
|
|
| 1 |
|
|
|
|
|
|
|
|
|
|
| 1 |
|
|
|
|
|
| 15 |
|
|
| 1’6 |
|
| 17 | 18 | |
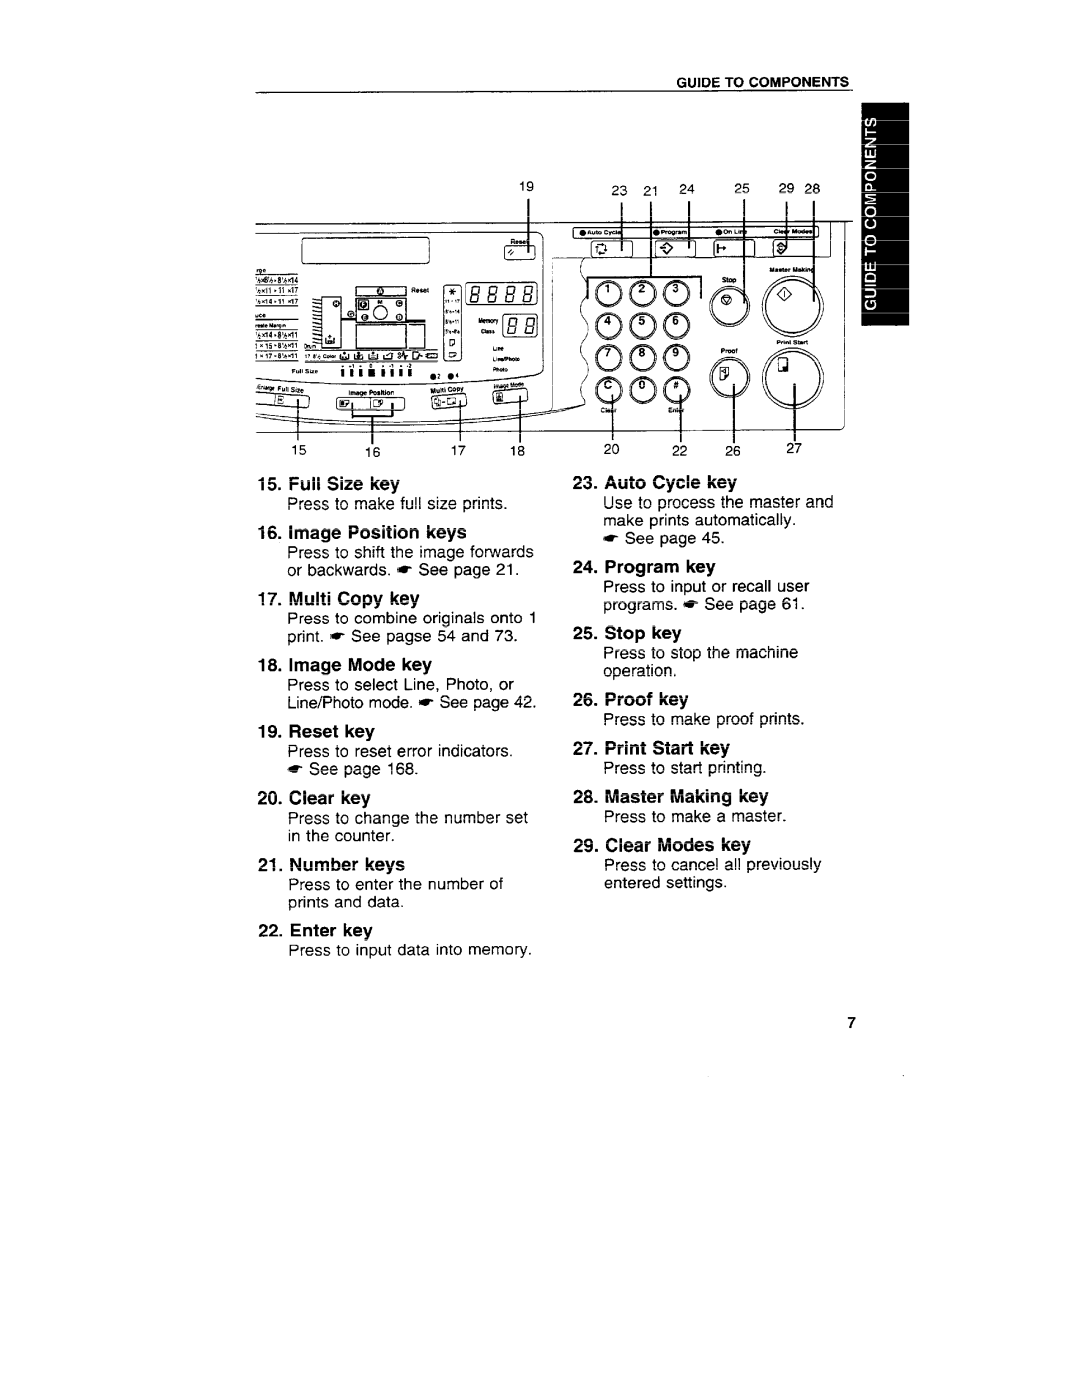
15.Full Size key
Press to make full size prints.
16.Image Position keys
Press to shift the image forwards or backwards. * See page 21.
17.Multi Copy key
Press to combine originals onto 1 print. * See pagse 54 and 73.
18.Image Mode key
Press to select Line, Photo, or Line/Photo mode. = See page 42.
19.Reset key
Press to reset error indicators. I* See page 168.
20.Clear key
Press to change the number set in the counter.
21.Number keys
Press to enter the number of prints and data.
22.Enter key
Press to input data into memory.
23 21 24 25 29 28
|
|
| ! |
|
● Aulo Cyc4e | ● Progr.. | ●On Lif+ |
| CM r- |
[ “;’‘) | ‘+ | ‘] ‘b | l[@’ | ] |
|
|
|
| Master MA |
Ooolfj |
|
|
| |
Cx5x3 |
|
|
|
Cx!x3 f)
co#
00QCIWr Ellt,
20 22 26 27
23.Auto Cycle key
Use to process the master and make prints automatically.
[- See page 45.
24.Program key
Press to input or recall user programs. * See page 61.
25.Stop key
Press to stop the machine operation.
26.Proof key
Press to make proof prints.
27.Print Start key Press to start printing.
28.Master Making key Press to make a master.
29.Clear Modes key
Press to cancel all previously entered settings.
7