"DV Driver (DV-Treiber)","Video Codec" und "DirectX 9.0" müssen installiert sein, damit DV Media Pro 1.0 ordnungsgemäß ausgeführt wird.
Die Software für die Videowiedergabe auf dem PC muss in der folgenden Reihenfolge installiert werden: DV Driver (DV-
Treiber) – DirectX 9.0 – Video Codec.
Die Software für die Web-Kamera muss in dieser Reihenfolge installiert werden: DV Driver (DV-Treiber) – DirectX 9.0 –
Video Codec.

INSTALLAZIONE DEL SOFTWARE (PROGRAMMA DV MEDIA PRO)

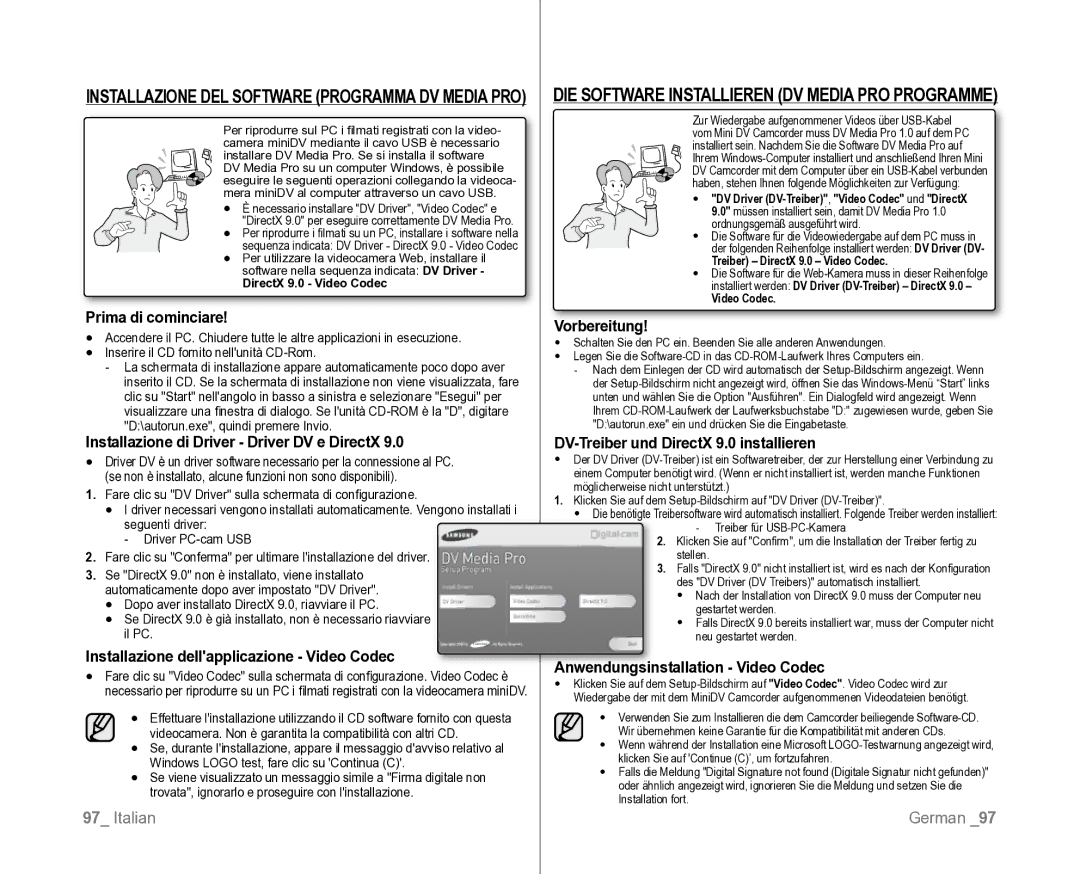
Per riprodurre sul PC i filmati registrati con la video- camera miniDV mediante il cavo USB è necessario installare DV Media Pro. Se si installa il software DV Media Pro su un computer Windows, è possibile eseguire le seguenti operazioni collegando la videoca- mera miniDV al computer attraverso un cavo USB.

È necessario installare "DV Driver", "Video Codec" e

"DirectX 9.0" per eseguire correttamente DV Media Pro.

Per riprodurre i filmati su un PC, installare i software nella

sequenza indicata: DV Driver - DirectX 9.0 - Video Codec

Per utilizzare la videocamera Web, installare il


software nella sequenza indicata: DV Driver -


DirectX 9.0 - Video Codec

Prima di cominciare!

Accendere il PC. Chiudere tutte le altre applicazioni in esecuzione.

Inserire il CD fornito nell'unità CD-Rom.

-La schermata di installazione appare automaticamente poco dopo aver inserito il CD. Se la schermata di installazione non viene visualizzata, fare clic su "Start" nell'angolo in basso a sinistra e selezionare "Esegui" per visualizzare una finestra di dialogo. Se l'unità CD-ROM è la "D", digitare

"D:\autorun.exe", quindi premere Invio.

Installazione di Driver - Driver DV e DirectX 9.0

Driver DV è un driver software necessario per la connessione al PC. (se non è installato, alcune funzioni non sono disponibili).

1.Fare clic su "DV Driver" sulla schermata di configurazione.

I driver necessari vengono installati automaticamente. Vengono installati i seguenti driver:

- Driver PC-cam USB

2.Fare clic su "Conferma" per ultimare l'installazione del driver.

3.Se "DirectX 9.0" non è installato, viene installato automaticamente dopo aver impostato "DV Driver".

Dopo aver installato DirectX 9.0, riavviare il PC.

Se DirectX 9.0 è già installato, non è necessario riavviare il PC.

Installazione dell'applicazione - Video Codec

Fare clic su "Video Codec" sulla schermata di configurazione. Video Codec è necessario per riprodurre su un PC i filmati registrati con la videocamera miniDV.

Effettuare l'installazione utilizzando il CD software fornito con questa videocamera. Non è garantita la compatibilità con altri CD.

Se, durante l'installazione, appare il messaggio d'avviso relativo al Windows LOGO test, fare clic su 'Continua (C)'.

Se viene visualizzato un messaggio simile a "Firma digitale non trovata", ignorarlo e proseguire con l'installazione.

DIE SOFTWARE INSTALLIEREN (DV MEDIA PRO PROGRAMME)

Zur Wiedergabe aufgenommener Videos über USB-Kabel vom Mini DV Camcorder muss DV Media Pro 1.0 auf dem PC installiert sein. Nachdem Sie die Software DV Media Pro auf Ihrem Windows-Computer installiert und anschließend Ihren Mini DV Camcorder mit dem Computer über ein USB-Kabel verbunden haben, stehen Ihnen folgende Möglichkeiten zur Verfügung:

Vorbereitung!

Schalten Sie den PC ein. Beenden Sie alle anderen Anwendungen.

Legen Sie die Software-CD in das CD-ROM-Laufwerk Ihres Computers ein.

-Nach dem Einlegen der CD wird automatisch der Setup-Bildschirm angezeigt. Wenn der Setup-Bildschirm nicht angezeigt wird, öffnen Sie das Windows-Menü “Start” links unten und wählen Sie die Option "Ausführen". Ein Dialogfeld wird angezeigt. Wenn Ihrem CD-ROM-Laufwerk der Laufwerksbuchstabe "D:" zugewiesen wurde, geben Sie "D:\autorun.exe" ein und drücken Sie die Eingabetaste.

DV-Treiber und DirectX 9.0 installieren

Der DV Driver (DV-Treiber) ist ein Softwaretreiber, der zur Herstellung einer Verbindung zu einem Computer benötigt wird. (Wenn er nicht installiert ist, werden manche Funktionen möglicherweise nicht unterstützt.)

1.Klicken Sie auf dem Setup-Bildschirm auf "DV Driver (DV-Treiber)".

Die benötigte Treibersoftware wird automatisch installiert. Folgende Treiber werden installiert: - Treiber für USB-PC-Kamera

2.Klicken Sie auf "Confirm", um die Installation der Treiber fertig zu stellen.

3.Falls "DirectX 9.0" nicht installiert ist, wird es nach der Konfiguration des "DV Driver (DV Treibers)" automatisch installiert.

Nach der Installation von DirectX 9.0 muss der Computer neu gestartet werden.

Falls DirectX 9.0 bereits installiert war, muss der Computer nicht neu gestartet werden.

Anwendungsinstallation - Video Codec

Klicken Sie auf dem Setup-Bildschirm auf "Video Codec". Video Codec wird zur Wiedergabe der mit dem MiniDV Camcorder aufgenommenen Videodateien benötigt.

Verwenden Sie zum Installieren die dem Camcorder beiliegende Software-CD. Wir übernehmen keine Garantie für die Kompatibilität mit anderen CDs.

Wenn während der Installation eine Microsoft LOGO-Testwarnung angezeigt wird, klicken Sie auf 'Continue (C)’, um fortzufahren.

Falls die Meldung "Digital Signature not found (Digitale Signatur nicht gefunden)" oder ähnlich angezeigt wird, ignorieren Sie die Meldung und setzen Sie die Installation fort.

97_ Italian

German _97

Page 101
Image 101
Samsung VP-D382H/XEF, VP-D381/XEF manual Prima di cominciare, Installazione di Driver Driver DV e DirectX, Vorbereitung

VP-D382H/XEF, VP-D381/XEF specifications

The Samsung VP-D381/XEF and VP-D382H/XEF are compact camcorders that deliver quality recording features and user-friendly operation, making them suitable for both beginners and experienced videographers. These models, part of Samsung's esteemed range of digital camcorders, emphasize functionality, portability, and enhanced video quality.

One of the salient features of the VP-D381/XEF and VP-D382H/XEF is their high-resolution recording capabilities. With a powerful 800x digital zoom and a 34x optical zoom, these camcorders allow users to capture clear and vivid images from a distance. The optical zoom feature ensures that the details of distant subjects are preserved, making these devices ideal for outdoor events and wildlife recording.

Both models are equipped with a 1/6-inch CCD sensor, which helps in achieving better image quality, particularly in varying lighting conditions. The camcorders also include digital image stabilization technology, which minimizes motion blur and delivers smoother video output. This is particularly beneficial for capturing fast-moving subjects or when filming while in motion.

Another noteworthy aspect is the user-friendly interface, which includes a rotating LCD screen that allows flexible shooting angles. The 2.7-inch LCD display provides an adequate viewing experience, letting users compose and playback their shots with ease. Additionally, the intuitive menu navigation ensures that even novice users can quickly adapt to the device.

For audio, the VP-D381/XEF and VP-D382H/XEF incorporate built-in stereo microphones that capture sound clearly, significantly enhancing the overall video quality. The camcorders also feature various shooting modes and scene selections, allowing for creative flexibility in different environments, from bright daylight to dimly lit indoor settings.

In terms of connectivity, both models boast a range of options, including USB ports for easy file transfer to computers and compatible devices. SD card slots provide expandable storage, allowing users to shoot longer without worrying about running out of space.

Ultimately, the Samsung VP-D381/XEF and VP-D382H/XEF are excellent camcorders that blend portability, advanced features, and ease of use. Their combination of high-quality video capture, user-friendly design, and enhanced audio capabilities make them suitable for recording cherished moments, creating content, or simply exploring the world of videography. Whether looking to document family gatherings, travel adventures, or personal projects, these Samsung camcorders are reliable companions.