43
Make sure that the 3 porous pads are fit securely.
Insert the foot-parts into the holes of "Paper Guide, Front".
Then, put them under the rib and check if it is securely fit.
Do not damage "Porous Pad, Paper Guide, Front, Support".
Do not apply too much adhesive when using some. Do not contaminate "Porous Pad, Paper Guide, Front, Support" with the adhesive.
Install "Porous Pad, Paper Guide, Front" immediately after applying the adhesive.
Reinstalling "Porous Pad, Paper Guide, Front, Support"
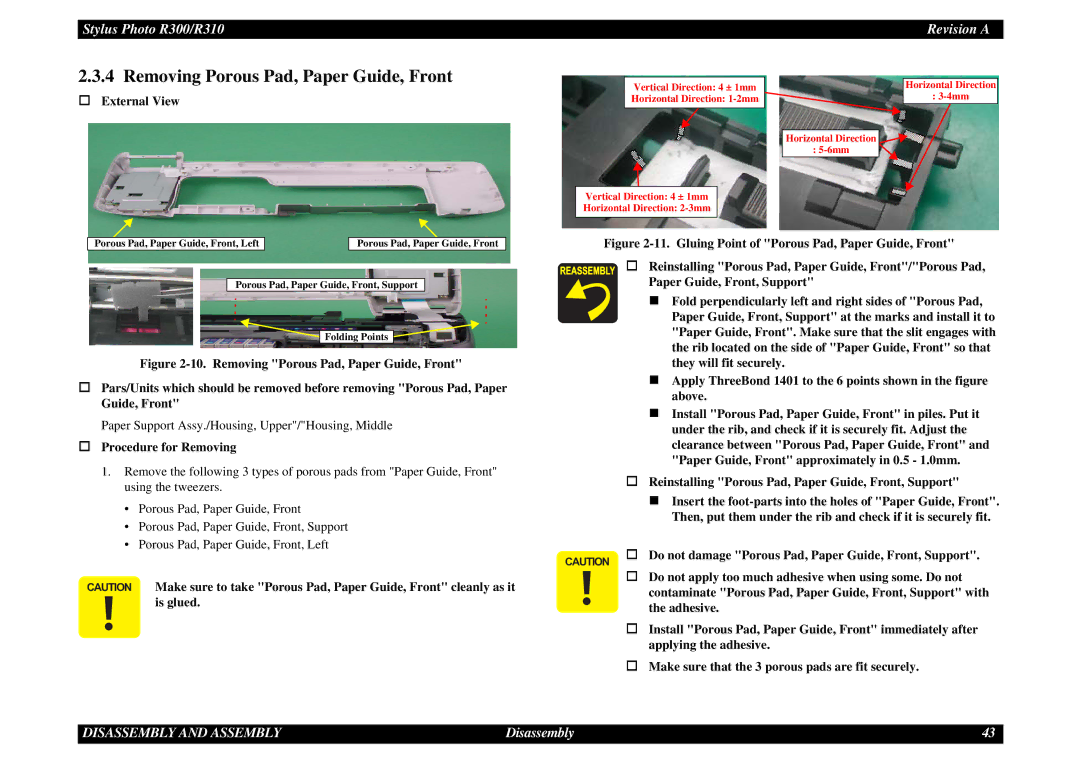
Horizontal Direction : 5-6mm
Vertical Direction: 4 ± 1mm
Horizontal Direction: 2-3mm
Figure 2-11. Gluing Point of "Porous Pad, Paper Guide, Front"
Reinstalling "Porous Pad, Paper Guide, Front"/"Porous Pad,
Paper Guide, Front, Support"
Fold perpendicularly left and right sides of "Porous Pad,
Paper Guide, Front, Support" at the marks and install it to "Paper Guide, Front". Make sure that the slit engages with the rib located on the side of "Paper Guide, Front" so that they will fit securely.
Apply ThreeBond 1401 to the 6 points shown in the figure above.
Install "Porous Pad, Paper Guide, Front" in piles. Put it under the rib, and check if it is securely fit. Adjust the clearance between "Porous Pad, Paper Guide, Front" and "Paper Guide, Front" approximately in 0.5 - 1.0mm.
Revision A
Horizontal Direction
: 3-4mm
Stylus Photo R300/R310
2.3.4 Removing Porous Pad, Paper Guide, Front
External View
Vertical Direction: 4 ± 1mm
Horizontal Direction: 1-2mm
Porous Pad, Paper Guide, Front, Left
Porous Pad, Paper Guide, Front
Porous Pad, Paper Guide, Front, Support
![]() Folding Points
Folding Points ![]()
![]()
Figure 2-10. Removing "Porous Pad, Paper Guide, Front"
Pars/Units which should be removed before removing "Porous Pad, Paper Guide, Front"
Paper Support Assy./Housing, Upper"/"Housing, Middle
Procedure for Removing
1.Remove the following 3 types of porous pads from "Paper Guide, Front" using the tweezers.
•Porous Pad, Paper Guide, Front
•Porous Pad, Paper Guide, Front, Support
•Porous Pad, Paper Guide, Front, Left
CAUTION
CAUTION Make sure to take "Porous Pad, Paper Guide, Front" cleanly as it is glued.
DISASSEMBLY AND ASSEMBLY | Disassembly |