EPSON Stylus Photo R300/R310 | Revision A |
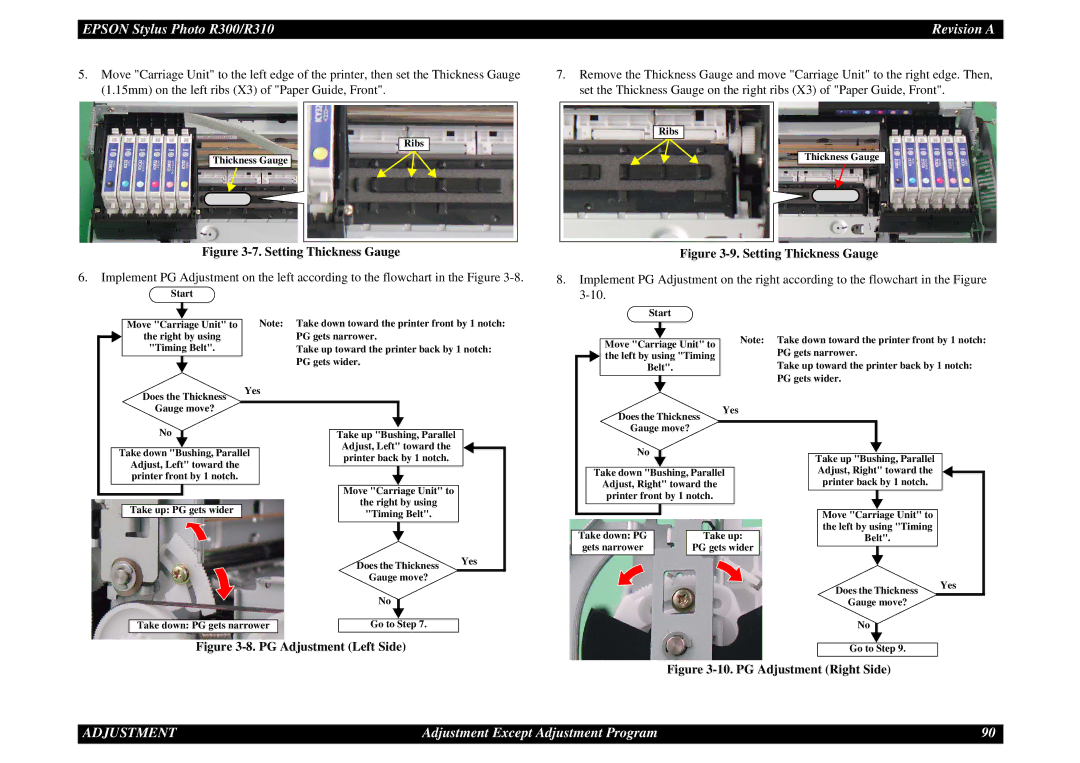
5.Move "Carriage Unit" to the left edge of the printer, then set the Thickness Gauge (1.15mm) on the left ribs (X3) of "Paper Guide, Front".
Ribs
Thickness Gauge
Figure 3-7. Setting Thickness Gauge
6.Implement PG Adjustment on the left according to the flowchart in the Figure
Start |
|
|
| |||
|
|
|
| Note: Take down toward the printer front by 1 notch: | ||
| ||||||
Move "Carriage Unit" to | ||||||
the right by using | PG gets narrower. | |||||
"Timing Belt". | Take up toward the printer back by 1 notch: | |||||
|
|
|
| PG gets wider. | ||
|
|
|
| |||
Does the Thickness | Yes | |||||
|
|
| ||||
Gauge move? |
|
|
|
| ||
7.Remove the Thickness Gauge and move "Carriage Unit" to the right edge. Then, set the Thickness Gauge on the right ribs (X3) of "Paper Guide, Front".
Ribs
Thickness Gauge
Figure 3-9. Setting Thickness Gauge
8.Implement PG Adjustment on the right according to the flowchart in the Figure
Start |
|
| |||
|
|
| Note: | Take down toward the printer front by 1 notch: | |
|
|
| |||
Move "Carriage Unit" to | |||||
| PG gets narrower. | ||||
the left by using "Timing |
| ||||
Belt". |
| Take up toward the printer back by 1 notch: | |||
|
|
| Yes | PG gets wider. | |
|
|
| |||
Does the Thickness |
| ||||
|
| ||||
No
Take up "Bushing, Parallel |
Adjust, Left" toward the |
Gauge move? |
Take down "Bushing, Parallel Adjust, Left" toward the printer front by 1 notch.
Take up: PG gets wider
| printer back by 1 notch. |
|
| ||
|
|
|
|
|
|
|
|
|
| ||
| Move "Carriage Unit" to |
|
| ||
| the right by using |
|
| ||
| "Timing Belt". |
|
| ||
|
|
|
| Yes | |
| Does the Thickness | ||||
| Gauge move? |
|
| ||
No
Take down "Bushing, Parallel Adjust, Right" toward the printer front by 1 notch.
Take down: PG |
| Take up: |
gets narrower |
| PG gets wider |
Take up "Bushing, Parallel |
|
Adjust, Right" toward the |
|
printer back by 1 notch. |
|
Move "Carriage Unit" to |
|
the left by using "Timing |
|
Belt". |
|
Does the Thickness | Yes |
|
No
Take down: PG gets narrower | Go to Step 7. |
Figure 3-8. PG Adjustment (Left Side)
Gauge move? |
No |
Go to Step 9. |
Figure 3-10. PG Adjustment (Right Side)
ADJUSTMENT | Adjustment Except Adjustment Program | 90 |