EPSON Stylus Photo R300/R310 | Revision A |
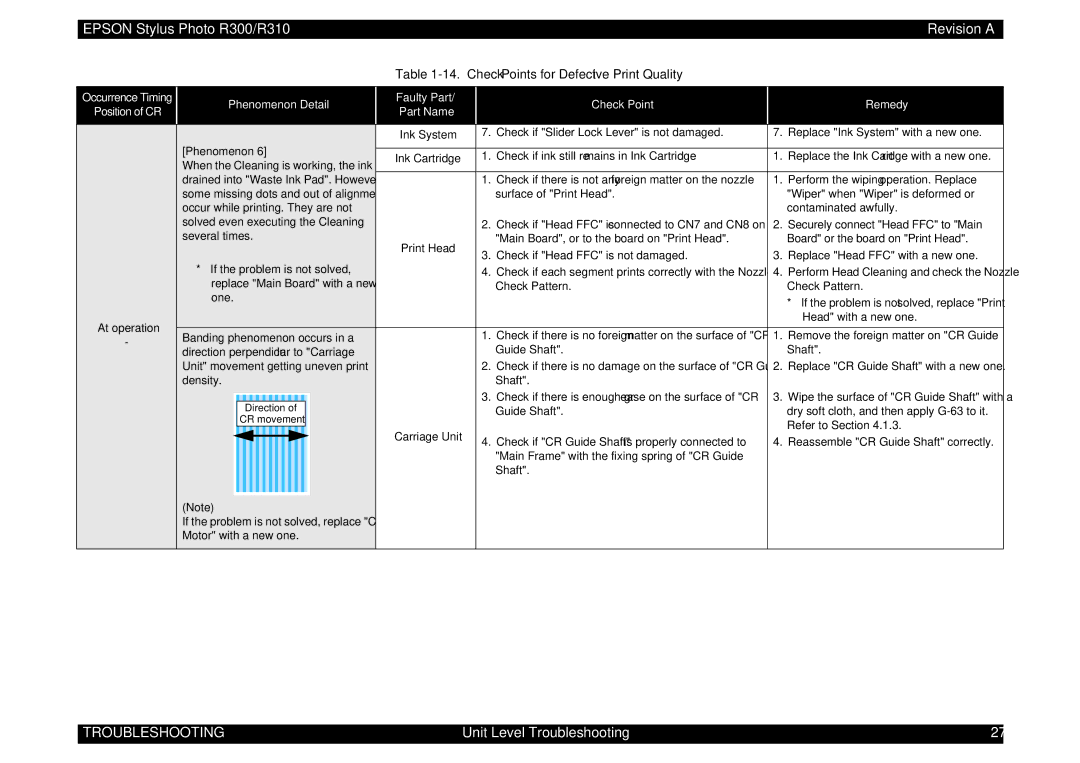
Table 1-14. Check Points for Defective Print Quality
Occurrence Timing
Position of CR
Phenomenon Detail
Faulty Part/
Part Name
Check Point
Remedy
At operation
-
Ink System | 7. Check if "Slider Lock Lever" is not damaged. | 7. Replace "Ink System" with a new one. |
[Phenomenon 6] | Ink Cartridge | 1. | Check if ink still remains in Ink Cartridge | 1. | Replace the Ink Cartridge with a new one. | |
When the Cleaning is working, the ink is | ||||||
|
|
|
|
| ||
drained into "Waste Ink Pad". However, |
| 1. | Check if there is not any foreign matter on the nozzle | 1. | Perform the wiping operation. Replace | |
some missing dots and out of alignment |
|
| surface of "Print Head". |
| "Wiper" when "Wiper" is deformed or | |
occur while printing. They are not |
|
|
|
| contaminated awfully. | |
solved even executing the Cleaning |
| 2. | Check if "Head FFC" is connected to CN7 and CN8 on | 2. | Securely connect "Head FFC" to "Main | |
several times. | Print Head |
| "Main Board", or to the board on "Print Head". |
| Board" or the board on "Print Head". | |
| 3. | Check if "Head FFC" is not damaged. | 3. | Replace "Head FFC" with a new one. | ||
* If the problem is not solved, |
| |||||
| 4. | Check if each segment prints correctly with the Nozzle | 4. | Perform Head Cleaning and check the Nozzle | ||
replace "Main Board" with a new |
|
| Check Pattern. |
| Check Pattern. | |
one. |
|
|
|
| * If the problem is not solved, replace "Print | |
|
|
|
|
| ||
|
|
|
|
| Head" with a new one. | |
Banding phenomenon occurs in a |
| 1. | Check if there is no foreign matter on the surface of "CR | 1. | Remove the foreign matter on "CR Guide | |
direction perpendicular to "Carriage |
|
| Guide Shaft". |
| Shaft". | |
Unit" movement getting uneven print |
| 2. | Check if there is no damage on the surface of "CR Guide | 2. | Replace "CR Guide Shaft" with a new one. | |
density. |
|
| Shaft". |
|
| |
Direction of |
| 3. | Check if there is enough grease on the surface of "CR | 3. | Wipe the surface of "CR Guide Shaft" with a | |
|
| Guide Shaft". |
| dry soft cloth, and then apply | ||
CR movement |
|
|
|
| Refer to Section 4.1.3. | |
| Carriage Unit |
|
|
| ||
| 4. | Check if "CR Guide Shaft" is properly connected to | 4. | Reassemble "CR Guide Shaft" correctly. | ||
|
| |||||
|
|
| "Main Frame" with the fixing spring of "CR Guide |
|
| |
|
|
| Shaft". |
|
| |
(Note) |
|
|
|
|
| |
If the problem is not solved, replace "CR |
|
|
|
|
| |
Motor" with a new one. |
|
|
|
|
|
TROUBLESHOOTING | Unit Level Troubleshooting | 27 |