Digital Video Camcorder
Contents Índice
Contents
Contents Índice
Contents Índice
Cámara Técnicas avanzadas
109
Camera Advanced Techniques
162
137
156
159
Precauciones sobre el cuidado de la videocámara
Precautions on Camcorder Care
Start Inicio
Inicio rápido
Quick Start
El monitor LCD está cerrado
Notas e instrucciones de seguridad
Notas referentes a la rotación de la pantalla LCD
Notas referentes a los Derechos DE Reproducción
Notas referentes a la condensación de humedad
Notas referentes a la videocámara
Notas referentes a la batería
Notas e instrucciones de seguridad
Direct sunlight can damage the LCD monitor
Notas referentes al objetivo
Notas referentes al visor electrónico
Notas referentes a la limpieza de los cabezales de vídeo
Reparaciones
Replacement Parts
Notas referentes a la empuñadura
Servicing
Características
Features
Getting to Know Your Device
Introducción sobre el dispositivo
Accesorios básicos
Basic Accessories
Display Button Botón de visualización
Front & Left View Vistas frontal y lateral izquierda
Rueda de navegación
Visualización múltiple
DC Power in Jack Multiple Display Viewfinder
Rear & Left View Vistas posterior y lateral izquierda
Rear & Right View Vistas posterior y lateral derecha
Shoulder Strap Hook
Battery Release Tripod Receptacle Tape Eject Slide Button
Rear & Bottom View Vistas posterior e inferior
Hand Strap Hook
Getting to Know Your Device
Remote Control Mando a distancia
OSD presentación en pantalla en Modos REC / Play
OSD in REC mode
OSD in Play mode
OSD On Screen Display in REC / Play Modes
Cámara
OSD in Camera mode
Getting to Know Your Device
OSD On Screen Display
Encendido / apagado de OSD presentación en pantalla
Turning the OSD On Screen Display On / Off
Camcorder Preparation
How to Use the Remote Control Uso del mando a distancia
Ajuste de la empuñadura
Adjusting the Hand Strap
Camcorder Preparation
Videocámara Preparación
Uso del adaptador de CA y el cable de CC
Connecting a Power Source
Using the AC Power Adapter and the DC Cable
Conexión a una fuente de alimentación
Cómo cargar la batería de iones de litio
Using the Lithium Ion Battery Pack
Charging the Lithium Ion Battery Pack
Utilización de la batería de iones de litio
Camcorder Preparation Videocámara Preparación
Consejos para la identificación de la batería
Battery Level Display
Tips for Battery Identification
Indicador de carga de la batería
OFF
Setting the Power Switch
Selección del interruptor de encendido
5-Way Button
Using the 5-Way Button
Camcorder Preparation Videocámara Preparación
Uso del botón de 5 posiciones y el Dial de modo
Ajuste del monitor LCD
Adjusting the LCD Monitor
Ajuste del enfoque
Using the Viewfinder Uso del Visor
Adjusting the Focus
Play
Control del sonido del altavoz incorporado
Controlling the Sound from the Built-In Speaker
Menu SUB Menu
Using the Menu Uso del botón Menu
Below Según el modo actual
REC Mode
Ajuste del reloj
Setting the Clock
Camcorder Functions
Videocámara Funciones
Ajuste de fecha y hora
Setting the DATE/TIME
Pulse el botón Menu para salir del menú Notas
Setting the Wireless Remote Control Acceptance WL.REMOTE
OFF ENC Apag
Ajuste de Idioma de OSD
Setting the Beep Sound
Setting the OSD Language
Ajuste del sonido del pitido
Inicial
Camcorder Functions Videocámara Funciones
Viewing the Demonstration Visualización de la Demostración
Initial Inicial
Display Pantalla TV
Easyq
Using Easyq Mode Utilización del modo Easyq
Camcorder Functions
Enfoque manual / enfoque automático MF/AF
Auto Focusing
Manual Focusing
Manual Focus / Auto Focus MF/AF
Acercamiento y alejamiento de las imágenes
Zooming In and Out with the Digital Zoom
Acercamiento y alejamiento de imágenes con el Zoom Digital
Zooming In and Out
Inserting a Cassette
Camcorder Basic Recording
Inserting and Ejecting a Cassette
Introducción y expulsión de la cinta
Accidental Protección de una cinta
Videocámara Grabación básica
Protecting a Cassette
Save REC Protección de una cinta
Grabación de vídeo
Making Your First Recording
Primera grabación
Recording video
Búsqueda de grabación REC Search
Record Search REC Search
Camcorder Basic Recording Videocámara Grabación básica
Easyq
Camcorder Advanced Recording Videocámara Grabación avanzada
Modos de exposición automática programada Program AE
Programmed Automatic Exposure Modes Program AE
Videocámara Grabación avanzada
Setting the Program AE Ajuste de Program AE
Camcorder Advanced Recording
Interior Outdoor Exterior
White BAL
Auto Hold Indoor Outdoor
Auto Hold Retener Indoor
Ajuste del Zoom Digital para uso de la videocámara D. Zoom
Setting the Digital Zoom for Camcorder Use D. Zoom
Camera Cámara
Setting the Digital Image Stabiliser DIS
Ajuste del Estabilizador digital de la imagen DIS
Pulse el botón Menu Aparece el menú superior que incluye
BLK&WHT B&N
Applying Digital Special Effects to Your Recording DSE
Selecting a Digital Special Effect in Camcorder Mode
Selecting the Record Mode for Camcorder Use
Mode Modo Audio
Selecting the Audio Mode for Camcorder Use
Corte de ruido del viento Wind CUT Antiviento
Cutting Off Wind Noise Wind CUT
Uso de la modalidad de compensación de luz de fondo BLC
Using Backlight Compensation Mode BLC
Pulse el botón Slow Shutter
Setting the Slow Shutter Speed
Ajuste de velocidad del obturador lento
Incrementada sólo funcionan en la modalidad REC
Nite PIX
Camcorder Advanced Recording
Ajuste de la exposición y la velocidad del obturador
Setting the Shutter Speed and Exposure
Shutter Speed function works only in REC mode
New value of your adjustment is applied
Desaparición gradual de la imagen
Using the Fade In / Out Function
Uso de la función Fade In / Out Aparición y
DATE/TIME Fecha / hora
Quick Menu is only available in REC mode
Camcorder Advanced Recording Videocámara Grabación avanzada
DIS
DSE Efectos especiales digitales
DSE Digital Special Effects
Exposure Exposición
Shutter Obturador
Proporciona una forma rápida de acceder a los ajustes de
Fotografía directamente con el enfoque automático
Taking Photos
Toma de fotos
Various Recording Techniques Técnicas diversas de grabación
Reproducción de una cinta grabada
Camcorder Playback
Videocámara Reproducción
Playing Back a Recorded Tape
Diversas funciones en las modalidades de Play
Various Functions in Play modes
Avance de secuencia Reproducción secuencia a secuencia
X2 Playback Forward/Reverse
Frame Advance Frame by Frame Playback
Sound will only be heard during normal SP or LP playback
El indicador / parpadea en el monitor
Camcorder Playback
Searching Still Images Búsqueda de imágenes fijas
Utilizando stop-motion detener-movimiento
Grabación de sonido
Camcorder Playback Videocámara Reproducción
Dubbing an Additional Sound Track to Your Recording
Dubbing the Sound
Puede seleccionar reproducir la pista de audio
Playing Dubbed Sound Reproducción de sonido grabado
Ajuste de Memoria cero en la cinta Posición final
Setting the Zero Memory on the Tape Ending Position
Parar
Mirror ESPEJO.6
Las imágenes de PB Zoom no se pueden exportar a un PC
PB ZOOM- Zooming During Playback
PB Zoom Aplicación del Zoom durante la reproducción
PB Zoom images cannot be exported to a PC
Uso de la tarjeta de memoria
Using the Mode Dial
Using the Memory Card
Camera Preparation Cámara Preparación
Inserción de una tarjeta de memoria
Camera Preparation
Inserting a Memory Card
Ejecting a Memory Card
If OK is selected, message Please Wait
Formatting a Memory Card
Formato de una tarjeta de memoria
Número de imágenes almacenadas en la tarjeta de memoria
Number of Recordable Images/Length of Motion Clip
Still images that you recorded are saved Jpeg file format
Number of Images Stored on Memory Card
Numeración de las imágenes almacenadas
Camera Functions Cámara Funciones
Numbering Stored Pictures
Tiff Tiff Super Fine
Setting the Picture Quality
Camera Functions
Ajuste de la calidad de la imagen
Tamaño
Setting the Picture Size Ajuste del tamaño de la imagen
Camera Functions Cámara Funciones
Cámara
Language
Setting the Menu Language Ajuste del menú Language
Definir
Dark Bajo Normal Medio Bright Alto
Setting the LCD Brightness
Ajuste del brillo de la LCD
Dark Normal Bright
Derecha
Setting the Clock
Ajuste del reloj
Time Fecha Y Hora
Setting the Imprint Option Ajuste de la opción Imprint
Available options of OFF and on are
Menú Available Remote Control buttons in each mode
SET, then press the Down button
WL.REMOTE Remoto
Setting the Shutter Sound Ajuste del sonido del obturador
Setting the Beep Sound Ajuste del sonido del pitido
Mycam OFF
Setup
Cámara Funciones
124
106
101
Taking and Viewing Your First Photo
Taking Still Images Program Mode
Taking Still Images Easyq Mode
Camera Basic Picture Taking
Visualización de una sola fotografía
Viewing Still Images
Viewing a Single Still Image
Visualización de fotografías
Visualización de una presentación
Viewing a Slide Show
Display button once
Setting the Q.View Duration
Viewing a Still Image using the Quick Review
Q.View function works only for still images
Supresión de una imagen en Vista de imagen única
Deleting Recorded Pictures Supresión de imágenes grabadas
Viewing Multiple Images in Multiple Image View
Deleting One Image in Single Image View
Camera Basic Picture Taking Cámara Toma básica de imágenes
Self
Delayed Recording Self Timer
Timer
Disparo con retardo Temporizador
Size
Taking Motion Clips Mpeg Using the Camera
Preparation Setting the Resolution and Frame Rate
Toma de secuencias en movimiento Mpeg con la cámara
Película
Cine
Camera Cámara
PLAY/STILL
Stop
Vibration Warning
Setting the Focus
Camera Advanced Techniques
Ajuste del enfoque
Uso del flash incorporado
Using the Built-In Flash
Cámara Técnicas avanzadas
112 0.9 ft in Tele mode
Setting the Focus Modes
Auto Focus Mode
Manual Focus Mode
CLOSE-UP 1ER Plano
Continuous Auto Focus Mode
Camera Advanced Techniques Cámara Técnicas avanzadas
Macro Mode
Bloqueo de exposición automática AE Lock
Setting the Exposure
Ajuste de la exposición
Locking the Auto Exposure AE Lock
Puntual
Spot AE o Multi AE
PROGRAM, A, S
Medición
Fireworks BEACH&SNOW
Sunset Ocaso Close UP Dawn Amanecer Backlight LUZ Fond
Compensación de exposición manual
Manual Exposure Compensation
Setting the Aperture Ajuste de la apertura
Ajuste de velocidad del obturador
Setting the Shutter Speed
Ajuste del balance de blanco predefinido
Setting the White Balance
Setting the Preset White Balance
Ajuste del balance de blanco
122
Setting the ISO Sensitivity Ajuste de la sensibilidad ISO
Uso de Efectos especiales digitales
Using Digital Special Effects
Programa
Taking Multiple Images Using Auto Exposure Bracketing
From time to time, determining the best exposure
Photo
Taking Multiple Images using Continuous Shot
Toma de varias imágenes con el disparo continuo
Ajuste de nitidez
Setting the Sharpness
Uso del Zoom digital
Using the Digital Zoom
Proteger la calidad de imagen
Camera Advanced Techniques
Rotating a Stored Picture Giro de una imagen almacenada
Cambiar Tamaño
Resizing a Stored Picture
Cambio de tamaño de una imagen almacenada
Customizing Your Camera MySET Menu
Personalización de la cámara Menú MySET Miconfig
Carga de ajustes personalizados
Loading Your Customized Settings
Start Image IM. Inic
Personalización de la cámara Cambio de imagen de inicio
Customizing Your Camera Changing the Start-Up Image
MI Cámara
Zoom de la imagen
Camera Advanced Techniques Cámara Técnicas avanzadas
Zoom While Viewing Reproducción durante la visualización
Zooming the Picture
Cuando se desbloquea
Protecting Stored Pictures
Protección de imágenes almacenadas
Unlock the picture, then press OK button to set
Desbloq
Impresión de imágenes Uso de PictBridge
Printing Your Pictures Using the PictBridgeTM
Miscellaneous Information
Información diversa
Selecc
Selecting Images
Selección de imágenes
Para seleccionar imágenes, seleccione el menú Select Selecc
Customize
Printer Setup CONFIG. Impr
Customizing Print Options
LAYOUT, Paper TYPE, Print QUALITY, Date
Impresión de imágenes
Printing Images
Index
Aparece una lista con las opciones disponibles YES SÍ y no
Resetting PictBridge Settings
Para cancelar la impresión, pulse el botón Menu
Miscellaneous Information Información diversa
Configuración de Dpof estándar
Standard Dpof Setup
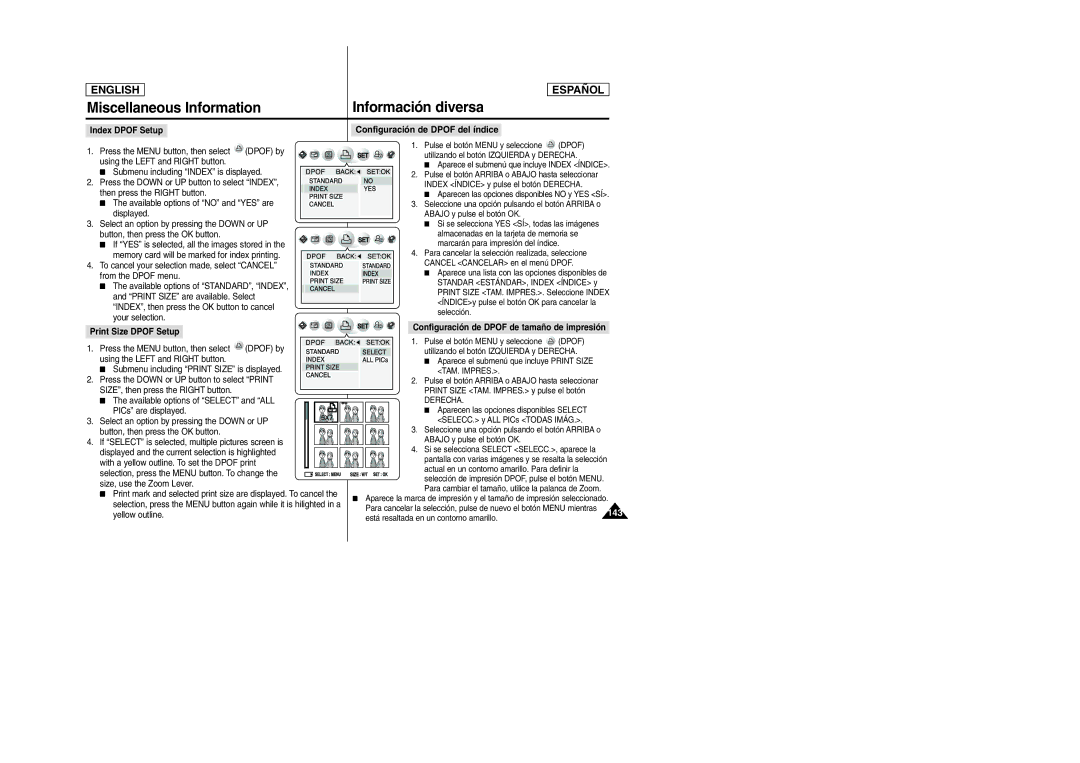
Configuración de Dpof del índice
Index Dpof Setup
Print Size Dpof Setup
Configuración de Dpof de tamaño de impresión
Impresión de imágenes marcadas Dpof
Printing Dpof Marked Images
To Play Back Recorded Video
Connecting to Other Devices TV and VCR
Conexión con otros dispositivos TV y aparato de vídeo
Para reproducir vídeo grabado
Stop
To Connect to a VCR that is Connected to Your TV Set
Para reproducir vídeo grabado
147
Video
Recording TV Programmes Using the Camcorder SCD6050 only
To Record a TV Programme
Para registrar una Cinta Vídeo
To Connect to a VCR
Para conectar un aparato de vídeo
To Record a Video Tape
150
PC System Requirements
Connecting to Other Devices PC
Connecting to a PC Using a DV i.Link, Ieee 1394 cable
Conexión con otros dispositivos PC
Not be affected
To connect your Camcorder to a PC Using DV cable
DV indicator appears on the LCD monitor
To Record Using a DV Connection
Para instalar el software suministrado
To Install the Provided Software
Requisitos de sistema del PC
USB Cable supplied
To Connect Your Camera to a PC Using USB cable
Connect the provided USB cable to your camera’s USB port
Interruptor de encendido en el Modo Cámara
To Disconnect USB Connection
To Copy Still Images Using a USB Connection
Card to a PC. Format the memory card periodically
Maintenance Mantenimiento
Cleaning and Maintaining the Camcorder
Limpieza y mantenimiento de la videocámara
Blue Screen
Maintenance
To Clean the Video Heads
Mantenimiento
Utilización de la videocámara en el extranjero
Using Your Camcorder Abroad
Pantalla de autodiagnósticos
Troubleshooting
Troubleshooting Solución de problemas
Self Diagnosis Display
Solución de problemas
Troubleshooting
161
Especificaciones técnicas
Specifications
Specifications
Especificaciones técnicas
163
Índice alfabético
Index
Índice alfabético
Página Web en Internet de Samsung Electronics
Samsung Electronics’ Internet Home