Zebra ZXP Series Card Printer User’s Manual
Trademarks
Copyright Notice
Product Disposal
Contents
Printer Settings and Adjustments
Introduction
Description
Printer Components
Laminator Components
Following figure shows components of the Laminator
Controls, Connectors, and Indicators
USB
Icons
Zebra Supplies
Zebra ZXP Series 8 Card Printer User’s Manual
Installation and Setup
General Information
Unpacking the Printer
Printer without a Laminator
Installation and Setup
Printer with a Laminator
Installation and Setup
Input Hopper
Installing the Card Hoppers
Output Hopper
Loading Cards
Opening the Printer Door
Installing the Cleaning Cartridge
Peel the protective wrapper from the Adhesive Roller
Peel the protective wrapper from the Cleaning Roller
Installing the Cleaning Roller
Step Close the Printer’s Door
Loading the Transfer Film
Installation and Setup Loading the Transfer Film
Loading a Print Ribbon
Installation and Setup Loading a Print Ribbon
Loading the Laminate
Opening the Laminator Door
Removing the Laminate Cassettes
Installation and Setup
Loading the Laminate Cassettes
Installation and Setup
5 mm
Installing the Laminate Cassettes
Installation and Setup Loading the Laminate
Laminating Contact Smart Cards
Installation and Setup Loading the Laminate
Using Partial-Width Laminate
Back F Card
Collar
Connecting Power
Do not Switch the Printer on
USB Connection
Connecting the Printer to your Computer
Step
Ethernet Connection
Installing the USB Printer Driver
Installing the Windows Printer Driver
From the Main Menu, click Install Zebra Printer Driver
Installing the Windows Printer Driver
Installation and Setup Installing the Windows Printer Driver
This will bring up the Choose Destination Location window
Installation and Setup Installing the Windows Printer Driver
Installation and Setup
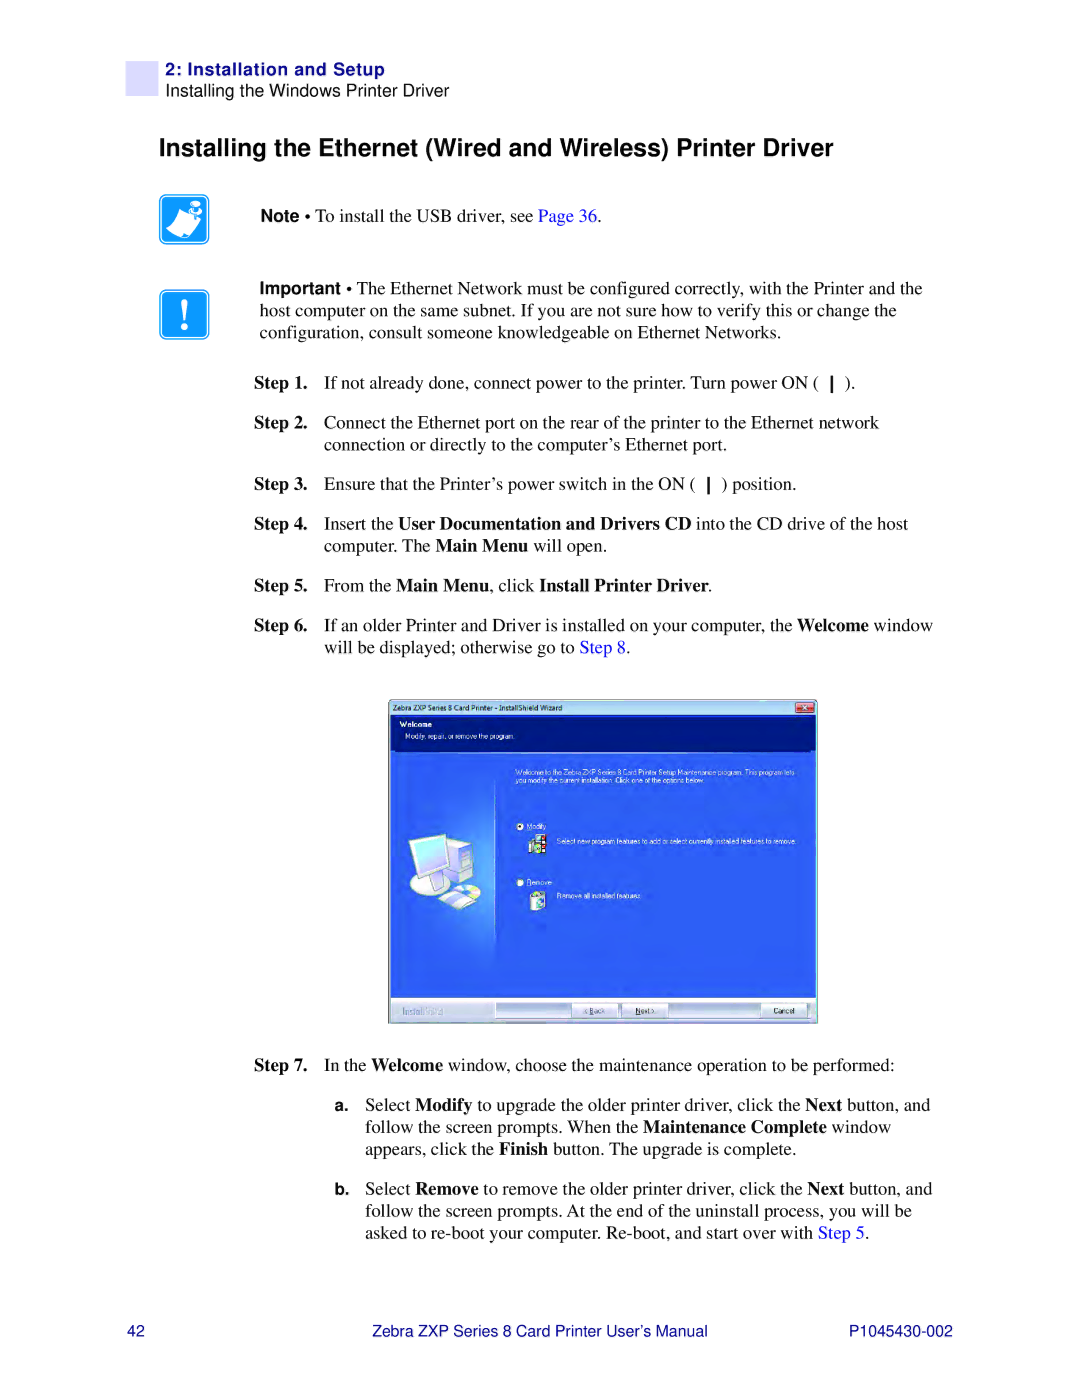
Installing the Ethernet Wired and Wireless Printer Driver
From the Main Menu, click Install Printer Driver
Installation and Setup
Installation and Setup Installing the Windows Printer Driver
Installation and Setup
This will bring up the Choose Destination Location window
Installation and Setup
Zebra ZXP Series 8 Card Printer User’s Manual
Operation
Introduction
Card Type Selection
Printing a Test Card
Manual Card Feed
Manual Card Feed
Operator Control Panel OCP
Messages
Operational
Message Description
Error Messages
Printer will still operate
Printer Menu Information
Info Menu
Main Menu
Print Test Cards Menu
Network Settings Menu
Advanced Settings Menu
See Clean Printer Menu on
Clean Printer Menu
Return
Wireless Settings Menu
Link/Activity Indicator Green
Ethernet Indicators -- Detail
Speed Indicator Orange
Printer Settings Adjustments
Printer Properties Printing Preferences
Printer Properties
General Tab
Sharing Tab
Ports Tab
Advanced Tab
Color Management Tab
Devices Tab All Profiles Tab Advanced Tab
Devices Tab
All Profiles Tab
Advanced Tab
Security Tab
Device Information Tab
Media Info
Printing Preferences
Card source
Card Setup Tab
Card Destination
Testing Service at
Ribbon info and options
Black Panel Options Uv Panel Option Inhibit Option
Black Panel Options
Zebra Technologies
Apply black extraction on
Black extraction from color images Print black with K panel
Area manager
Reasons and Behavior for Black Panel Extraction
Printer Settings and Adjustments
Select the Uv type
Uv Panel Option
Uv printing options
Printer Settings and Adjustments
Disable Uv
Uv image area extraction
Security ID
Inhibit Option
Select the inhibit panel area
To create a bitmap-based inhibit panel area
Paint menu, select Properties
Encoding Tab
Black Panel K Optimization Tab
Color Image
Dither error diffusion default
Monochrome Conversion
Dither 6x6 halftoning and Dither 8x8 halftoning
Summary
Send as grayscale
Color YMC Optimization Tab
About Tab
ZXP Series Toolbox
ZXP Series Toolbox Access
Information
Printer
Printer Sensors
Media
Laminator
Wired Network
Network Configuration
Wireless Network
Configuration
Job Log
ZXP Series Toolbox Configuration
Save/Restore
Check Firmware Updates Not implemented
Firmware and Settings
Firmware and Lookup Tables
Lookup Tables
Click the Save Installed LUT to Host button
Click the Download selected LUT button
Wireless Settings
Printer Settings
Transfer Temperature Offset
Print Position
Clean Printer
Cleaning
Side Card Path
Front Card Path
Heater Rollers
Clean Laminator
Laminator Card Path see Cleaning Laminator on
Laminator Oven see Cleaning Heater Assembly Rollers on
Print Test Card
Print Sample Card
Technology
Settings
Magnetic Encoding
Encode/Read Data
Smart Card
126
Toolbox Password
Configure Security
Advanced Security
Last Print Job Options
Error Messages
Passkey
To set security access roles
Security Roles
Print PRN file
Print Viewer
To send a PRN file to the printer
Cleaning the Printer
Cleaning
When to Clean
Cleaning the Rollers
Cleaning
Cleaning the Platen
Re-install the Transfer Film Close the printer Door
Initiate the cleaning process
Cleaning the Laminator
Cleaning Laminator
Cleaning Laminator Media Feed Rollers
Cleaning
Cleaning Heater Assembly Rollers
Cleaning
Cleaning the Printhead
Place the printer power switch in the on Position
Card Cleaning Cartridge
Cleaning Roller
142
Troubleshooting
OCP Error Messages
Code Message Possible Cause Possible Solution
Troubleshooting
Script Processing
Contactless Read
TOP Laminate
Laminator Eeprom
Wifi Incompatible
OCP Test Card Images
See Test Card descriptions on the following
Test Card Descriptions
MID Gray
Ethernet Issues
154
Technical Specifications
Standard Features
Communications Interfaces
Specifications
Encoding Options
Software
Card Compatibility
Agency Approvals
Electrical
Power Consumption, Printer only
Power Consumption, Printer + Laminator
Physical
Declarations of Conformity
FCC Regulations
Industry Canada Notice
Japanese Notification Chinese Notification
02.11b/g Wireless Compliance Information
Proprietary Statements
Radio Regulatory Information
Europe EU Declaration of Conformity
Technical Specifications
164
Printer Configurations
Appendix a
Part Numbers
Part Number Description
Setting Custom Card Specifications
Appendix B
Process Flowchart
Refer to Section B.4.3
3-Step Process
Select the Card Type
Make adjustments
Print and examine Test Card
Adjustments
Warpage
Adjustment Overview
174
Partial Transfer
Front of card
176
Setting Custom Card Specifications
Back of card
Setting Custom Card Specifications
180
Warpage
Edges curled down
182
Setting Custom Card Specifications
Edges curled up
Setting Custom Card Specifications
186
Irregular Warpage
188
Setting Custom Card Specifications
190
Appendix C
Network Operations
Adding a Network Printer
Observe the Devices and Printers window
Observe the Choose a printer port window
Observe the Type a printer hostname or IP address window
Observe the Install the printer driver window
Observe the Type a printer name window
Observe the You’ve successfully added ... window
Setting Up Printer Pooling
Printer Pooling
Using the Printer Pool
Printer Sharing
Yes
Wireless Network Operations
Appendix D
Installing the Printer
Configuring the Printer
Appendix E
Magnetic Card Encoder
Driver Setting
Magnetic Encoder Cleaning
Media Loading Orientation
ISO Default
Magnetic Encoding Type
Aamva
Encoder Macro Commands
Appendix F
Smart Card Options
Driver Setting
Encoding and Reading Smart Cards
Contact Smart Cards
Media Loading Orientation for Contact Smart Cards
Contact Station Smart Card Interface
Pin Smart Card Contact Points DB-9
Media Loading Orientation for Contactless Smart Cards
Contactless Smart Cards
Printing on Contactless Smart Cards
212
Procedure
Packing the Printer for Shipment
Packing the Printer for Shipment
Appendix H
Packing the Printer with Laminator for Shipment
216
Page
218
Worldwide Support
North America and Latin America Repair Services
North America and Latin America Technical Support
Europe, Middle East, and Africa Technical Support
Language Phone
Europe, Middle East, and Africa Repair Services
Type of repair and location Phone
Asia Pacific Technical Support
Asia Pacific Repair Services
Zebra Website