Manuals
/
Fortinet
/
Computer Equipment
/
Network Card
Fortinet
50A
user manual
187, Adding a phase 1 configuration Standard options
Models:
50A
1
187
272
272
Download
272 pages
24.69 Kb
184
185
186
187
188
189
190
191
Specs
Install
Adding a default route
Editing administrator accounts
Connecting
Network configuration
Replacement messages
Setup wizard
Policy routing command syntax
General procedure
Page 187
Image 187
IPSec VPN
AutoIKE IPSec VPNs
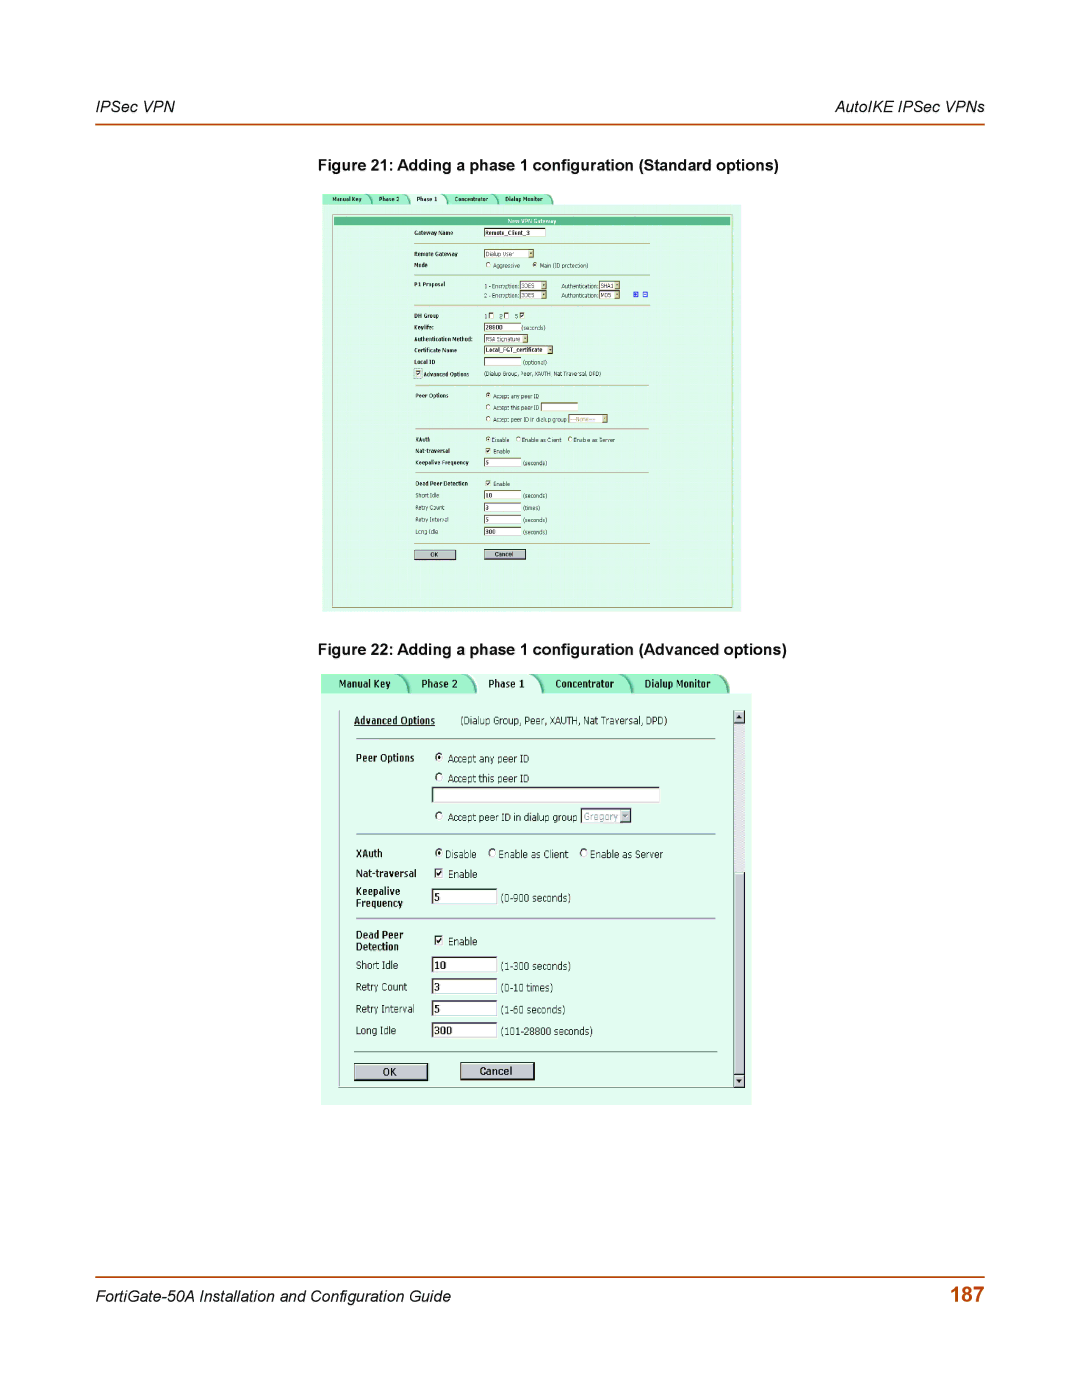
Figure 21: Adding a phase 1 configuration (Standard options)
Figure 22: Adding a phase 1 configuration (Advanced options)
FortiGate-50A
Installation and Configuration Guide
187
Page 186
Page 188
Page 187
Image 187
Page 186
Page 188
Contents
February
Installation and Configuration Guide
Regulatory Compliance
Trademarks
Table of Contents
Transparent mode installation
Virus and attack definitions updates and registration
Network configuration
Firewall configuration 137
Users and authentication 171
Pptp and L2TP VPN 203
Antivirus protection 225
Glossary 259 Index 263
Contents
Introduction
NAT/Route mode and Transparent mode
NAT/Route mode
Transparent mode
Document conventions
Comments on Fortinet technical documentation
Fortinet documentation
Customer service and technical support
Getting started
Mounting
Package contents
To power on the FortiGate-50A unit
Powering on
Connecting to the web-based manager
Environmental specifications
To connect to the web-based manager
Connecting to the command line interface CLI
Bits per second Data bits Parity
To connect to the CLI
Stop bits Flow control
Factory default Dhcp configuration
Factory default FortiGate configuration settings
Factory default Transparent mode network configuration
Factory default NAT/Route mode network configuration
Factory default firewall configuration
Content
Factory default firewall configuration Recurring
Service
Authentication
Strict content profile
Factory default content profiles
Strict content profile Options
Web content profile Options
Scan content profile
Web content profile
Scan content profile Options
Unfiltered content profile
Planning the FortiGate configuration
Unfiltered content profile Options
Setup wizard
Configuration options
CLI
FortiGate model maximum values matrix
Signatures Antivirus file Block patterns Web filter
Next steps
Next steps Getting started
NAT/Route mode installation
Changing the default configuration
Preparing to configure NAT/Route mode
Internal servers
Reconnecting to the web-based manager
Using the setup wizard
Advanced NAT/Route mode settings
Starting the setup wizard
Example
Using the command line interface
Configuring the FortiGate unit to operate in NAT/Route mode
Configuring NAT/Route mode IP addresses
FortiGate-50A External
Connecting the FortiGate unit to your networks
Internal
Changing antivirus protection
Configuring your networks
Completing the configuration
Setting the date and time
Registering your FortiGate unit
Configuring virus and attack definition updates
Completing the configuration
DNS Settings
Transparent mode installation
Preparing to configure Transparent mode
Transparent mode settings Administrator Password
Go to System Status
Changing to Transparent mode
Configure the Transparent mode default gateway
Configuring the Transparent mode management IP address
Connecting the FortiGate unit to your networks
Registering your FortiGate
Enabling antivirus protection
Go to Firewall Policy Int-Ext
Default routes and static routes
Transparent mode configuration examples
Default route to an external network
General configuration steps
Go to System Network Routing
Web-based manager example configuration steps
CLI configuration steps
Go to System Network Management
DMZ
Set system route number 1 dst 24.102.233.5 255.255.255.0 gw1
Example static route to an internal destination
Set system route number 1 dst 172.16.1.11 255.255.255.0 gw1
System status
System status
To change the FortiGate host name Go to System Status
Firmware upgrade procedures Procedure Description
Changing the FortiGate host name
Changing the FortiGate firmware
To upgrade the firmware using the CLI
Upgrading the firmware using the web-based manager
Upgrading the firmware using the CLI
To upgrade the firmware using the web-based manager
Execute ping
Reverting to a previous firmware version
Reverting to a previous firmware version using the CLI
To revert to a previous firmware version using the CLI
To install firmware from a system reboot
Press any key to enter configuration menu
Testing a new firmware image before installing it
Restoring the previous configuration
To test a new firmware image
Save as Default firmware/Run image without savingD/R
To update the attack definitions manually
Manual virus definition updates
Manual attack definition updates
To update the antivirus definitions manually
Displaying the FortiGate up time
Backing up system settings
Restoring system settings
Displaying the FortiGate serial number
Changing to Transparent mode
Restoring system settings to factory defaults
To change to Transparent mode Go to System Status
Shutting down the FortiGate unit
Changing to NAT/Route mode
To change to NAT/Route mode Go to System Status
Restarting the FortiGate unit
Viewing CPU and memory status
System status
To view CPU and memory status Go to System Status Monitor
CPU and memory status monitor
Viewing sessions and network status
Sessions and network status monitor
Viewing virus and intrusions status
To view the session list Go to System Status Session
Session list
Example session list
Protocol
Session list
Updating antivirus and attack definitions
Virus and attack definitions updates and registration
To make sure the FortiGate unit can connect to the FDN
Connecting to the FortiResponse Distribution Network
Go to System Update
Version Expiry date Last update attempt Last update status
Manually initiating antivirus and attack definitions updates
To configure update logging Go to Log&Report Log Setting
Scheduling updates
Configuring update logging
Enabling scheduled updates
Adding an override server
To add an override server Go to System Update
Enabling scheduled updates through a proxy server
Enabling push updates
To enable push updates Go to System Update
Enabling push updates
Push updates when FortiGate IP addresses change
Enabling push updates through a NAT device
Example network topology Push updates through a NAT device
Example push updates through a NAT device
General procedure
Schedule Always Service ANY Action Accept
To configure the FortiGate NAT device
Adding a firewall policy for the port forwarding virtual IP
Registering FortiGate units
Example push update configuration
FortiCare Service Contracts
Registering the FortiGate unit
Updating registration information
Recovering a lost Fortinet support password
Viewing the list of registered FortiGate units
Adding or changing a FortiCare Support Contract number
Registering a new FortiGate unit
Changing your contact information or security question
Changing your Fortinet support password
Downloading virus and attack definition updates
Downloading virus and attack definitions updates
Registering a FortiGate unit after an RMA
Registering a FortiGate unit after an RMA
Configuring interfaces
Network configuration
Viewing the interface list
Changing the administrative status of an interface
Configuring an interface with a manual IP address
To stop an interface that is administratively up
Connected
Configuring an interface for Dhcp
Connecting
Initializing
Adding a secondary IP address to an interface
Configuring an interface for PPPoE
Adding a ping server to an interface
Controlling administrative access to an interface
Changing the MTU size to improve network performance
Configuring traffic logging for connections to an interface
Configuring the management interface in Transparent mode
100
Configuring routing
Adding a default route
Adding DNS server IP addresses
101
Adding destination-based routes to the routing table
Configuring the routing table
Adding routes in Transparent mode
102
103
Policy routing
104
Configuring Dhcp services
Policy routing command syntax
Configuring a Dhcp relay agent
105
Configuring a Dhcp server
Adding a Dhcp server to an interface
Adding scopes to a Dhcp server
IP Pool
Adding a reserve IP to a Dhcp server
106
Scope Name
Viewing a Dhcp server dynamic IP list
Configuring the modem interface
107
108
Connecting a modem to the FortiGate unit
Configuring modem settings
To configure modem settings Go to System Network Modem
To connect to a dialup account Go to System Network Modem
Connecting to a dialup account
Disconnecting the modem
109
Viewing modem status
Backup mode configuration
Standalone mode configuration
To configure backup mode Go to System Network Modem
Adding firewall policies for modem connections
To operate in standalone mode Go to System Network Modem
111
112
RIP settings
RIP configuration
113
Holddown
Invalid
Flush
115
Configuring RIP for FortiGate interfaces
116
To add a RIP filter list Go to System RIP Filter
Adding RIP filters
Adding a RIP filter list
117
Assigning a RIP filter list to the incoming filter
Assigning a RIP filter list to the neighbors filter
119
Assigning a RIP filter list to the outgoing filter
120
121
System configuration
Setting system date and time
To set the date and time Go to System Config Time
122
To set the system idle timeout Go to System Config Options
To set the Auth timeout Go to System Config Options
Changing system options
Modifying the Dead Gateway Detection settings
Adding and editing administrator accounts
123
124
Adding new administrator accounts
Editing administrator accounts
To add an administrator account Go to System Config Admin
To edit an administrator account Go to System Config Admin
Configuring Snmp
125
Configuring Snmp community settings
Configuring the FortiGate unit for Snmp monitoring
Configuring FortiGate Snmp support
Configuring Snmp access to an interface
System Name
127
System Location
128
FortiGate MIBs
129
FortiGate traps
General FortiGate traps
System traps
130
131
System configuration and status
Firewall configuration
Users and authentication configuration
132
Customizing replacement messages
Replacement messages
133
134
Customizing alert emails
Nids event
135
Critical event
136
137
Firewall configuration
Addresses
Default firewall configuration
138
139
Services
Content profiles
Schedules
140
Adding firewall policies
141
Action
Dynamic IP Pool Fixed Port
VPN Tunnel
Traffic Shaping
142
Maximum Bandwidth Traffic Priority
Authentication
Anti-Virus & Web filter
143
144
Configuring policy lists
Log Traffic
Comments
Changing the order of policies in a policy list
Policy matching in detail
145
Enabling policies
Addresses
Enabling and disabling policies
Disabling policies
147
Adding addresses
To add an address Go to Firewall Address
148
Editing addresses
Deleting addresses
Organizing addresses into address groups
Predefined services
Services
149
GRE
150
Ldap
151
152
Adding custom TCP and UDP services
153
Adding custom Icmp services
Adding custom IP services
Grouping services
154
Schedules
Creating recurring schedules
Creating one-time schedules
155
156
Adding schedules to policies
157
Virtual IPs
To add a schedule to a policy Go to Firewall Policy
Virtual IP External Interface examples Description Internal
Adding static NAT virtual IPs
158
To add a static NAT virtual IP Go to Firewall Virtual IP
159
Adding port forwarding virtual IPs
Adding a port forwarding virtual IP
160
To add a policy with a virtual IP Go to Firewall Policy
IP pools
Adding policies with virtual IPs
161
162
Adding an IP pool
IP Pools for firewall policies that use fixed ports
IP pools and dynamic NAT
163
IP/MAC binding
Go to Firewall IP/MAC Binding Static IP/MAC
164
Configuring IP/MAC binding for packets going to the firewall
165
Adding IP/MAC addresses
Viewing the dynamic IP/MAC list
Enabling IP/MAC binding
166
Content profiles
167
Default content profiles
Adding content profiles
To add a content profile Go to Firewall Content Profile
Oversized File/Email Pass Fragmented Email
168
To add a content profile to a policy Go to Firewall Policy
Adding content profiles to policies
169
170
171
Users and authentication
To set authentication timeout Go to System Config Options
Setting authentication timeout
Adding user names and configuring authentication
Adding user names and configuring authentication
173
Deleting user names from the internal database
174
Configuring Radius support
Adding Radius servers
Deleting Radius servers
To add an Ldap server Go to User Ldap
Configuring Ldap support
Adding Ldap servers
175
176
Deleting Ldap servers
To delete an Ldap server Go to User Ldap
To add a user group Go to User User Group
Configuring user groups
Adding user groups
177
178
Deleting user groups
To delete a user group Go to User User Group
179
IPSec VPN
AutoIKE with certificates
Key management
Manual Keys
AutoIKE with pre-shared keys
181
General configuration steps for a manual key VPN
Manual key IPSec VPNs
Adding a manual key VPN tunnel
AES192
AutoIKE IPSec VPNs
182
AES128
To add a phase 1 configuration Go to VPN Ipsec Phase
General configuration steps for an AutoIKE VPN
Adding a phase 1 configuration for an AutoIKE VPN
To create an AutoIKE VPN configuration
Remote Gateway Static IP Address
184
Remote Gateway Dialup User
To configure phase 1 advanced options
Configuring advanced options
185
186
187
Adding a phase 1 configuration Standard options
To add a phase 2 configuration Go to VPN Ipsec Phase
Adding a phase 2 configuration for an AutoIKE VPN
188
Use selectors from policy
189
Use wildcard selectors
190
Managing digital certificates
Obtaining a signed local certificate
Generating the certificate request
Key Type
191
Key Size
192
Downloading the certificate request
Importing the signed local certificate
Obtaining CA certificates
Importing CA certificates
Configuring encrypt policies
193
To add a source address Go to Firewall Address
Adding a source address
Adding a destination address
194
195
Adding an encrypt policy
To add an encrypt policy Go to Firewall Policy
196
IPSec VPN concentrators
To create a VPN concentrator configuration
VPN concentrator hub general configuration steps
197
198
Adding a VPN concentrator
Source InternalAll Destination VPN spoke address Action
To create a VPN spoke configuration
VPN spoke general configuration steps
199
VPN Tunnel
200
Policies
Viewing dialup VPN connection status
Monitoring and Troubleshooting VPNs
To view VPN tunnel status Go to VPN Ipsec Phase
Viewing VPN tunnel status
202
Testing a VPN
203
Configuring Pptp
Configuring the FortiGate unit as a Pptp gateway
Pptp and L2TP VPN
To add a source address
204
To add a firewall policy
205
To add a source address group
To add a destination address
206
Configuring a Windows 98 client for Pptp
To connect to the Pptp VPN
Configuring a Windows XP client for Pptp
Configuring a Windows 2000 client for Pptp
207
208
To configure the VPN connection
Select Properties Security
Configuring the FortiGate unit as an L2TP gateway
Configuring L2TP
209
To add source addresses
210
211
Configuring a Windows 2000 client for L2TP
212
To disable IPSec
To connect to the L2TP VPN
213
Configuring a Windows XP client for L2TP
214
Detecting attacks
Network Intrusion Detection System Nids
215
216
Configuring checksum verification
Selecting the interfaces to monitor
Disabling monitoring interfaces
Viewing attack descriptions
Viewing the signature list
217
Adding user-defined signatures
Disabling Nids attack signatures
218
219
Downloading the user-defined signature list
Enabling Nids attack prevention signatures
To enable Nids attack prevention Go to Nids Prevention
Preventing attacks
Enabling Nids attack prevention
221
Setting signature threshold values
Automatic message reduction
Logging attacks
Logging attack messages to the attack log
Reducing the number of Nids attack log and email messages
223
Manual message reduction
224
Antivirus protection
General configuration steps
225
226
Antivirus scanning
To scan FortiGate firewall traffic for viruses
227
File blocking
Blocking files in firewall traffic
Adding file patterns to block
228
Configuring limits for oversized files and email
Blocking oversized files and emails
Exempting fragmented email from blocking
Viewing the virus list
To view the virus list Go to Anti-Virus Config Virus List
229
230
231
Web filtering
232
Content blocking
Go to Web Filter Content Block
Adding words and phrases to the Banned Word list
233
Clearing the Banned Word list
Backing up the Banned Word list
Restoring the Banned Word list
Example Banned Word List text file
234
235
Configuring FortiGate Web URL blocking
URL blocking
Adding URLs to the Web URL block list
236
Clearing the Web URL block list
Downloading the Web URL block list
Uploading a URL block list
237
Configuring FortiGate Web pattern blocking
To upload a URL block list
238
Configuring Cerberian URL filtering
Installing a Cerberian license key
Adding a Cerberian user
Enabling Cerberian URL filtering
Configuring Cerberian web filter
About the default group and policy
To configure Cerberian web filtering
240
Script filtering
Enabling script filtering
Selecting script filter options
Go to Web Filter URL Exempt
Exempt URL list
Adding URLs to the URL Exempt list
241
Uploading a URL Exempt List
Downloading the URL Exempt List
242
243
244
245
Email filter
Adding words and phrases to the email banned word list
Email banned word list
246
Uploading the email banned word list
Downloading the email banned word list
247
248
Email block list
Adding address patterns to the email block list
Downloading the email block list
To upload the email block list
Email exempt list
Uploading an email block list
249
250
To add a subject tag Go to Email Filter Config
Adding a subject tag
Adding address patterns to the email exempt list
251
Logging and reporting
Recording logs
Recording logs on a remote computer
252
Recording logs on a NetIQ WebTrends server
253
To filter log entries Go to Log&Report Log Setting
Filtering log messages
Log message levels
254
Configuring traffic logging
Enabling traffic logging for a firewall policy
Configuring traffic filter settings
Enabling traffic logging
Enabling traffic logging for an interface
Adding traffic filter entries
Destination IP Address Destination Netmask Service
256
To add a DNS server Go to System Network DNS
Configuring alert email
Adding alert email addresses
257
Enabling alert email
Testing alert email
258
259
Glossary
260
261
262
263
Index
Index
264
DNS
265
Http
266
NAT
267
268
RMA
269
TCP
270
VPN
271
272
Top
Page
Image
Contents