Scanning Guide
MULTIFUNCTIONAL DIGITAL COLOR SYSTEMS
Page
Grant of License
SOFTWARE LICENSE AGREEMENT
Disclaimer of Warranty
Term
General
Limitation of Liability
U.S. Government Restricted Rights
2 SOFTWARE LICENSE AGREEMENT
Copyright
TRADEMARKS AND COPYRIGHT
Trademarks
Conventions
Preface
About This Guide
Lineup of Our Manuals
Color Guide
TopAccess Guide
Network Administration Guide
Printing Guide
Network Fax Guide
To read manuals in PDF Portable Document Format files
e-Filing Guide
User Management Guide
Precautions in this manual
8 Preface
Chapter 2 Scan to e-Filing
TABLE OF CONTENTS
Chapter 1 Overview
Chapter 3 Scan to File or USB
Copy & File
Using Template
Chapter
Internet Fax
Overview
About Scan Features
How to Perform Scan Operations
Confirming the Scan Job Status
Scan to e-Filing Mode
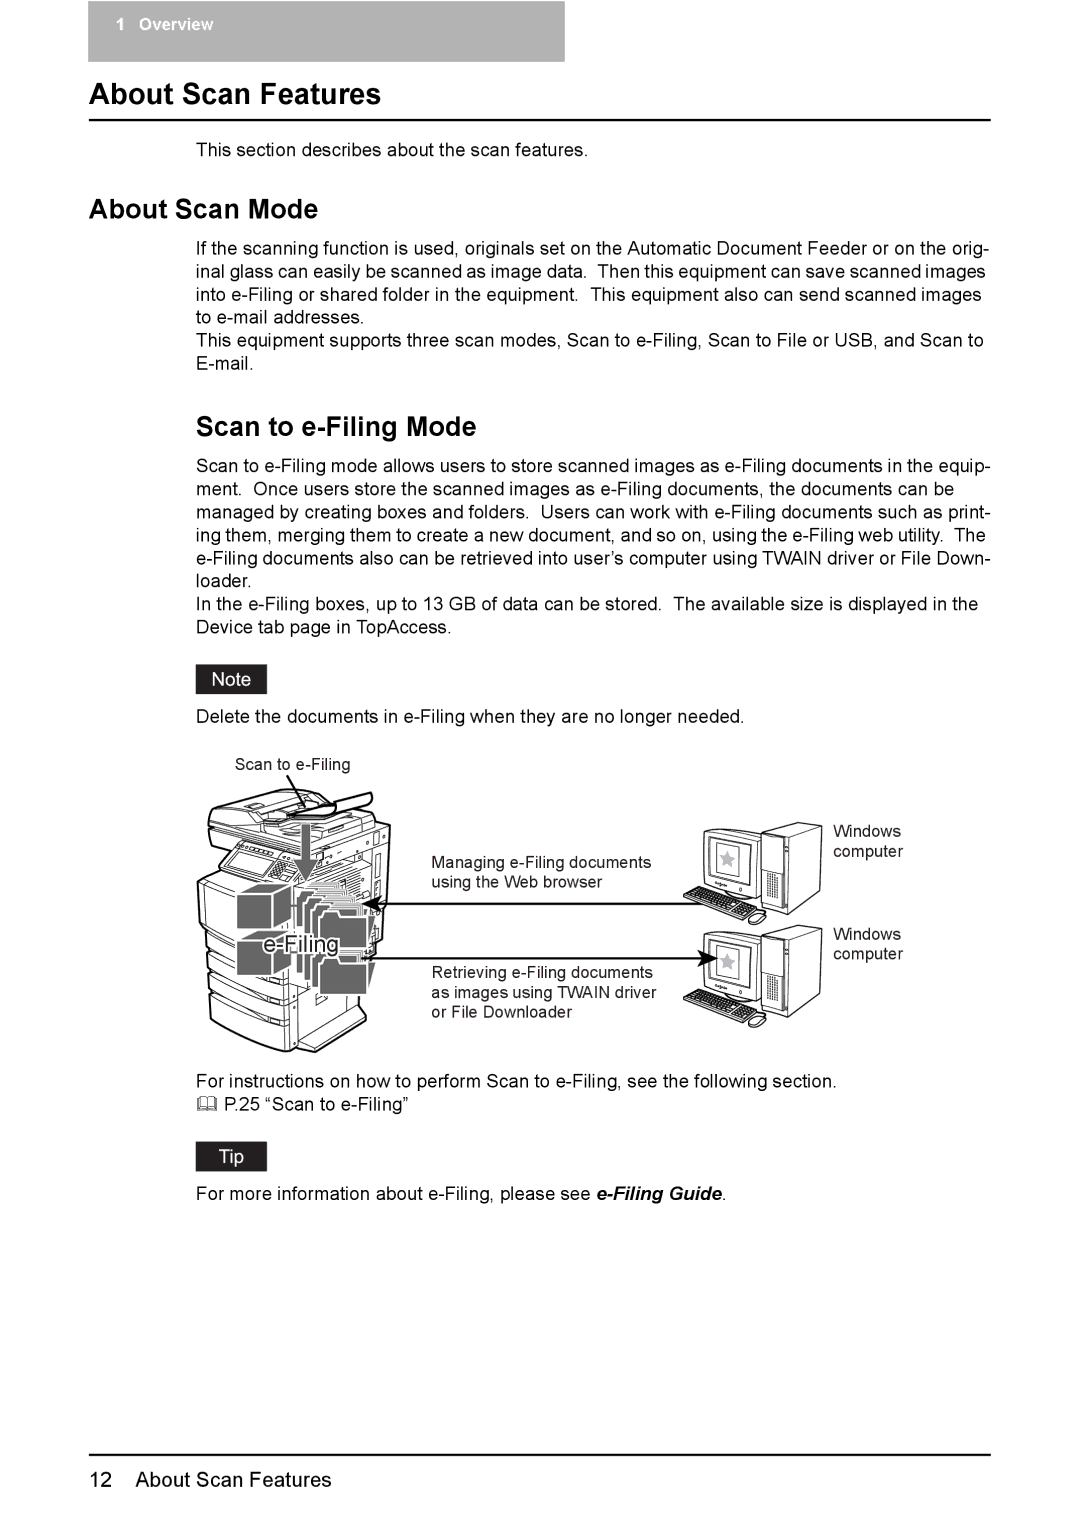
About Scan Features
About Scan Mode
e-Fil ing
Network Folder
Scan to File or USB Mode
Scan to E-mail Mode
USB Media
Color Mode
About Expansion Memories
About Scan Speed
Available Resolution
Scan Speed
Color Mode
Resolution
Full Color/Auto Color
2 Pressmenu.the SCAN button on the control panel to enter the scan
How to Perform Scan Operations
Scanning Procedure for Single Agent 1 Place the originals
3 Select a button of the desired scan mode
How to Perform Scan Operations
18 How to Perform Scan Operations
Scanning Procedure for Dual Agents 1 Place the originals
5 Press the SCAN! button
2 Pressmenu.the SCAN button on the control panel to enter the scan
3 Select a button of the desired scan mode
How to Perform Scan Operations
5 Select the other button of the desired scan mode
20 How to Perform Scan Operations
6 Press the SCAN! button
How to Perform Scan Operations
y Items of table
Confirming the Scan Job Status
22 Confirming the Scan Job Status
y Buttons
y Items of list
Confirming the Scan Log
y Buttons
24 Confirming the Scan Log
1 Overview
Scan to e-Filing
How to Perform Scan to e-Filing
How to Use Scanned Data Stored in e-Filing
26 How to Perform Scan to e-Filing
How to Perform Scan to e-Filing
Scanning Procedure for Scan to e-Filing 1 Place the originals
2 Pressmenu.the SCAN button on the control panel to enter the scan
How to Perform Scan to e-Filing
3 Press the SCAN TO E-FILING button
4 Press the BOX/FOLDER button
28 How to Perform Scan to e-Filing
y ROTATION
y COLOR MODE
y SINGLE/2-SIDED SCAN
y ORIGINAL MODE
30 How to Perform Scan to e-Filing
y RESOLUTION
y COMPRESS
y CONTRAST
y BACKGROUND ADJUSTMENT
y ORIGINAL SIZE
y SHARPNESS
32 How to Perform Scan to e-Filing
14 Press the ENTER button
15 Press the SCAN! button
y RGB ADJUSTMENT
16 If the “To continue, place document on glass. And press Scan!” message is displayed, place another original on glass and press SCAN! to scan another original, or press the JOB FINISH button to finish scanning
Using Scanned Data in e-Filing from e-Filing Web Utility
How to Use Scanned Data Stored in e-Filing
Using Scanned Data in e-Filing from Touch Panel Display
Scan to File or USB
How to Perform Scan to File or USB
How to Use Scanned Data Stored as Files
3 Press the SCAN TO FILE OR USB button
How to Perform Scan to File or USB
Scanning Procedure for Scan to File or USB 1 Place the originals
36 How to Perform Scan to File or USB
How to Perform Scan to File or USB
If you want to store the scanned data in the USB media, connect the
USB media to the equipment, press the MFP LOCAL button to
USB Connector Host USB Storage device
y SERVER NAME
y LOGIN USER NAME
y PASSWORD
y NETWORK PATH
y LOGIN USER NAME
40 How to Perform Scan to File or USB
y COMMAND PORT
y PASSWORD
y PASSWORD
How to Perform Scan to File or USB
y LOGIN USER NAME
y SERVER NAME
y FILE FORMAT
9 Select the following items and press the EDIT button
42 How to Perform Scan to File or USB
y MULTI/SINGLE
y RESOLUTION
How to Perform Scan to File or USB
y COLOR MODE
y SINGLE/2-SIDED SCAN
y COMPRESS
44 How to Perform Scan to File or USB
y ORIGINAL MODE
y EXPOSURE
y RGB ADJUSTMENT
How to Perform Scan to File or USB
y BACKGROUND ADJUSTMENT
y CONTRAST
15 Press the SCAN! button
46 How to Perform Scan to File or USB
14 Press the ENTER button
3 Scan to File or USB
How to Perform Scan to File or USB
When Scanned Data Is Stored in USB Media
How to Use Scanned Data Stored as Files
When Scanned Data Is Stored in MFP LOCAL
When Scanned Data Is Stored in REMOTE 1 or
How to Use Scanned Data Stored as Files
50 How to Use Scanned Data Stored as Files
3 Scan to File or USB
How to Perform Scan to E-mail
Scan to E-mail
3 Press the SCAN TO E-MAIL button
How to Perform Scan to E-mail
Scanning Procedure for Scan to E-mail 1 Place the originals
52 How to Perform Scan to E-mail
How to Perform Scan to E-mail
54 How to Perform Scan to E-mail
6 Press the SUBJECT, BODY, and FILE NAME buttons to enter each item
7 Select the following items and press the Next button
y FILE FORMAT
8 Specifyton. the following items as you require and click the EDIT but
y RESOLUTION
56 How to Perform Scan to E-mail
y COLOR MODE
y ROTATION
y BACKGROUND ADJUSTMENT
How to Perform Scan to E-mail
y ORIGINAL MODE
y EXPOSURE
y CONTRAST
13 Press the ENTER button
y RGB ADJUSTMENT
y SHARPNESS
Specifying Destinations
14 Press the SCAN! button
4 Scan to E-mail
Entering an E-mail address manually 1 Press the E-MAIL ADDRESS button
60 How to Perform Scan to E-mail
Selecting from address book
3 Press the SETTINGS button
2 Press the SETTINGS button
1 Press the contacts that you want to send
4 Scan to E-mail
Searching with ID number for a contact 1 Press the KNOWN ID button
62 How to Perform Scan to E-mail
How to Perform Scan to E-mail
Searching with search strings from address book
1 Press the SEARCH ADDRESS button
3 Press the contact that you want to send, and press the ENTER button
64 How to Perform Scan to E-mail
How to Perform Scan to E-mail
4 Press the SETTINGS button
Searching with search strings from LDAP server
1 Press the SEARCH ADDRESS button
Select the directory service name that you want to search from, and
2 Press the DIR SERVICE button
press the ENTER button
4 Scan to E-mail
5 Press the contact that you want to send, and press the ENTER button
How to Perform Scan to E-mail
68 How to Perform Scan to E-mail
6 Press the SETTINGS button
Selecting from groups 1 Press the GROUP button
Searching with ID number of a group 1 Press the GROUP button
How to Perform Scan to E-mail
2 Press the KNOWN ID button
How to Perform Scan to E-mail
Searching with group name 1 Press the GROUP button
2 Press the SEARCH GROUP button
72 How to Perform Scan to E-mail
5 Press the SETTINGS button
Confirming or removing E-mail addresses from destination
y The DESTINATION screen is displayed
1 Press the DESTINATION button
2 You can confirm the destinations that are currently specified
74 How to Perform Scan to E-mail
4 Scan to E-mail
Registering Scan Template
Using Template
Scanning Using Template
This section describes the instructions on how to use scan templates
Scanning Using Template
Scan Procedure using a template 1 Place the originals
want to recall
Press the template group button that contains the template that you
5 Press the template button that you want to recall
78 Scanning Using Template
7 Press the SCAN! button
1 Place the originals
3 Press the SCAN TO E-MAIL button
80 Scanning Using Template
2 Pressmenu.the SCAN button on the control panel to enter the scan
want to recall
Press the template group button that contains the template that you
82 Scanning Using Template
8 Press the Scan to E-mail template button that you want to recall
9 Press the SCAN! button
10 If the “To continue, place document on glass. And press Scan!” message is displayed, place another original on glass and press SCAN! to scan another original, or press the JOB FINISH button to finish scanning
1 Pressmenu.the SCAN button on the control panel to enter the scan
Registering Scan Template
Registering a scan template in public template group
y PUBLIC TEMPLATE GROUP
Registering Scan Template
2 Press the buttons of the agent and set the scanning conditions
4 Press the REGISTRATION button
6 Press the PASSWORD button
y NAME
8 Select the blank template button and press the SAVE button
y PASSWORD
y NAME
1 Pressmenu.the SCAN button on the control panel to enter the scan
Registering a scan template in a user template group
5 Using Template
88 Registering Scan Template
Registering Scan Template
2 Press the buttons of the agent and set the scanning conditions
4 Press the REGISTRATION button
90 Registering Scan Template
y NAME
7 Select the blank template button and press the SAVE button
y PASSWORD
y NAME
5 Using Template
92 Registering Scan Template
This section describes the instructions on how to perform Copy & File
How to Perform Copy & File
Copy & File
How to Perform Copy & File
Scanning Procedure for Copy & File 1 Place the originals
3 Press the COPY & FILE button
How to Perform Copy & File
y PASSWORD
96 How to Perform Copy & File
y LOGIN USER NAME
y COMMAND PORT
y PASSWORD
How to Perform Copy & File
y LOGIN USER NAME
y NETWORK PATH
y PASSWORD
98 How to Perform Copy & File
y LOGIN USER NAME
y NETWORK PATH
9 Press the START button
100 How to Perform Copy & File
6 Copy & File
About Internet Fax
How to Perform Internet Fax
Internet Fax
Receiving Internet Fax
Internet Fax Transmission Overview
Precaution for Internet Transmission
About Internet Fax
y Internet Fax to/from Client Computers
About Internet Fax
y Internet Fax to Internet Fax
1 Press the FAX button on the control panel
How to Perform Internet Fax
Sending Procedure for Internet Fax
press the OPTION button
y EXPOSURE
y RESOLUTION
y MODE
y TX TYPE
106 How to Perform Internet Fax
5 Specify the E-mail addresses that you want to send
6 Press the START button
y SUBJECT
Specifying Destinations
Entering an E-mail address manually 1 Press the E-MAIL ADDRESS button
108 How to Perform Internet Fax
Selecting from address book
1 Press the E-MAIL button of the contacts that you want to send
How to Perform Internet Fax
Searching with ID number for a contact 1 Press the KNOWN ID button
Searching with search strings from address book
3 Press the E-MIAL button of the contact that you want to send
110 How to Perform Internet Fax
1 Press the SEARCH ADDRESS button
How to Perform Internet Fax
3 Press the contact that you want to send, and press the ENTER button
Searching with search strings from LDAP server
2 Press the DIR SERVICE button
112 How to Perform Internet Fax
1 Press the SEARCH ADDRESS button
press the ENTER button
Selecting from groups 1 Press the GROUP button
2 Press the group buttons that you want to select as the destination
114 How to Perform Internet Fax
2 Press the KNOWN ID button
How to Perform Internet Fax
Searching with ID number of a group 1 Press the GROUP button
Searching with group name 1 Press the GROUP button
4 Press the group buttons that you want to select as the destination
116 How to Perform Internet Fax
2 Press the SEARCH GROUP button
Confirming or removing E-mail addresses from destination
118 How to Perform Internet Fax
Advanced Function
Sending 2-sided Originals
1 Press the DESTINATION button
Priority Transmission
3 Press the ADDRESS button to return to the address menu
2 Press the ENTER button
120 How to Perform Internet Fax
7 Internet Fax
Receiving Manually
Receiving Internet Fax
Receiving Automatically
1 Press the USER FUNCTIONS button on the control panel
122 Receiving Internet Fax
2 Press the USER button, and then press the CHECK E-MAIL
3 Checking completes
Remote Scan Driver Errors
Installing Remote Scan Driver
Scanning Remotely Using Remote Scan Driver
Remote Scan
Installing the Remote Scan Driver
Installing Remote Scan Driver
Planning for Installation
Installing from Client Utilities CD-ROM
3 SelectNext. “I accept the terms of the license agreement” and click
1 Insert the Client Utilities CD-ROM into the CD-ROM drive
2 Select your language and click OK
4 Select “Custom” and click Next
7 Click Next
5 Check “TOSHIBA e-STUDIO Remote Scan driver”
6 Click Next
126 Installing Remote Scan Driver
9 Click Finish
Installing from TopAccess
8 Click Next
4 Double-click the “InstallClient1.exe” file that you downloaded
Installing Remote Scan driver from TopAccess
2 Click the “Install Client1” link to download the installer file
P.124 “Installing from Client Utilities CD-ROM”
Scanning using remote scan driver
Scanning Remotely Using Remote Scan Driver
How to Scan
4 Click Acquire Image or the same functional command in the File menu
Discovering the device automatically
When You Are Running the First Time
5 Specify the options and click Scan
Selection
2 When the process is completed, found devices are listed in the list
Discovering the device manually
In the TopAccessDocMon Local Discovery dialog box, click Manual
want to monitor from the list and click OK
2 Network - Enable IPX/SPX Search
How to Use Remote Scan Driver
Configuring Discovery Settings
3 Network - Enable TCP/IP Search
File menu
2 Page Settings/Image Settings tab
4 Cancel
Edit menu
6 Resolution
4 Color Mode
5 Original Mode
2 Single/2-Sided Scan
3 Background Adjustment
Adding a New Device Using Network Discovery
Changing the Target Device
138 Scanning Remotely Using Remote Scan Driver
Selecting the target device
1 Click the Devices menu and select Select e-STUDIO
8 Remote Scan
Cannot Find the Device
Remote Scan Driver Errors
Remote Scan Driver Error Conditions
Cannot Connect to the Device Found by Discovery
140 Remote Scan Driver Errors
INDEX
SCAN TO E-MAIL
TopAccessDocMon Local Discovery
SCAN TO E-FILING
SEARCH ADDRESS
FC-2500C/3500C/3510C OME060020A0
R060120A8401-TTEC
MULTIFUNCTIONAL DIGITAL COLOR SYSTEMS Scanning Guide
2-17-2, HIGASHIGOTANDA, SHINAGAWA-KU, TOKYO, 141-8664, JAPAN