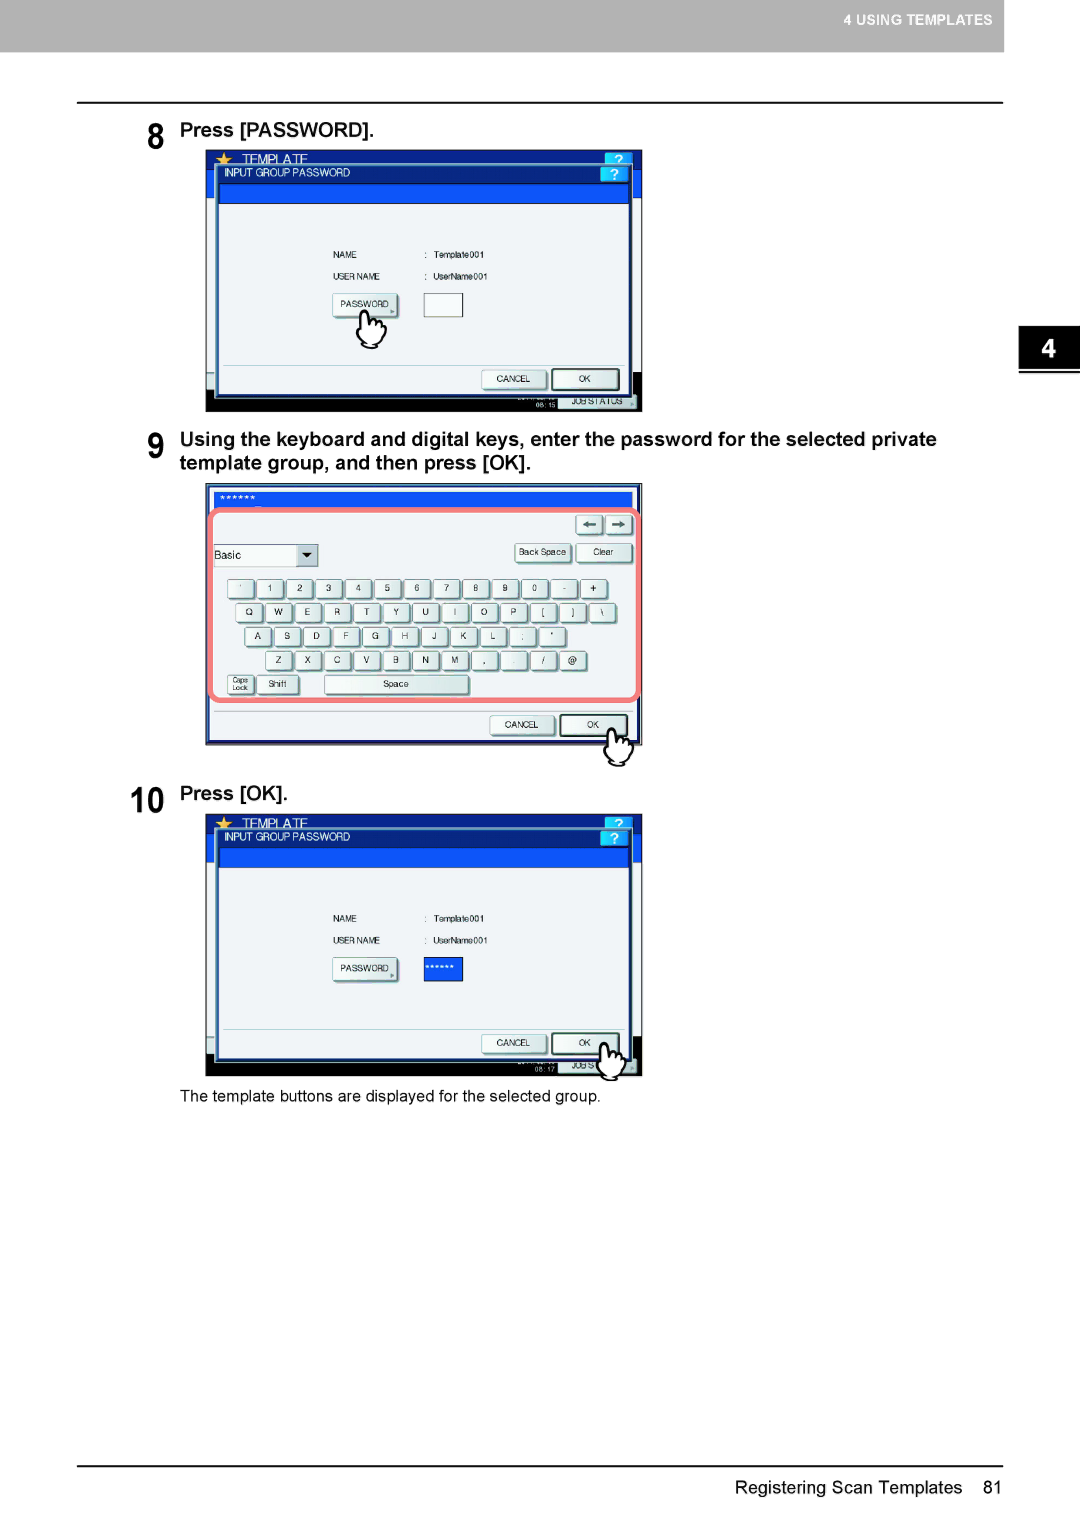
Scanning Guide
2012 TOSHIBA TEC CORPORATION All rights reserved
Options
How to read this manual Symbols in this manual
Preface
Model and series names in this manual
2 Preface
Trademarks
BASIC OPERATION
CONTENTS
Chapter
OVERVIEW
Chapter
USING TEMPLATES
Chapter 5 OTHER SCANNING METHODS
INTERNET FAX
OVERVIEW
Scan Features
Internet Fax Features
e-Filing
Scan Features
Scan functions
Scan to e-Filing
Shared Folder
Scan to File
Network Folder
USB Media
Scan to E-mail
Scan to USB
Web Service WS Scan
10 Scan Features
Scan speed
Templates
y Internet Fax Machine to/from Client Computers
Internet Fax Features
y Internet Fax Equipment to Internet Fax Equipment
1 OVERVIEW
12 Internet Fax Features
P.115 “Available file formats”
BASIC OPERATION
Default Settings
Web Service WS Scan
Using Saved Scan Data
3 Destination Display Area
Viewing Touch Panel for Scan Menu
1 Message Display Area
2 Function Buttons
8 PREVIEW
9 SCAN SETTING
10Scan Settings Display Area
13SETTINGS
16 Default Settings
Default Settings
Scan to e-Filing
Scan to e-Filing
2 On the control panel, press the SCAN button to enter the SCAN menu
Scan to File
Scanning to files 1 Place the originals
Scan to File
3 Press FILE
4 Make sure that MFP LOCAL is selected and highlighted
20 Scan to File
5 To store the scan in a network folder, press REMOTE 1 or REMOTE
6 Select the desired file destination from the list
When you select FTPS
Select a folder for the remote destination
When you select NetWare IPX
When you select NetWare IP
When you select FTPS
y LOGIN USER NAME When you select FTP
When you select SMB
When you select NetWare IPX or NetWare IP
y SECURITY
Scan to File
y FILE FORMAT
y MULTI/SINGLE PAGE
24 Scan to File
10 Press SCAN
Page
2 On the control panel, press the SCAN button to enter the SCAN menu
Scan to E-mail
Scanning to e-mail 1 Place the originals
3 Press E-MAIL
Scan to E-mail
4 On the AUTHENTICATION screen, complete the user authentication
5 Press TO
28 Scan to E-mail
7 Press SUBJECT and BODY and enter each item
y MULTI/SINGLE PAGE
If necessary, make the following settings for the attached file
y FILE NAME
y FILE FORMAT
y FROM ADDRESS
9 Specify the following items as required, and then press OK
y SECURITY
y FRAGMENT MESSAGE SIZE KB
Scan to E-mail
10 Press SCAN or the START button
32 Scan to E-mail
device to the equipment and wait a few seconds
Scan to USB
Scanning to USB 1 Place the originals
To store scans in a USB storage device, connect the
y FILE NAME
34 Scan to USB
y SECURITY
Scan to USB
y FILE FORMAT
y MULTI/SINGLE PAGE
36 Scan to USB
6 Press SCAN to scan data
Scan to USB
System Requirements
Web Service WS Scan
Scanning with Web Service Scan 1 Place the originals
Scan Driver Installation
Web Service WS Scan
Press WS SCAN
Select the client that fits your needs, and then press SCAN
Using scans saved in MFP LOCAL
Using Saved Scan Data
Using scan data saved as e-Filing documents
Using scan data saved as files
When scans are sent directly to the shared folder
Using scans saved in USB storage device
Using scans saved in network folders REMOTE 1/2
Viewing the scan job status
Viewing the Scan Job Status and Log
Viewing the scan job log
Page
Specifying E-mail Addresses
Changing Scan Settings
USEFUL FUNCTIONS
Previewing Scans
Specifying color mode
Changing Scan Settings
Specifying resolution
Selecting original mode
e-STUDIO4540C Series, e-STUDIO6550C Series
48 Changing Scan Settings
Changing orientation
50 Changing Scan Settings
Scanning 2-sided originals
Specifying original size
52 Changing Scan Settings
Changing compression ratio
Removing blank pages
Erasing black frames around images
54 Changing Scan Settings
Adjusting exposure
Adjusting contrast
Adjusting background density
Saturation
Adjusting sharpness
Adjusting color balance
RGB adjustment
Previewing scans 1 On the SCAN or FAX menu screen, press PREVIEW
Previewing Scans
Previewing Scans
the entry
Specifying E-mail Addresses
Entering an e-mail Addresses 1 Press INPUT @
Specifying E-mail Addresses
3 Press OK
60 Specifying E-mail Addresses
Selecting from the address book
1 On the SINGLE tab, press for the desired contacts
2 Press OK
Specifying E-mail Addresses
Refining your search
Searching the address book with ID numbers 1 Press KNOWN ID
Searching the address book with search strings 1 Press SEARCH
Specifying E-mail Addresses
3 Press for the desired contacts and then press OK
64 Specifying E-mail Addresses
4 Press OK
Searching the LDAP server with search strings
1 Press SEARCH
Specifying E-mail Addresses
4 Press for the desired contacts and then press OK
66 Specifying E-mail Addresses
5 Press OK
Selecting groups 1 Press GROUP to display the GROUP tab
2 Select the desired groups. For Scan to E-mail, press OK at the end
1 Press GROUP to display the GROUP tab
Refining groups search
2 Select the desired group. For Scan to E-mail, press OK at the end
Searching for groups with ID numbers
68 Specifying E-mail Addresses
Press KNOWN ID
4 Select the desired group. For Scan to E-mail, press OK at the end
2 Press SEARCH
Searching for groups by name 1 Press GROUP to display the GROUP tab
70 Specifying E-mail Addresses
5 Press OK
1 Press DESTINATION
Viewing/Deleting specified e-mail addresses
2 On the control panel, press the SCAN button to enter the SCAN menu
Scanning With Dual Functions Dual Agents
Scanning with dual functions Dual Agents 1 Place the originals
3 Select a scan function that you want to use
Scanning With Dual Functions Dual Agents
6 On the SCAN menu, press SCAN
74 Scanning With Dual Functions Dual Agents
Encrypting PDF files
2 Select PDF for the file format and then ON for the security setting
Encrypting PDF Files
y Encryption Level
3 Key in or select the following items, and then press OK
y USER PASSWORD
y MASTER PASSWORD
This chapter describes how to scan documents using templates
USING TEMPLATES
Using Scan Templates
Registering Scan Templates
y PUBLIC TEMPLATE GROUP
Registering Scan Templates
Registering scan templates
1 On the control panel, press the SCAN button to enter the SCAN menu
Registering Scan Templates
2 Select a scan function and make the settings as required
On the touch panel, press TEMPLATE to display the TEMPLATE menu
Press REGISTRATION to display the REGISTRATION tab
6 Press PASSWORD
The template buttons are displayed for the selected group
8 Press PASSWORD
10 Press OK
4 USING TEMPLATES
y NAME
11 Select an empty template button, and then press SAVE
y PASSWORD
y NAME
Registering Scan Templates
4 USING TEMPLATES
84 Using Scan Templates
Using Scan Templates
Using scan templates 1 Place the originals
3 On the touch panel, press TEMPLATE to display the TEMPLATE menu
5 Press PASSWORD
86 Using Scan Templates
9 Press PASSWORD
7 Press OK
8 Select the template that you want to use
Using Scan Templates
11 Press OK
88 Using Scan Templates
13 Press SCAN
3 On the touch panel, press TEMPLATE to display the TEMPLATE menu
1 Place the originals
2 On the control panel, press the SCAN button to enter the SCAN menu
7 Press OK
5 Press PASSWORD
90 Using Scan Templates
4 USING TEMPLATES
Using Scan Templates
8 Select a “SCAN TO E-MAIL” template that you want to use
9 Press PASSWORD
11 Press OK
92 Using Scan Templates
13 Press SCAN
Using Scan Templates
Page
Scanning Images Using the TOSHIBA e-STUDIO WIA Driver
OTHER SCANNING METHODS
Scanning Images Using the TOSHIBA e-STUDIO Remote Scan Driver
96 Scanning Images Using the TOSHIBA e-STUDIO Remote Scan Driver
Scanning Images Using the TOSHIBA e-STUDIO Remote Scan Driver
Scanning Images Using the TOSHIBA e-STUDIO WIA Driver
Page
Sending Internet Faxes
Precautions for Internet Fax Transmissions
INTERNET FAX
Viewing Touch Panel for Fax Menu
100 Precautions for Internet Fax Transmissions
Precautions for Internet Fax Transmissions
3. GROUP Tab
Viewing Touch Panel for Fax Menu
1. Message Display Area
2. SINGLE Tab
10. SEND
102 Viewing Touch Panel for Fax Menu
8. JOB STATUS
9. PREVIEW
2 On the control panel, press the FAX button
Sending Internet Faxes
Sending Internet faxes
Sending Internet Faxes 1 Place the originals
y TX TYPE
4 Specify the following items as required, and then press
y RESOLUTION
y ORIGINAL MODE
y BODY
5 Specify the following items as required, and then press OK
y SUBJECT
Press STORAGE
Saving sent data as a file Internet fax and file
Saving sent data as a file Internet Fax and File
Refer to “Sending Internet Faxes” P.103 and follow steps 1 to
Sending Internet Faxes
4 To store the data in a network folder, press REMOTE 1 or REMOTE
When you select FTPS
5 Select a folder for the remote destination
When you select NetWare IPX
When you select NetWare IP
y FILE FORMAT
y COMMAND PORT FTP and FTPS only
Sending Internet Faxes
y FILE NAME
110 Sending Internet Faxes
documents
Setting 2-sided scan 1 Press ADVANCED to display the ADVANCED tab
Setting advanced functions
Setting 2-sided scan
112 Sending Internet Faxes
2 Press 2-SIDED SCAN
Select either BOOK or TABLET for the original type, and then press OK
Press ADDRESS to return to the ADDRESS tab
3 Press OK
Setting Priority Reserve
Setting Priority Reserve 1 Press ADVANCED to display the ADVANCED tab
2 Press PRIORITY RESERVE
6 INTERNET FAX
4 Press ADDRESS to return to the ADDRESS tab
114 Sending Internet Faxes
Receiving Internet Faxes automatically
Receiving Internet Faxes
Available file formats
Receiving Internet faxes
Viewing the Internet fax job status
Viewing the Internet Fax Job Status and Log
Viewing the send log for Internet fax jobs
118 Viewing the Internet Fax Job Status and Log
Viewing the receive log for Internet fax jobs
Saving contact information to the address book
Numerics
INDEX
Windows Imaging Acquisition WIA Scan Driver
Scan Settings Display Area
TOSHIBA e-STUDIO WIA Driver
Page
R120120L0101-TTEC SYS
MULTIFUNCTIONAL DIGITAL COLOR SYSTEMS MULTIFUNCTIONAL DIGITAL SYSTEMS
Scanning Guide
2-17-2, HIGASHIGOTANDA, SHINAGAWA-KU, TOKYO, 141-8664, JAPAN