USB button
Printing Conventions in This Manual
Write button
Do not open or modify in any way the unit or its AC adaptor
Page
Maintenance
Power Supply
Placement
Memory Backup
Handling CD-ROMs
Copyright
Contents
Chapter Convenient Functions and System Settings
Contents
Chapter Setting the External Pedal Functions
Chapter Creating Original Effects Types Customize..55
Appendices
Installing Setup the USB Driver 125
Troubleshooting 164
Index 174
Accepts Multiple Inputs
True Tabletop Guitar Effects System
Functions You Want for Digital Recording
Stereo Monitor Speakers Built-In
PREAMP/SPEAKER p , p Preamp/Speaker Simulator
Delay p , p
Front Panel
Comp Compressor p , p
FX-1 p
Chorus p , p
Reverb p , p
FX-2 p
Rear Panel
EXP PEDAL/CTL 1,2
Signal Flow
Playing Sounds
Making the Connections
Adjusting the Output Level
Turning On the Power
Using the GS-10’s Speakers
Turning Off the Power
Setting Output Device Amps Output Select
AUX Input
Connecting Audio Devices to the AUX Input Jack
Using the Digital Output
If the Patch Does Not Switch
What is a Patch?
How to Select Patches Patch Change
About the Display Indication
Selecting the Input Input Select
Creating Your Own Favorite Tones Patches
AUX
Setting the Mic Input Level MIC Gain
USB Bass
Press Parameter
Adjusting the Tones with the Knobs
Press Quick FX
Setting the Effects Simply Quick FX
Turning the Effect On and Off
To select Quick Settings for another effect, repeat Steps 2
Making More Precise Effect Settings
Rotate the Value dial to select the Quick Setting you want
Naming Patches
Changing the Connection Order of Effects Effect Chain
Press Write
Storing Patches Patch Write
Copying Patches
Exchanging Patches
Initializing Patches
Copying the PREAMP/SPEAKER Settings to Another Channel
Registering Your Favorite Patches Direct Patch
CH Select Channel Select
PREAMP/SPEAKER Preamp/ Speaker Simulator
On/Off Effect On/Off
Parameter Value
Introduction to Effects and Parameters Type
Bass
When Custom 1-2 is selected for SP Type
Gain
Middle
Comp Compressor
Effect Level
OD/DS Overdrive/Distortion
Drive
Edit Custom DS
Tap Time
DlyTime Delay Time
DlyTime.F Delay Time Fine
Feedback
Rate
Pre Delay
Mode
Depth
EQ Equalizer
AW Auto Wah
FX-1
PW Pedal Wah
TM Tone Modify
ACS Advanced Compressor
LM Limiter
TR Tremolo
ENH Enhancer
SG Slow Gear
FB Feedbacker
DF Defretter
RM Ring Modulator
Resonance
Level Feedback Level
FX-2
Introduction to Effects and Parameters Rise Time
Vib Rate Vibrato Rate
Manual
PH Phaser
FL Flanger
Step Rate
HR Harmonist
Fine
PS Pitch Shifter
Pitch
2CE 2x2 Chorus
OC Octave
PB Pedal Bend
VB Vibrato
UV Uni-V
RT Rotary
Vowel
SDD Short Delay
HU Humanizer
SL Slicer
AR Auto Riff
Hold
SYN Guitar Synth
Introduction to Effects and Parameters Key
Creating Original Phrases User Phrase
Octave Shift
Introduction to Effects and Parameters Wave
Chromatic
PWM Rate Pulse Wise Modulation Rate
Introduction to Effects and Parameters Velocity
BS Bass Simulator
SEQ Stereo Equalizer
Synth Level
On/Off Off, On Threshold0-100 Release0-100
Name Patch Name
Noise Suppressor
Effect Chain
Foot Volume
Master
Patch Level
Customizing the Cosm Amps
Customizing the Speakers
Customizing Overdrive and Distortion
Range Low
Customizing Pedal Wah
Top
Range High
Patch Level
Foot Volume
Assign
Pedal Wah
Direct Patch Up
Tuner On/Off
Remote Strt/Stop
Direct Patch Down
Quick Settings
Preset Settings
Manual Settings
Target
Target Range
When using the foot switch
When using the expression pedal
Active Range
Setting the External Pedal Functions Source
Source Mode
EXP Pedal
How to Tune
Tuning the Guitar
About the Display During Tuning
Changing the Tuner Settings
Switching Tuner On and Off with the External Pedal
Adjusting the Display Contrast LCD Contrast
Limiting the Patches That Can Be Switched Patch Extent
Bypass
Immediate
Setting the Knob Functions Knob Mode
Current Setting
On The Assign status is carried over
Checking the Effect Output Level with the Level Meter
Press Meter
Operations Using Midi
Operating From the GS-10
Making the Settings for Midi Functions
EXP PDL Out Expression Pedal Out
KnobCtl Out Knob Control Out
PC Out Program Change Out
CTL1 Out Control 1 Out
Making the Connections
Transmitting and Receiving Settings Data
Transmitting Data to an External Midi Device Bulk Dump
Transmitting
Receiving
When Receiving Data Saved on a Midi Sequencer
Receiving Data from an External Midi Device Bulk Load
Press Exit to quit Bulk Load
Program Change Patch Number Bank Select
Setting the Program Change Map
Initial Program Change Map Settings
Rotate the PATCH/VALUE dial to select Program
Program Change
Fix
Prog
Patch Number Bank Program Select
When set to Advanced
Setting the Messages Used for Controlling Devices
When set to Standard
When set to MMC
When Midi Remote Ctrl is set to Advanced
Setting
When Midi Remote Ctrl is set to Standard
Controlling the Device Remotely
Midi ‘Shift’ Options
Settings Example When Using Sonar
Type of Keys
Driver Mode
Before Connecting with USB
Setting USB-Related Functions
Adjusting the Recording Level Output Level
Setting the Output Mode
Enabling and Disabling the Direct Monitor Command
Switching the Output Signals Direct Monitor
Using the GS-10 Connected to a Computer Via USB
Audio
Switching the Driver Mode
Midi in Standard Driver Mode
Audio&MIDI
Running the GS-10 from a Computer
Using the GS-10 As a Midi Interface
Recording the GS-10’s Output with a Computer
Main types of Midi message used by the GS-10
About Midi
How Midi messages are transmitted and received
About the Midi implementation
Error Messages
About USB
Ch. Select Ch-A Ch-B Ch-C
Patch List
Patch Name
P152
P200 DI Clean Bass
P151
P153
Restoring the Factory Settings Factory Reset
Factory Settings
Data Format for Exclusive Messages
One-way Transfer Procedure
Roland Exclusive Messages
Address-mapped Data Transfer
Data set 1 DT1 12H
Example of Message Transactions
System Realtime Message
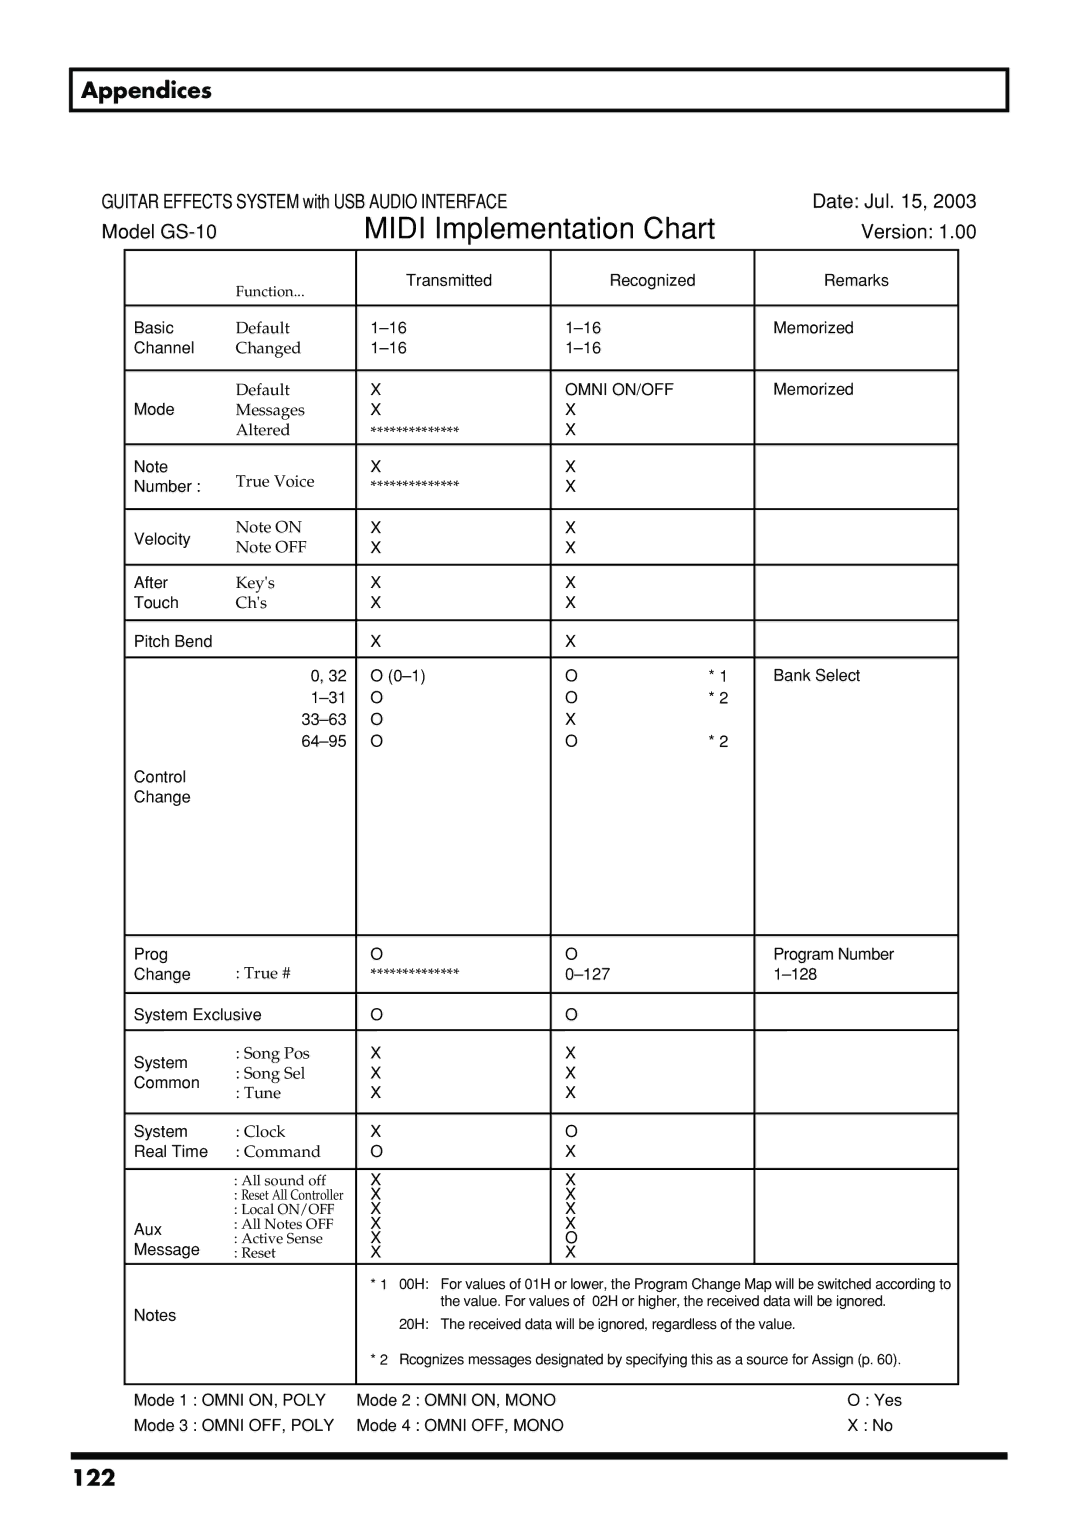
Midi Implementation
Channel Voice Message
System Exclusive Message
Request Data RQ111H
ONE WAY Communication
Midi Machine Control MMC
Data Set DT112H
Address Block Map
Meter
Table Tuner Tuner
Table Output System Output Select
Table System System System
Table Direct Patch System Direct Patch
Table MIC System MIC
Table Meter System Meter
Table USB Setting USB Setting
Table Midi System Midi
Table Harmonist Harmonist User Scale
Scale
Scale 18 C
Table HR Harmony Note Harmonist User Scale
Table Auto Riff Auto Riff User Phrase
100
101
Table AR Step Note
Table Speaker Speaker Customize
102
Table AMP AMP Customize
Table WAH WAH Customize
103
Table OD/DS OD/DS Customize
104
Table Quick Fx Data Quick Fx Data
105
106
107
108
Table Quick Fx Name Quick Fx Name
109
Table Patch Patch
110
OFF Original
111
SEQ
112
113
AUX
114
115
116
Table Quick Fx Target Quick Fx Assign Target
117
Table EQ Middle Q EQ LoHi-Mid Q
Table Pre Delay
118
Table Step Rate PH Step Rate
Table HR Scale Harmony Scale
Table OC Range Table SDD Delay Time SDD DlyTime
119
Table Xover Frequency 2CE Xover f
Table Name Name Edit
120
Table Chain Effect Chain
Table Target Patch Assign Target
Table Meter Point
121
Table Source Assign Source
122
123
Specifications
GS-10 Guitar Effects System with USB Audio Interface
USB
124
What is USB Driver?
Computer GS-10
Standard Driver
Special Driver and Standard Driver
Special Driver
126
Windows XP/2000 users
Installing the special driver
Installing & Setting Up the Driver Windows
127
\DRIVER\USBXP2k\SETUPINF.EXE
128
129
Click OK
Verify that Boss GS-10 is displayed, and click Finish
→ Next, you need to make the driver settings p
130
Click Yes
Click the Hardware tab, and then click Driver Signature
131
Windows
File signature verification is set to Ignore, and click OK
132
150
133
180
134
220
\DRIVER\USBME98\SETUPINF.EXE
135
136
Installing the OS-standard driver
When installation is complete, restart Windows
Windows XP/2000 users Windows Me users Windows 98 users
Click Finish Restart Windows
Installing & Setting Up the Driver Windows Windows Me users
137
Page
Click Next
139
Check CD-ROM drive, and click Next
Click Finish
140
341
141
Driver settings
About the input/output devices
Windows XP/2000/Me users
→ Next, set the Windows Volume Control p
142
Open Control Panel
143
Windows 98 users
Items that can be set
Raise or lower the slider to adjust the volume of the GS-10
144
Open the System Properties dialog box
145
Windows XP/2000 users
Click the Hardware tab, and click the Device Manager button
Mac OS 9/8 users
146
Click Restart to restart your Macintosh
Use the following procedure to install the GS-10 driver
147
OMS settings
148
Installing & Setting Up the Driver Macintosh 149
Page
FreeMIDI settings
151
Click Continue
Repeat up to Cable When settings are complete, click Done
152
→ Next, you need to install the Asio driver p
153
Installing the Asio driver
154
Installing & Setting Up the Driver Macintosh 155
Page
157
File menu, click Quit to close Apple System Profiler
158
Settings the sound input/output
Click the Speakers tab or Speaker Settings
From the Apple menu, select Control Panel Sound
159
Choose a source for sound input Device, select USB audio
With the GS-10 disconnected, start up Mac OS
Installing & Setting Up the Driver Macintosh Mac OS X users
160
Input tab, set Choose a device for sound input to GS-10
161
Output tab, set Choose a device for sound output to GS-10
162
Adjusting the audio latency
Using Asio Direct Monitor
Play back audio data on your application
If using Windows
Setting the Special Driver’s Functions
Opening the special driver settings dialog box
If using Macintosh
No sound / volume too low
Problems when using the GS-10
Problems with the sound
Oscillating sound occurs
Problems related to the USB driver
Other Problems
Does your computer meet the USB specifications?
Driver is not installed correctly
Can’t install/delete/use the driver in Windows XP/2000
166
Operating system becomes unstable
Problems when using the USB driver
Special driver mode Are you using only audio?
Can’t hear sound from the computer
Input port Output port
Can’t play back / record Midi
168
Noise is heard during audio playback
169
170
Are you using a USB device other than the GS-10?
Sound is interrupted during audio recording/playback
Is the GS-10 connected to a USB hub?
171
Recording produces a silent blank file
Sound becomes distorted or noisy when you apply an effect
Loud buzz is present in the guitar signal
Game background music does not play
173
Deleting the special driver
Macintosh users
Index
Numerics
Index
175
176
USB
Memo
177
178
For the U.K
Avis
03342912 ‘03-8-1N