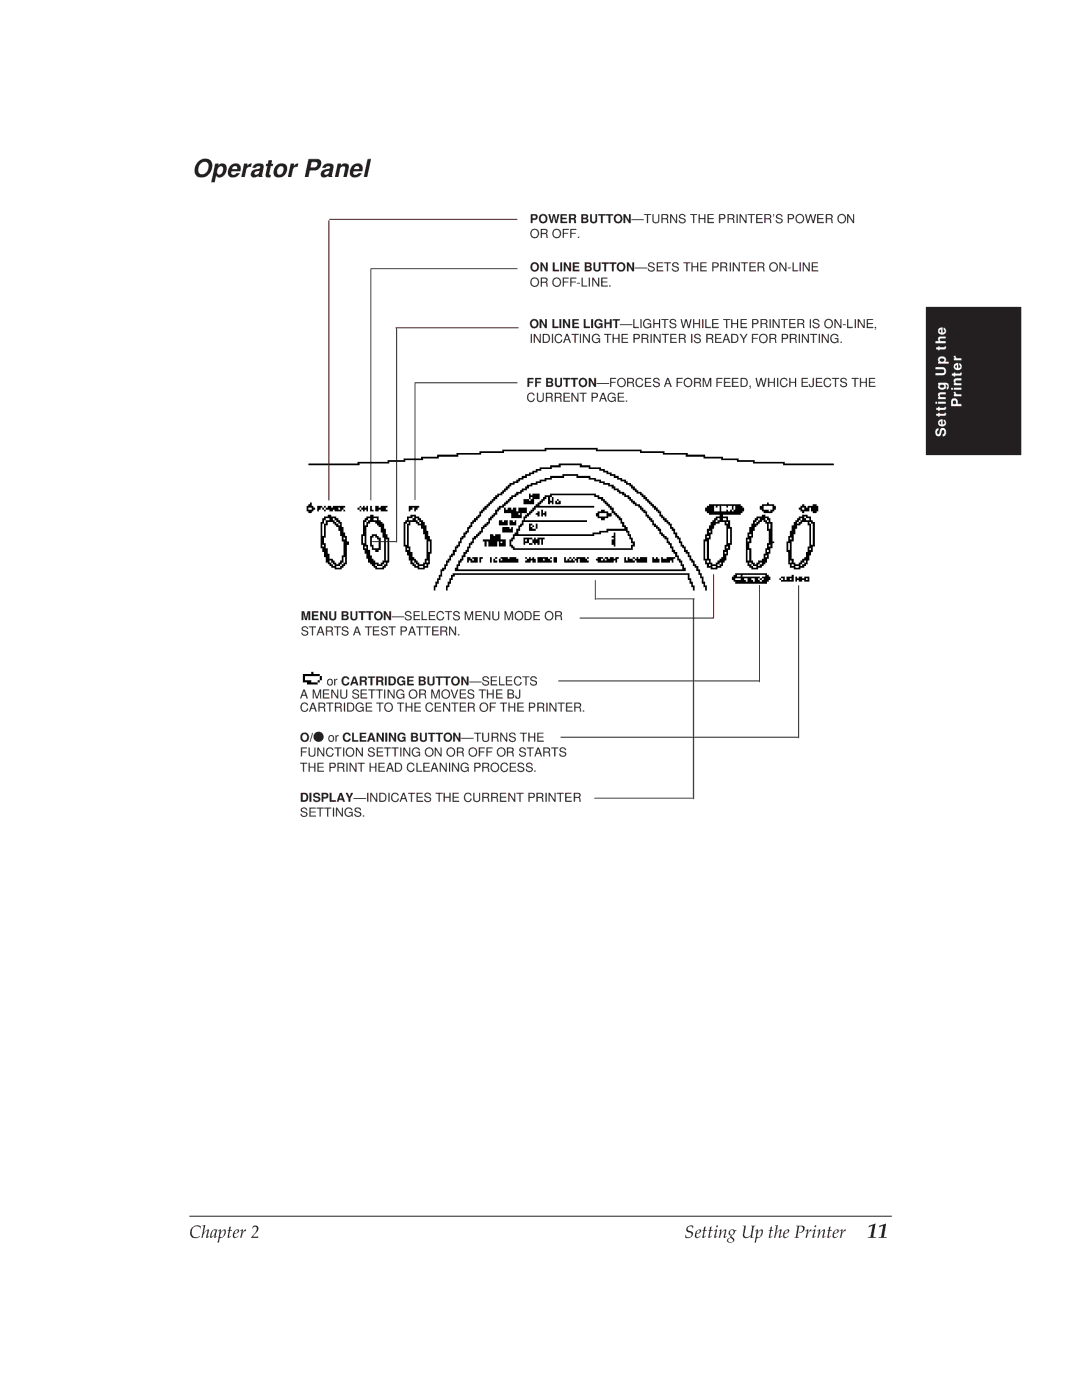
Disclaimer
Copyright
Trademarks
Chapter 3 Using the Printer
Using Your Documentation
Contents of This Manual
Chapter 2 Setting Up the Printer
Conventions
Chapter 5 Using the Operator Panel
Chapter 7 Troubleshooting
Chapter 9 Installing and Using the Battery Pack
Contents
Chapter 3 Using the Printer
Chapter 6 Maintaining the Printer
Appendix A Specifications
viii
User’s Manual
BJ-30 Bubble Jet Printer
Canon Computer Systems Help Desk 1-800-423-2366 USA
Chapter
Chapter Introduction
Introduction
Excellent Print Quality and Speed
Features and Benefits
Simple Maintenance
Compact Design
BC-10 Black BJ Cartridge
Supplies and Accessories
BJ Cartridge and Ink Tank
Print Media
Portable Kit NK-300
Portable Kit, Battery Pack, and Universal Adapter
NiMH Battery Pack NB-300
Related Publication
Fax number
Bulletin board services
Customer Support
Help desk
6 Introduction
Servicing the Printer
Unpacking Your Printer
Chapter Setting Up the Printer
1. Carefully remove all items from the box
2. Check to see that you have the following items
Selecting a Location for Your Printer
Chapter
Examining the Printer
From the Front
From the Back
or CARTRIDGE BUTTON-SELECTS
Operator Panel
Setting Up the Printer
O/ or CLEANING BUTTON-TURNS THE
2. Plug the AC adapter into an AC outlet
Attaching the AC Adapter
1. Make sure both the printer and the computer are turned off
Connecting Your Printer to the Computer
2. Connect the parallel cable
2. Open the paper support
Installing the BJ Cartridge
4. Open the front cover
3. Press the POWER button
Chapter
5. Make sure the cartridge holder is in the center of the printer
6. Unpack the BJ cartridge
CARTRIDGE button
8. Insert the BJ cartridge
7. Remove the protective material from the BJ cartridge
10. Close the front cover
9. Press down on the left side of the BJ cartridge
11. Press the CARTRIDGE button
2. Fan the paper
Loading a Stack of Paper
Slide the paper guide against the stack of paper
3. Slide the stack of paper into the sheet feeder until it stops
4. Secure the stack with the paper guide
Align the paper with the right edge of the sheet feeder
3. Press and hold down the MENU button until the printer beeps twice
Printing a Test Pattern
1. Make sure that the sheet feeder contains a stack of paper
2. Make sure that the printer is turned on
Installing the Windows Printer Driver
Installing a Printer Driver
Page
Installing the Canon TrueType Fonts for Microsoft Windows
Using the BJ-30 Windows Driver
Printing From Windows
Software Applications
Managing Your Printer’s Features
Operator Panel Buttons
Line Printers
FUNCTION Settings
Line Printers Versus Page Printers
Line Printers and Processing
Page Printers and Processing
Congratulations
Turning the Printer On and Off
Chapter Using the Printer
2. Press the POWER button
Back Print Film
Selecting Paper Types
Plain Papers
Transparencies
1. Make sure the paper support is open
Loading Paper
3. Slide the stack of paper into the sheet feeder until it stops
2. Fan the paper
4. Adjust the paper guide to the stack of paper
Auto Feed Guidelines
Printing on Envelopes
3. Insert the envelopes
2. Prepare the envelopes
Chapter
4. Adjust the paper guide to the stack of envelopes
5. Make sure the printer is on-line and start your print operation
38 Using the Printer
Printing on Legal-size Paper
WordPerfect 5.0 and 5.1 Bitstream Facelift for WordPerfect More Fonts
Printing in Landscape Orientation
Lotus 2.0, 2.1, and 2.2 Sideways
All Modes Pattern
Printing the Test Patterns
Nozzle Pattern
Ripple Pattern
Starting the Test Patterns
Font Pattern
2. Press and hold the MENU button until the printer beeps twice
4. Press the MENU button
To cancel printing
Test Pattern
Number
3. Disconnect the interface cable and the AC adapter
5. Place the printer and any accessories in a suitable carrying case
Traveling With the Printer
2. Remove any paper from the printer
You can travel with additional battery packs that are fully charged
Software
Chapter 4 Using the Printer With Your Software
Using
the Printer
Printer Setup Within Windows
Paper Size option
Selecting Printing Options
50 Using the Printer With Your Software
Media Type option
Plain Paper
Transparency
Grayscale
Paper Source option
Print Selection option
Black and White
Print Quality option
Other selections
Orientation option
Halftone
Special Options
Pattern 1 and Pattern
Diffusion
Intensity
Printing a Document
Recommended driver settings
Add a permanent swap file in Windows
Use Black and White when possible
Ways to Improve Print Speed in Windows
Turn off the Print Manager in the Windows Control Panel
Use a computer with a faster processor
Using the Windows Print Manager
Background printing
Add RAM to your computer
Selecting a Printer Driver
Setting Up MS-DOS Application Programs
Foreground printing
Selecting a Printer Control Mode
Typeface
Printer control mode
BJ mode
Epson LQ mode
62 Using the Printer With Your Software
Software and Printer Compatibility
Using the Operator Panel
Chapter Using the Operator Panel
Operator Panel Display
See Chapter 7, Troubleshooting, for details
1. Stack the paper properly in the sheet feeder
Feeding Paper
Form Feeding
Ejecting Paper
3. When the desired print mode is blinking, press the ON LINE button
Selecting a Print Mode
1. Press the MENU button once
Two-thirds Reduction Mode
Using the Reduction Modes
One-half Reduction Mode
1. Press the MENU button once
Selecting the Reduction Mode
3. Press the button to select the desired Reduction mode
2. Press the MENU button again
Using the
Selecting a Control Mode
3. Press the button to select the desired control mode
2. Press the MENU button two more times
72 Using the Operator Panel
4. When the desired font is blinking, press the ON LINE button
Selecting a Font
2. Press the MENU button three more times
1. Make sure the cartridge holder is still in the center position
Using the Low Ink Warning Function
2. Press the MENU button
74 Using the Operator Panel
Printer Guidelines
Chapter Maintaining the Printer
Use only the AC adapter that comes with the printer
3. Open the front cover 4. Clean inside the printer
Cleaning the Printer
2. Turn off the printer and unplug the AC adapter
6. Clean the exterior of the printer
5. Clean the platen area
3. To start the extensive cleaning procedure
Cleaning the Print Head
Starting Print Head Cleaning
2. To start the quick cleaning procedure
BJ Cartridge Guidelines
HOLD HERE HOLD HERE DO NOT TOUCH
BJ Cartridge and Ink Tank Maintenance
Ink tanks continually run out of ink
Ink Tank Capacity
Using Ink
Replacing the BJ Cartridge
1. Make sure paper support is open and the power is on
3. Open the front cover
GREEN TAB
4. Press the green tab on the front left edge of the cartridge holder
5. Lift the cartridge out of the printer
Printer
Chapter
6. Dispose of the BJ cartridge properly
7. Take the new BJ cartridge out of its protective packaging
8. Remove the protective material from the BJ cartridge
9. Insert the BJ cartridge
If you have enabled the Low ink warning function FUNCTION 1A
you must reset the ink gauge
Make sure that Bk indicator appears on the display
Replacing an Ink Tank
1. Make sure the paper support is open and the power is on
3. Open the front cover 4. Remove the empty ink tank
7. Close the front cover
5. Take the new ink tank out of its bag
3. Disconnect the interface cable and the AC adapter from the printer
Storing the Printer
9. Press the CARTRIDGE button
2. Remove any paper from the sheet feeder
See page
Chapter Troubleshooting
Problem
Check List
92 Troubleshooting
Problem
See page
N Attempting to repair the printer yourself may void the warranty
Warnings
Errors Indicated on the Display
Recoverable errors
Service call errors
Warnings
Solution
Cause
Problem
Solution
Recoverable Errors
Service Call Errors
Problem
Problem
Operational Problems
Problem
Solution
Data from computer is
Problem
Solution
Cause
Solution
Problem
Cause
100 Troubleshooting
Printing Problems
Problem
Solution
Solution
Problem
Cause
Cause
Problem
Solution
102 Troubleshooting
Cause
MODE LPT1,,P
Problem
Solution
104 Troubleshooting
Paper Loading Problems
Problem
Solution
Solution
Problem
Cause
Cause
Problem
Solution
106 Troubleshooting
Cause
Print Quality Problems
Problem
Solution
Cause
Problem
Solution
108 Troubleshooting
Solution
Problem
Cause
Cause
Windows Problems
Problem
Solution
Solution
Problem
Cause
Cause
Problem
Solution
112 Troubleshooting
Solution
Problem
Cause
Cause
Problem
Solution
114 Troubleshooting
Problem
TEMP = C\WINDOWS
DIR C\WINDOWS
SET TEMP = C\DOS
1. Remove the stack of paper from the paper support
Clearing Paper Jams
4. Press the ON LINE button to set the printer back on-line
Chapter
118 Troubleshooting
Chapter Customizing the Printer
Changing the FUNCTION Settings
1. Press the MENU button once
1. Make sure that paper is loaded in the sheet feeder
Verifying the Current Settings
4. Press the / button
5. Press the ON LINE button
1. Make sure that the printer’s power is on
Returning All Settings to Their Factory Defaults
Setting
Factory Default Settings
Function
Setting
FUNCTION Settings
Function
FUNCTION 2 Page length
BJ Mode
Description
FUNCTION 1 Horizontal print position
FUNCTION 7 Automatic power off mode
FUNCTION 3 Text scale mode
FUNCTION 6 Smoothing mode
N When to set FUNCTION 6 to ON
FUNCTION 11 Automatic carriage return CR
FUNCTION 12 Alternate graphics mode AGM
FUNCTION Settings
FUNCTION 10 Automatic line feed LF
FUNCTION 1A Low ink warning
FUNCTION 19 Automatic emulation switching mode
128 Customizing the Printer
Epson LQ Mode
FUNCTION
Description
FUNCTION 14 Character set
FUNCTIONs 11, 12, 13 International character set
Character set
FUNCTION Settings
Chapter
130 Customizing the Printer
Chapter 9 Installing and Using the Battery Pack
From the Back
Examining the Battery Case
Examine the battery case before you attempt to install it
From the Front
3. Turn the printer over so the bottom of the printer is facing up
Attaching the Battery Case to the Printer
1. Make sure the printer is turned off and close the paper support
2. Remove the AC adapter and the interface cable from the printer
6. Insert the battery pack into the battery pack compartment
8. Turn the printer over and set it in the upright position
Charging the Battery Pack
When the battery is fully charged, the CHARGE light turns off
2. Plug the other end of the AC adapter into an electrical outlet
To charge a battery pack, follow these steps
The CHARGE light blinks as the battery pack charges
1. Disconnect the AC adapter from the battery case
Using the Printer With the Battery Pack
5. Start your print operations
3. Close the interface cover 4. Open the paper support
138 Installing and Using the Battery Pack
1. Make sure the battery pack is installed in the battery case
Battery Pack Capacity
Printing With a Low Battery
Discharging the Battery Pack
N You can use the printer while the battery pack is discharging
3. Lift the battery pack out of the battery compartment
Removing a Battery Pack
Removing the Battery Case
2. Press in on the battery pack latch and lift up on the battery pack
142 Installing and Using the Battery Pack
5. Disconnect the battery case from the printer
Chapter
Paper Handling
Appendix A Specifications
Paper Weight
Printing Method
Printing Area-Papers
Printing Direction
Print Width
Line Feed Speed
Resident Printer Control Modes
Printing Area-Envelopes
U.S. Commercial number
European DL
Pitch
Printing Characters
Maximum Number of Characters per Line
Mode
Interface
Maximum Number of Characters per Line continued
Graphic Image Print
Buffer
Dimensions
Portable Kit Specifications
Power Source
Power Consumption 5 watts standby
Printing Envelopes in Microsoft Windows
Appendix B Application Notes
AmiPro
Method
Microsoft Publisher
Method
Microsoft Word 6.0 for Windows
Microsoft Word for Windows
Microsoft Word 2.0 for Windows
WordPerfect
WordPerfect
WordPerfect
First time printing envelopes
Printing envelopes other than the first time
Works 3.0 for Windows
Appendix B
156 Application Notes
All modes pattern
Automatic emulation switching mode
Automatic power off
Glossary
Commercial number 10 COM10
Canon extended mode
Centronics
Code page
Double-strike
Emphasized mode
Dithering
Double-high characters
Fixed pitch spacing
Hexadecimal dump mode
High quality HQ mode
ESCape sequences
Ink tank
High speed HS mode
Line weight
Ink jet printer
Glossary
characters
Nonimpact printer
Manual feed
Multilingual
Noise level
Parallel interface
Print mode
Printer command
Page orientation
Printing area
Reset
Resolution
Printer driver
Roman
Smoothing mode
Text scale mode
Ripple pattern
Index
Canadian support 5 Canon Accessories
Envelopes 143, 145 printing 36-38 printing area Epson Graphics 123
Ink gauge
Page length 122 orientation printers size 39 Paper feeding handling 2
REFRESH
Page
Index
Canadian Radio Interference Regulations
FCC Regulations