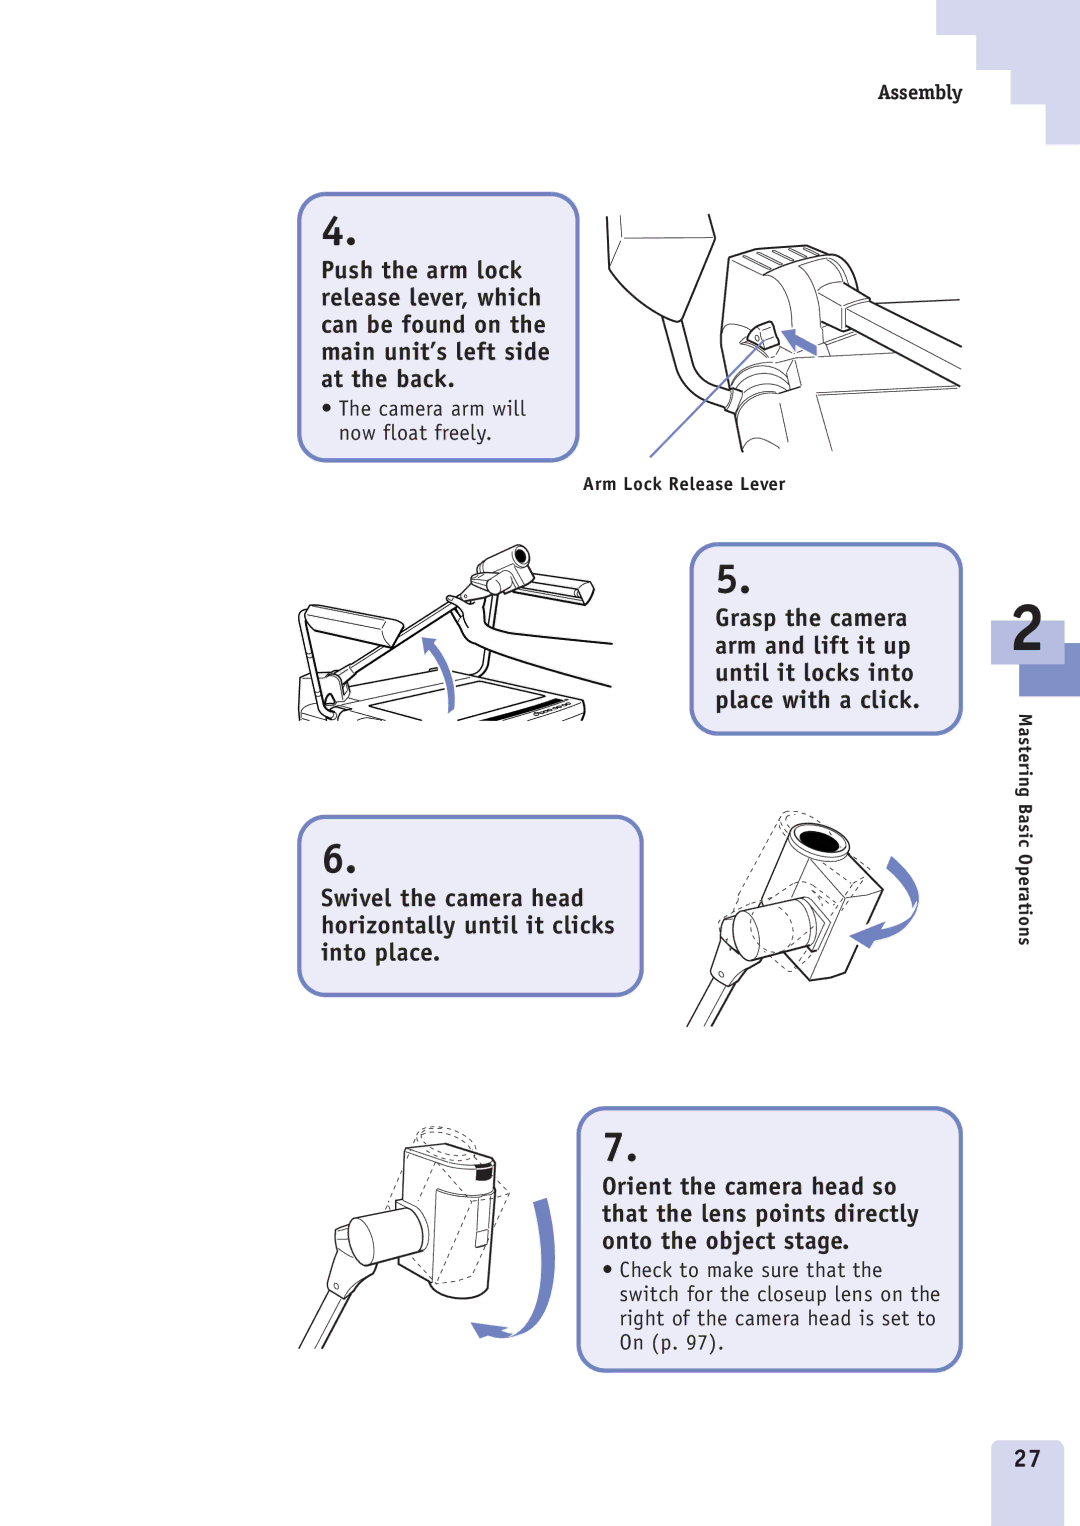
Setup for Operation with a Computer
An introduction to the Features
Troubleshooting
DZ-3600U
Remote Controls
Features of the DZ-3600U Digital Document Camera
High-Resolution
Introduction
Quick Reference Guide Pamphlet
How to Use the Guides
Users Guide This Guide
Copyright Compliance
2.Important Operational Instructions
Safe Use of the Equipment
1.Important Warnings
FDA Regulation
NOTIFICATION IC
FCC Notice
IC NOTICE
DZ-3600U Digital Document Camera
Important Safety Instructions
a.When the power cord or plug is damaged
Hot locations Locations close to open flame or fire
Presentation Examples
A La Carte Menu of DZ-3600U Applications
As a Presentation Tool
A La Carte Menu of DZ-3600U Applications
As a Scanner for 3-D Objects
As a Conventional Visualizer
An Introduction to the Features
Table of Contents
Setup for Operation with a Computer
Chapter
Opening Saved Images
Operating without a Computer
Chapter
Troubleshooting tips
Troubleshooting
Appendix
Chapter
Setup for Operation with a Computer
Chapter
Plug the other end of the power cord into an electrical outlet
Connecting to a Power Source
Connect the DZ-3600U to a power source with the supplied power cord
Insert the other end of the USB cable into the computer’s USB port
Connecting to a Computer
Computer
To Connect a Projector or Large Screen Monitor
Free Hard Disk Space
Computer System Requirements
Memory
Display
Installing the Software
Confirm that the main unit’s power is off
The setup utility will automatically start after a few moments
Place the software CD-ROM into the computer’s drive
Click the Next button
By placing a check mark in this box you are setting it so that Presentation Software will automatically start when you turn on the computer and run Windows a shortcut will be placed in Window’s Startup folder. p
Click the Next button
The software installation is complete
Click the Finish button
Turn off the computer, its monitor and any other peripherals
Click the Next button
Important Instructions for the Remote Control
CAPTURE RESOLUTION PREVIEW
Ê Note
Aim the Remote Control at the Camera Head
Check the Battery Charge Prior to Use
Mastering Basic Operations
Chapter
Facing the front of the main unit, lift up the right front light
Assembly
Gently remove the cover from the main unit if it is on
Lift up the left front light
Swivel the camera head horizontally until it clicks into place
Turning On the Power
Turn on the power of each device in the correct sequence
Mastering Basic Operations
Starting the Software
Ê NoteÊ
Placing Objects
Ê Note
A Few of the Basics
CAPTURE RESOLUTION PREVIEW
Zooming
Press the W button in the same manner
LIGHTS
Ê Note
Press the Capture button on the remote control
Capturing Images
Press the Rotate button on the remote control
Rotating Captured Images
Click the No button
Closing Software Programs
Move the mouse cursor close to the top of the window
Click the closebox at the extreme right of the toolbar
Turning Off the Power
Turn off the power on the devices in the correct sequence
Knock-Down
Turn the camera head in a horizontal plane to align the grooves
Fold down the right front light last
Transport Precaution
Fold down the left front light first
Ê Note
An Introduction to the Features
Chapter
About the Bundled Software
The Two Programs to Install
This topic features the two programs bundled with the DZ-3600U
DZ-3600U Presentation Software
DZ-3600U TWAIN Driver
About the Bundled Software
Ê NoteÊ
Preview Mode and Still Mode
Preview Mode
Still Mode
Preview Mode and Still Mode
Status Bar
Toolbar and Status Bar
Toolbar
different command
Display/Hide the Toolbar and Status Bar
Display the Toolbar and
Hide the Toolbar and Status Bar
Move the mouse cursor to the top of the window
Capturing Images
Procedure with the Remote Control
Capturing Images
Preview Still Mode Mode
Click the button
Procedure with the Control Panel
Procedure with the Computer
Capturing Images
Press the Resolution button
Selecting the Capture Resolution
Procedure with the Remote Control
Procedure with the Control Panel
Selecting the Capture Resolution
Procedure with the Computer
Procedure with a Computer
Switching to Preview Mode
In still mode, press the Preview button
In preview mode, press the Preview button
Selecting the Display Resolution PreviewMode
Selecting the Display Resolution
The display resolution and display rate will change
Selecting the Display Resolution
Procedure with a Computer
Selecting the Display Resolution
Saving Just the Displayed Image
Saving Images
Saving Images as Presentation Software Files
Saving All Images and the HTML Index
Click the button
Saving Images As Presentation Software Files
Click Save History
Specify a folder and file name, then click the Save button
An Introduction to the Features
Saving Just the Displayed Image
Click Export Current Image
Click the button
Specify the folder location and folder name, then click the OK button
Saving All Images and the HTML Index
Click Export All Images
Click the button
An Introduction to the Features
Saving Images
Click Open History
Opening Saved Images
Presentation Software files saved to disk can be opened and displayed
Still
To Reverse the
Forwarding/Reversing the Preview Still
Display to the Next Image
Display to the
Procedure with a Computer
To Reverse the Display to the Previous Image
To Forward the Display to the Next Image
Click the button
To Select a Previously Captured Image from the List
Selecting Images from
the List
Procedure with the Remote Control
Zoom Out
Adjusting the Display Size of Preview Images
Procedure with the Control Panel
Zoom In
Fit to Width
Changing the Display Size of Still
Captured Images
Fit to Window
Click the button
Select a Display Size
Method
Click the arrow here and select a size from the list
Preview Images
Adjusting the Brightness of
The brightness of images in preview mode can be adjusted
Darker Brighter
Turn the Brightness dial
Adjusting the Brightness
DarkerBrighter
Click the
To Adjust the Focus to a Closer Setting
Adjusting the Focus of
To Adjust the Focus to a More Distant Setting
To Turn Autofocus On/Off
To Adjust the Focus to a More Distant Setting
To Turn Autofocus On Off
To Adjust the Focus to a Closer Setting
Procedure with the Control Panel
Turn the Detail dial
Adjusting the Detail of
Adjusting Detail
Procedure with the Remote Control
Preview Mode
Adjusting the Color Balance of Preview Images
2. Zoom the chart until it completely fills the window
Procedure with the Remote Control
Resetting the White Balance Restoring Auto White Balance
Adjusting the Color Balance
Procedure with the Control Panel
Press the Rotate button
Adjusting the Orientation of Preview Images
Rotating the Display Degrees
Procedure with the Remote Control
Control Panel
To Restore the Original Orientation
To Rotate Degrees
Procedure with a Computer
To Rotate the Image 90 Degrees at a Time
Rotating Captured Images
To Rotate an Image
Still Mode
Method
To Select an Angle and Rotate the Image
An Introduction to the Features
The image will rotate through the specified arc
Capturing an Object in Monochrome Mode
To Switch to Color/ Grayscale/ Monochrome Mode
To Switch to Color/Grayscale Monochrome Mode
Press the Color button
Backlight
Using the Front Lights and
This command turns the front lights and backlight on and off
To Turn the Front Lights and Backlight On/Off
Procedure with the Control Panel
Procedure with a Computer
To Turn the Front Lights and Backlight On/Off
Shooting Negatives
To Switch to Negative Mode
Procedures Required for showing Negative Films
Press the NEGA button
To Flip the Image
Press the Reset button
Reversing or Inverting Images
To Reverse the Image
Turn Off the Closeup Lens
Shooting the Surroundings
Point the Lens in the Desired Direction
Press the Flip and Mirror Buttons
Displaying the Finger Pointer
Using the Finger Pointer
To Show/Hide the Finger Pointer
Press the button labeled with the pointing hand
Finger
To Move the Finger Pointer
To Move the
Pointer
Switching between Application Programs
Interfacing with PowerPoint
To Switch between Programs
Press the APP button on the remote control
Ê Note
To Advance/ Reverse a Slide
Controlling Slides
Ê Note
Scanning Images with TWAIN Driver
Selecting the Input Device
Using TWAIN Driver
Scanning Images with TWAIN Driver
Click the beside the Captured Image Size item in the window to display the menu below. This setting allows you to select the size dimensions expressed in pixels at which images are captured
Operating without a Computer
Chapter
Ê Note
Connecting to a Video Monitor or Projector
S Video Cable
Ê Note
BNC Video Cable
Ensure that the main unit and other devices are turned off
Connecting to Other Image Input Devices
Ê Note
Connecting to an External Input Device
Connecting to Other Image Input Devices
Turning On the Power
Assembly, Knock-Down and Power On/Off
Assembly and Knock-Down
Turning Off the Power
Resolution Button
Power Indicator
Capture Button/Indicator
Indicator
Brightness
Remote Control
Capture Button
Color Button
Camera Head
Reset Button
Closeup Lens Switch
Flip Button
Press the EXT In button
Displaying Images from External Input Devices
To Receive Images from an External Input Device
Procedure with the Remote Control
Troubleshooting
Chapter
The Computer Monitor Is Blank
Troubleshooting Tips
Presentation Software Will Not Start
Images Are Not Displaying on the Video Monitor
The Focus Is Off
The Processing Speed of Other Application Programs Has Slowed
Images Are Too Bright or Dark
The Coloration Is Off
Images Are Inverted or Reversed
The Remote Control Will Not Work
Lines Are Appearing in Captured Images
Images from External Input Devices Are Not Displaying
Error Messages
Error Messages
Appendix
Open the lid of the box
Remove the accessories from around the main unit
Removing the Equipment from the Box
Remove the plastic wrap from around the main unit
Remove the packing materials securing the camera arm
Unfold first the left, then the right front light
Remove the plastic bags from around the front lights
Remove the packing materials taped to the object stage
The following items should be included in the box
Packing List
Other Items
Power Cord
Remote Control
Changing the Remote Control Batteries
If there are spent batteries inside the battery chamber, remove them
Main Unit
Power Switch
Components Guide
The names and functions of the various components are listed below
Back Panel of the Main Unit
DIP Switches Electronic shutter
Service Mode
Output
Indicator/Dial
Preview Button/Indicator
Focus Button Indicator
EXT IN Button/Indicator
Capture Button
Remote Control
Resolution Button
Zoom Button
Closeup Lens Switch
Mirror Button
Reset Button
RESET FLIP MIRROR CLOSEUP
preview image p
Toolbar Preview Mode
the window
Software p
Toolbar Still Mode
Camera Head Rotation Angles
Specifications
Appendix
approximetely 30º up and down and 120º right and left
Grayscale
Glossary
Color
HTML
White Balance
TWAIN
VAROS
Glossary
Index
Symbols
Index
Art Direction
JAPAN -- CANON SALES CO., INC
U.S.A. -- CANON U.S.A., INC. NEW YORK OFFICE
CANON U.S.A., INC. LOS ANGELES OFFICE