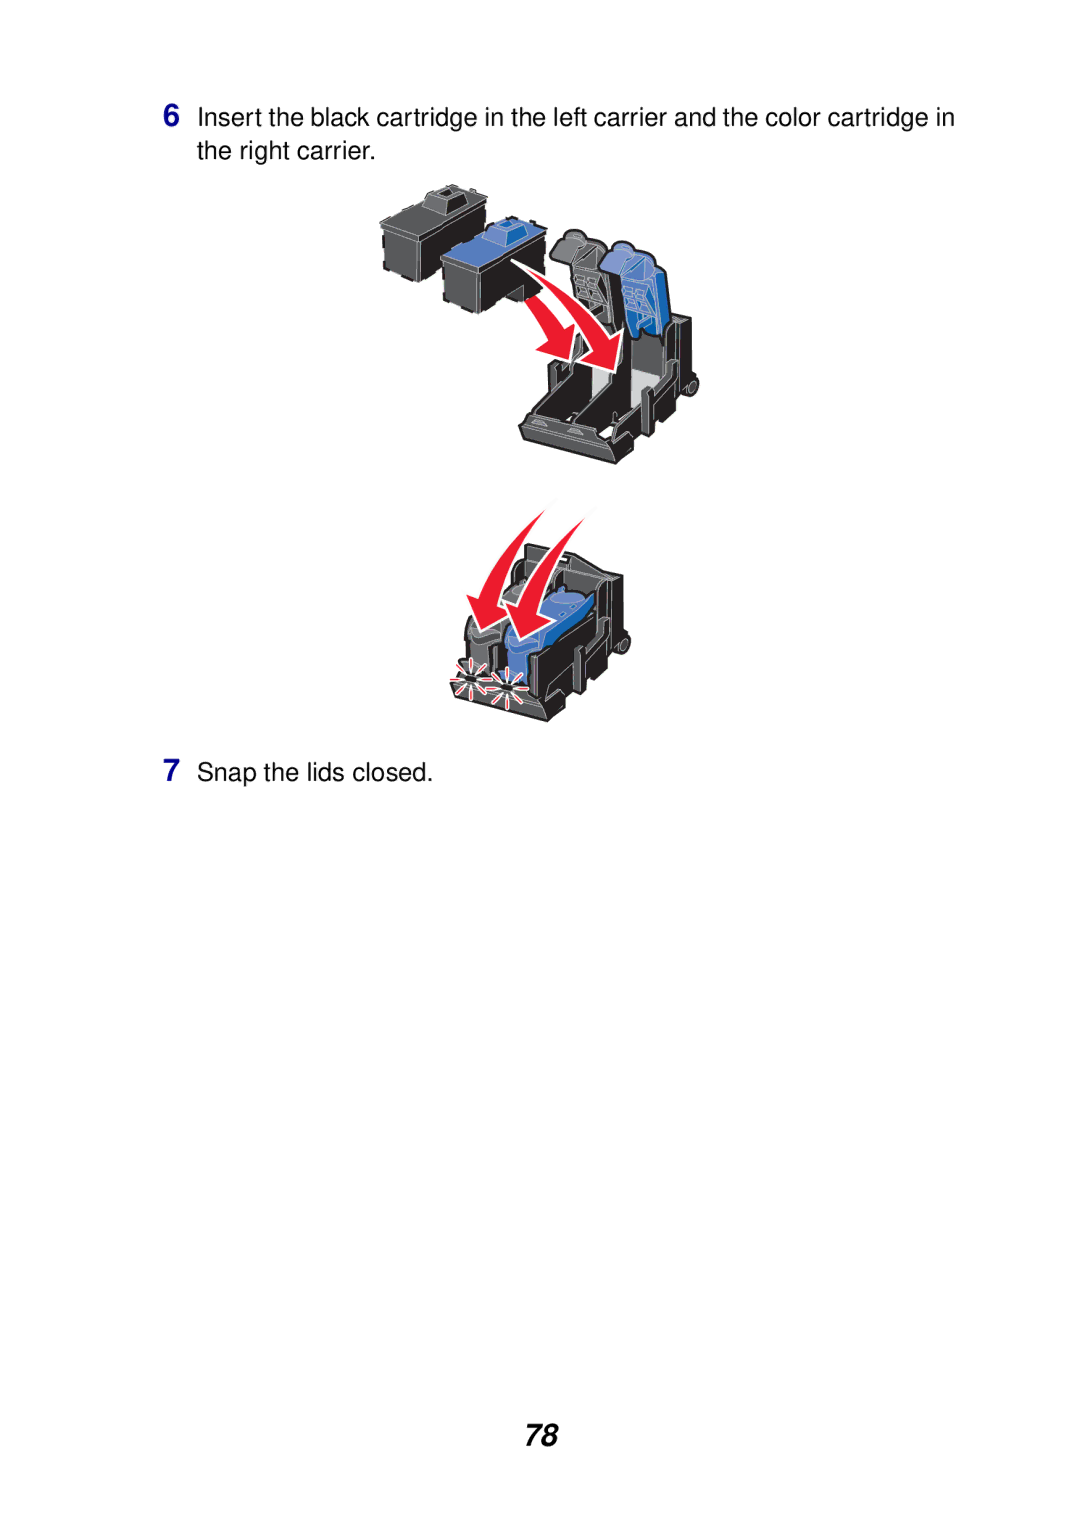
Manuals
/
Lexmark
/
Computer Equipment
/
All in One Printer
Lexmark
X6100 manual 7Snap the lids closed
Models:
X6100
1
84
121
121
Download
121 pages
33.98 Kb
81
82
83
84
85
86
87
88
<
>
Troubleshooting
Install
Error codes
Connecting directly to a telephone wall jack
Symptom
Setup sheet
Set Defaults
To delay sending a broadcast fax
To adjust how the image is cropped
7Click See More Copy Settings
Page 84
Image 84
6
Insert the black cartridge in the left carrier and the color cartridge in the right carrier.
7
Snap the lids closed.
78
Page 83
Page 85
Page 84
Image 84
Page 83
Page 85
Contents
• “Troubleshooting” on page
X6100 Series
User’s Guide for Windows
“Learning about your All-In-One”on page
Safety information
Edition: October
UNITED STATES GOVERNMENT RIGHTS
Mercury statement
Contents
Printing
Faxing
Networking
Maintaining your All-In-One
Troubleshooting
Clean the scanner glass
Setup troubleshooting
General troubleshooting
Page
Finding more information
Setup sheet
Setup sheet
Resource
Resource
Description
Click Start Programs Lexmark X6100 Series Readme
Setting up your All-In-One
Set up the All-In-One
Equipment
Benefits
See this section
All-In-One
Connecting directly to a telephone wall jack
Connecting to a telephone
2 1 3
3Connect a phone cord from the wall jack port on the All-In-Oneto the telephone wall jack
Connecting to an answering machine
13 2 4
Connecting to a computer modem
Learning about your All-In-One
Understand the All-In-Oneparts
A Lexmark X6100 Series with an ADF
A Lexmark X6100 Series without an ADF
Automatic Document Feeder ADF Control panel
Display
connector
Power supply
Scanner unit Scanner lock Scanner support
USB cable port
When you want to
Use the
Use the control panel
Press
Scan
Enter text on the control panel
Using the Fax Setup Utility
Use the All-In-Onesoftware
Page
On this tab
You can
Using the Lexmark All-In-OneCenter
Using Print Properties
1With your document open, click File Print
The Print Properties screen appears
Using the Lexmark X6100 Series Photo Editor
Using the Lexmark Solution Center
Using Optical Character Recognition
Loading paper and originals
Load plain paper into the paper support
Load banner paper into the paper support
Page
Load up to
Make sure
Load an original document into the ADF
Width
Length
Note: You can load A4, Letter, or legal size paper into the ADF text side up
Load an original document on the scanner glass
2Open the top cover
4Close the top cover
Copying
1Make sure your All-In-Oneis on
2Open the top cover
3Place the item you want to copy face down on the scanner glass in the upper left corner. Make sure the top of the document faces left
Copy using the control panel and the ADF
Copying appears on the display
3Open the top cover
7Click See More Copy Settings
5Close the top cover
The All-In-OneMain Page appears
Copy using the All-In-Onesoftware and ADF
4Click See More Copy Settings
9Click Copy Now
Control panel menus
Copy mode
6Click Copy Now
REPEAT IMAGE
SET DEFAULTS
Use Factory
Use Current
LANGUAGE
Scanning
2Open the top cover
4Close the top cover
1Make sure your computer and All-In-Oneare on
2Open the top cover
4Close the top cover
The All-In-OneMain Page appears
Scan using the control panel and the ADF
7Click See More Scan Settings
9Click Scan Now
Scan using the All-In-Onesoftware and the ADF
5Click Scan Now
Scan multiple images
E-maila scanned image or document
4Click See More Scan Settings
5Click Display Advanced Scan Settings
Save an image on your computer
Enlarge or reduce documents
5Click Preview Now
9Click Attach Now
Scan mode
From this sub menu
You can
CLEAR SETTINGS
SET DEFAULTS
default settings
Set your default settings to
Printing
Print a document
Print collated copies
3Click See More Copy Settings
Print more than one page on a sheet of paper
Print an image as a multi-pageposter
Print last page first
Print repeating images
Print two images on one page
3Click See More Copy Settings
4Select the Print Last Page First check box
Print a banner
3Click Properties
Page
Faxing
Receive a fax
Automatically
Manually
Recommended for a dedicated fax line
Recommended for a shared fax and telephone line
Send a fax
Answering machine
Use the control panel and scanner glass
Recommended for a shared fax and telephone line
4Close the top cover
5On the control panel, press Fax
7Press Black or Color
8Do you have another page?
Use the control panel and ADF
Send a fax from your PC
Use the All-In-OneCenter
Setting Up Speed Dial
Customize a fax job
Using the computer recommended
Using the control panel
Using Speed Dial
Sending a multi-pagefax to a group
To delay sending a broadcast fax
To send a broadcast fax immediately
Sending a delayed fax using speed dial
Distinctive ring patterns
•Single ring •Double ring •Triple ring
To customize your settings
Use the Fax Setup Utility
ANSWER FAX WHEN
EDIT SPEED DIAL
Advanced Fax options
Fax confirmation
Max send speed
Country code
Country code
Networking
Maintaining your All-In-One
Replace the print cartridges
3Squeeze the tabs on the cartridge lids, and then lift the lids
7Snap the lids closed
8Lift the scanner unit, and then push the scanner support to the right
Select
After installing new cartridges
To solve print quality problems
Align the print cartridges
Improve print quality
2Clean the print nozzles: Using the control panel
fLet the nozzles and contacts dry completely
Clean the scanner glass
Preserve the print cartridges
Order supplies
Item
Part number
Black cartridge
Troubleshooting
Setup troubleshooting
General troubleshooting
Both your computer and your All-In-Oneare on
Document does not print
Document prints slowly
1 Click Start Settings Printers
Document misfeeds or jams
Paper misfeeds or multiple sheets feed
Paper jams
If a paper jam occurs in the ADF
bLower the scanner unit to close it
1Turn the All-In-Oneoff
Document prints poorly
Document is too light or too dark
Vertical, straight lines are not smooth
Characters are missing or unexpected
Print is too dark or smudged
Display language is not preferable
Date and time on the display are incorrect
Print quality is poor at the edges of the page
Colors are faded or not printing completely
All-In-Oneis not communicating with the computer
Black and white copy quality is unsatisfactory
Page
Scanned image is unsatisfactorily cropped
To adjust how the image is cropped
2Click See More Scan Settings
3Click Display Advanced Scan Settings
Fax settings need adjustment
Edges of my document are cropped
Scanner unit will not close
5Click Save Settings
Error messages and flashing lights
3Click How to clear and avoid paper jams
Ink Low message
Paper Jam message
Hardware Error
Paper Out message
Cartridge Error: 50C
Hardware Error:
More troubleshooting options
Remove and reinstall the software
Power light blinks twice
Fax troubleshooting
Symptom
Problem
Solution
Symptom
Problem
Solution
Cannot
Using an unsupported line
To connect without an unsupported line
To connect with an unsupported line
Notices
Using the X6100 Series All-In-Onein Germany
Using the X6100 Series All-In-Onein Switzerland
Notice to users of the Canadian telephone network
Industry Canada
Mercury statement
Conventions
Copyright advisory
Index
Page
Page
Page
2003 Lexmark International, Inc
740 West New Circle Road Lexington, Kentucky