Manuals
/
Star Micronics
/
Computer Equipment
/
Printer
Star Micronics
LC-200
user manual
Standard Character SET #1
Models:
LC-200
1
129
152
152
Download
152 pages
19.89 Kb
126
127
128
129
130
131
132
133
Troubleshooting
Specification
Default Settings
Buttons and Indicators
Connecting the interface cable
Maintenance
Clearingthe buffer/Allreset
Printer Control Commands
Adjusting the Printing GAP
Functions of the EDS Settings
Page 129
Image 129
I
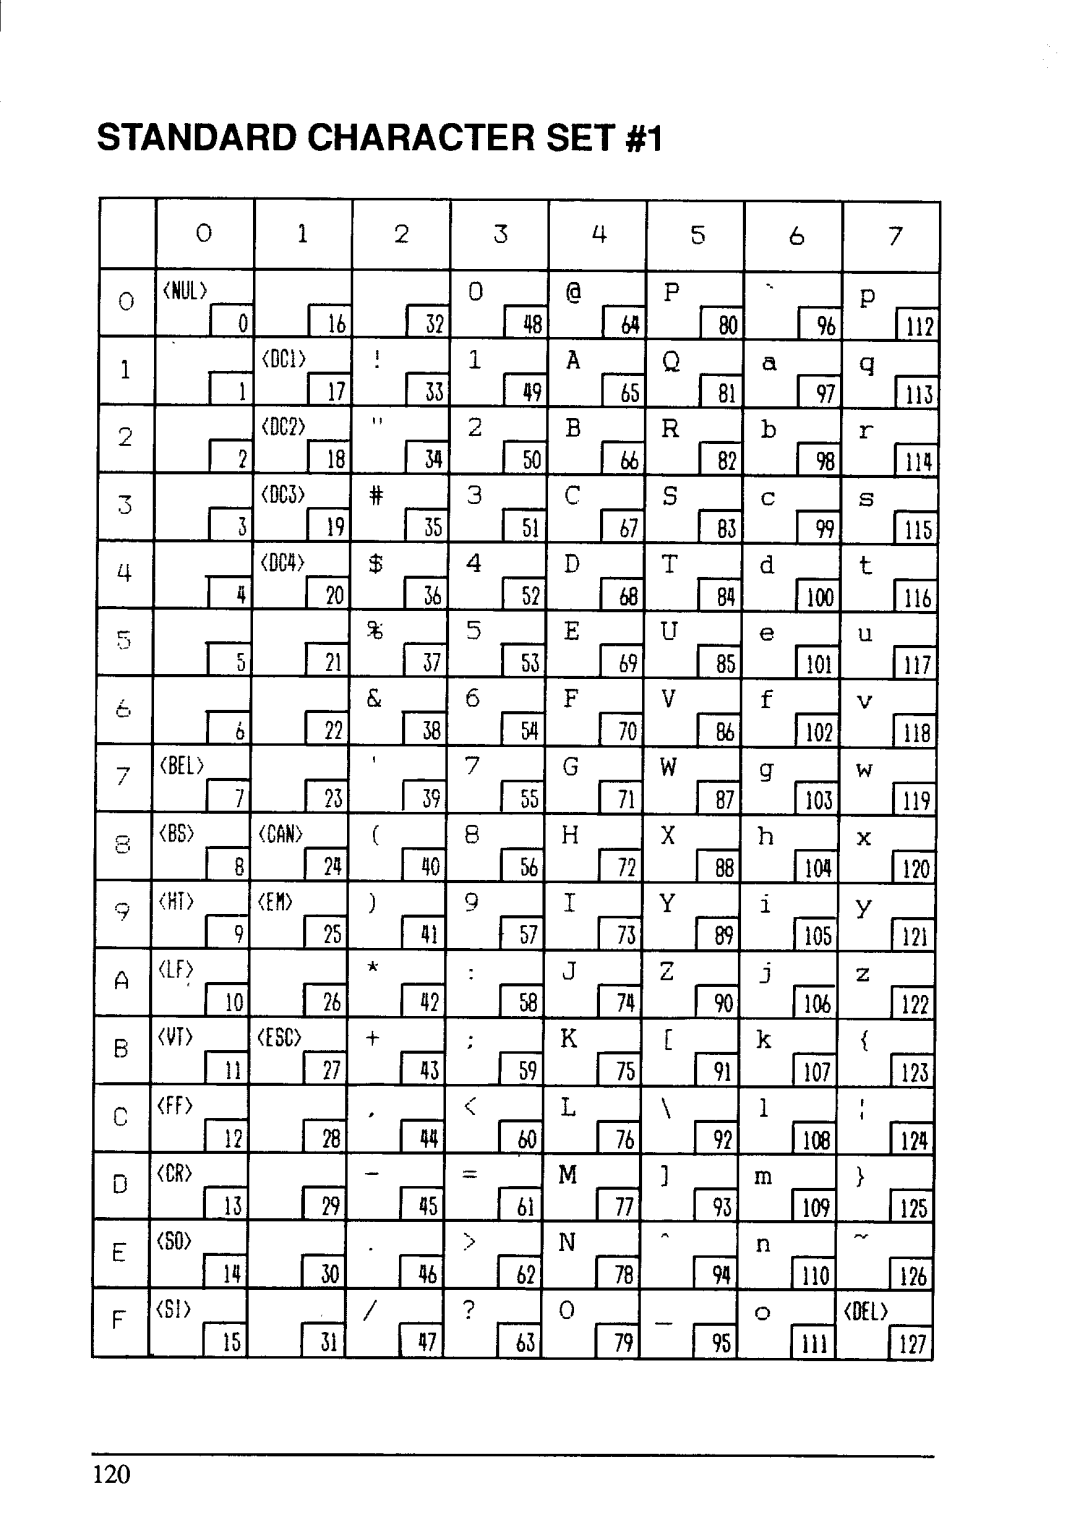
STANDARD CHARACTER SET #1
I 1011121314151
6171
120
Page 128
Page 130
Page 129
Image 129
Page 128
Page 130
Contents
LC-200
LC-200
Page
HOW to USE this Manual
Page
Features of the Printer
Table of Contents
Download Characters
Printer Control Commands
113
Locating the Printer
Chapter
Checkingthe carton contents
Printer’s external parts
Identifyingprinterparts
Install the ribboncartridgeand the roller unit
Mountingtheplaten knob
Seiting UP
~~cketson the cartridge itself
Pass the ribbon between the print head and print head shield
Figur@1-7. Install the roller unit onto the printer
Connecting the interface cable
Connectingtheprinter to your computer
Loading Single Sheets
Automaticloading
Lever
Manualloading
Loading and Parking Fanfold Forms
Loadingthepaper from the rear of theprinter
73.Mount the fanfold paper over the tractor units
Cover
75. Pull up the tractor unit for bottom feeding
Loadingthepaper from the bottomof theprinter
Paperparking
Paper unparking
Loading MULTI-PART Forms
17. Location of the adjustment lever
Adjusting the Printing GAP
Single
Control Panel Operations
Buttons and Indicators
Paperfeed button
Online button
Pitch button
SET/EJECT/PARKbutton
Font button
POWER-UP Functions
Short test mode
Long self-test
Long test mode
Stay in Panel Pitch
Print area test mode
Stay in Panel Font
Stay in Panel Pitch and Font
Next Lprint
Hexadecimaldump
Figura 2-6.Sample hexadecimal dump with IBM-PC
Return
Switch Combination Functions
Form feed
Topof form
Forwardmicro-feed
Reversemicro-feed
Changingthe auto loading value
Selectingtheprint color
Clearingthe buffer/Allreset
StoreMacroDefinition
Page
HOW to SET the EDS Mode
Default Settings
Functions of the EDS Settings
OFF
Standard IBM
Page
OFF
On on OFF
On on on
Bidirectional TEST/ADJUSTMENT Mode
Ascii
Printer Control Commands
Font Control Commands
Select draft quality characters
Select AU characters
Select Couriercharacters
Select NLQ font
Select Sanserlfcharacters
Select Script characters
Select italic characters
Select Oratorcharacters
Select NLQ italic characters
Select uprightcharacters
Canceldouble-strikeprinting
Cancelemphasizedprinting
Double-strikeprinting
Start underlining
Stop werlining
Stop underlining
Superscript
Subscript
Selectstandardcharacterset
Cancelsuperscriptor subscript
Select IBM characterset
Select characterset #1
Select internationalcharacterset
Select IBM codepage
S.A
Enable printing of all character codes on next character
Enableprinting of all charactercodes
Select slashzero
Select normalzero
Character Size and Pitch Commands
Elitepitch
Condensedprinting
Cancelcondensedprinting
Cancelexpandedprinting
Expandedprinting
Select masterprint mode
Cancelone-lineexpandedprinting
Selectproportionalspacing
Select fixed spacing
Select doubleor quadruplesize
Increasecharacterspacing
Select charactersize
Print double-heightcharacters
Return to normalheight
Vertical Position Commands
Select characterheight, width,and line spacing
Set line spacingto 1/8inch
Set line spacing to 1/6inch
Set line spacing to 7~2 inch
Set line spacingto n/216 inch
Set line spacing to n/72 inch
Line feed
ExecuteESC a
Reverseline feed
Performone n/216-inchline feed
Feedpaper n lines
Performone n/216-inchreverseline feed
Set top of page at currentposition
Setpage length ton lines
Cancelbottommargin
Set page length ton inches
Set bottommargin
Enablepaper-outdetector
Disablepaper-outdetector
Returnto top of currentpage
Set verticaltab stops
Set verticaltab stops in channel
Set verticaltab stopseveryn lines
Select verticaltab channel
Verticaltab
Horizontal Position Commands
Set left margin
Set right margin
Set left and right margins
Cancelautomaticine feed
Carriagereturn
Set automaticline feed
Centertext
Leftjustify
Rightjustify
Fulljustify
Set horizontaltab stops
Reset all tab stops
Set horizontaltab stopsevery n columns
Horizontaltab
Relativehorizontal
Absolutehorizontaltab in inches
Absolutehorizontaltab in columns
Print normal-density8-bitgraphics
Graphics Commands
Print double-density8-bitgraphics
Printdouble-density,double-speed8-bitgraphics
Print quadruple-density8-bitgraphics
Selectgraphicsmode
Convertgraphicsdensity
Print 9-pingraphics
Definedraft downloadcharacters
Download Character Commands
Define draft downloadcharacters
DefineNLQ downloadcharacters
Copy characterset from ROM into RAM
Select downloadcharacterset
Shift downloadcharacterarea
Select draft elite downloadcharacterset
Select draft downloadcharacterset
Select NLQ downloadcharacterset
Select NLQ italic downloadcharacterset
Selectprint color
Color Selection Commands
Wect Black
Select magenta
Violet
Select cyan
Select yellow
Select orange
Set MSB to
Cancellast line
Set MSB to O
Accept MSB as is
Quietprint
Cancelauiet mint
Set printer off-line
Setprinter on-line
Bidimctiona!printing
Bell
Unidirectionalprinting
One-lineunidirectionalprinting
Auto feed
Resetprinter
Ejecfpaper fromASF
Set print startposition onASF
Memo
Designing Your OWN Draft Characters
Download Characters
Definingthe attributedata
Assigningthe characterdata
Lprint U.S. Exportsm
Sampleprogram
Lprint SCALE$
Next
Lprint CHR$27 UT
Defining Your OWN NLQ Characters
Assigningthe characterdata with the Standard mode
128
Reaii MM
Lprint H U.S. Exportsv
Lprint AUTOSUCHR$9
Next 1410
Assigningthe characterdata with the IBM mode
Lprint U S . Exports
Readmm Lprint CHR$MM
Nexti Lprint
Lprint AUTOS’’CHR$9
Nexti Lprint Lprint GUNS’’CHR$9
Nexti
AP . Exports
Page
MS-DOS and Your Printer
Installing Application Software with Your Printer
CPI
Embedding Printer Commands
Printer Commands
Programming the Printer with DOS Commands
XlV !VA
Acopy Nlqelite .DAT PFfN Aprint Readme .DOc
‘Escape code Iolo E$=CHR27$
Programming with Basic
1520
2330
How theprogram works
~ = 1-1d e- d .Dwble+ieight, 10uk1e-5ized
106
Troubleshooting
Maintenance
Printing
Powersupply
If dots are missingin the printing,checkthe following
Is thepapertoothick?
Paper feeding
Is there toomuchpaperinthe paperfeedhopperorstacker?
112
Replacing the Print Head
Maintenance
Hea
NLQ
Specifications
T m
117
B d A e
Chapter
Standard Character SET #1
Page
Standard Character SET #2
International Character Sets
IBM Character SET #2
125
Code Page #850 Multi-1ingual
Llm
Page
Re#863 Canadian Fre\ ch
Code Page #865 Nordic
IBM Character SET #1
IBM Special Character SET
Index
Page
Page
Command Summary
137
138
IBM Mode
140
141
Top
Page
Image
Contents