00809-0100-4663, Rev BA January
Reference Manual
Page
North American Response Center
Customer Central
Page
Table of Contents
Section
Operation Sensor Installation
Reference Data Appendix B Approval Information
Maintenance Troubleshooting
Diagnostics
Appendix a
Appendix E
Digital Signal Processing
Universal Sensor Wiring Diagrams
Appendix D
Appendix H
Appendix F Resource Block
Appendix G
Transducer Block
TOC-6
System Description
Section Introduction
Service Support
Safety Messages
Explosions could result in death or serious injury
Section Installation
Mechanical Considerations
Transmitter Symbols PRE-INSTALLATION
Pipe Mounting
Installation
Procedures Mount the Transmitter
Environmental Considerations
Hardware Switches
Identify Options and Configurations
Conduit Ports Connections
Rosemount Electronics Board and Hardware Switches
Electrical Considerations
Conduit Cables
Power System Fuse Rating Manufacturer
Requirements for 12-42 V DC Power Supply
00809-0100-4663, Rev BA
Field Wiring
Characteristic
Ideal Specification
Foundation fieldbus Signal Connections Refer to -6 on
Transmitter Wiring Connection
Characteristics Terminators Fieldbus Segment Trunk Spur
Power Supply
Devices 1 through
Sensor Connections
Rosemount Sensors Transmitter to Sensor Wiring
Cable Requirements
Cable Shield
Rosemount 8732 Transmitter
Sensor to Remote Mount Transmitter Connections
Connect coil drive and electrode cables as shown in Figure
Rosemount 8705/8707/8711/8721
Rosemount
Introduction Local Operator Interface Basic Features
Section Configuration
Basic Set-up Parameters
Table Values
Data Entry
LOI Examples
Space
Stop Totalizer
Reset Totalizer
Table Value Example Select Value Example Display Lock
Start Totalizer
PV LRV
00809-0100-4663, Rev BA January LOI Menu Tree
Process Variables
Diagnostic
Messages
Review
PV Analog Output
Totalizer Setup
PV Primary Variable
PV -% Range
Flow Units
Basic Setup
Pulse Output
Tag
Fast Keys 2, 2
Special Volume Unit
Options for Flow Rate Units
Special Units
Base Time Unit
Base Volume Unit
Line Size
Conversion Number
Lower Range Value
PV URV
Upper Range Value
PV LRV
PV Damping
Calibration Number
Rosemount
Section Operation
Introduction Diagnostics
Diagnostic Controls
Transducer Block, Diagnostics
Basic Diagnostics
Advanced Diagnostics
8714i Result
8714i Results
Test Condition
Test Criteria
Sensor Signature
Sensor Calibration Result
Coil Circuit Result
Electrode Circuit Result
No Flow Limit
Re-Signature Meter
Recall Last Saved Values
Set Pass/Fail Criteria
License Key
Measurements
Licensing
License Status
Diagnostic Variables
Trims
Electronics Trim
Transducer Block, Diagnostics, Trims
Auto Zero
Status
Universal Trim
Additional Parameters
Advanced Configuration Detailed Setup
Display Language
Signal Processing
Time Limit
Control
Samples
Limit
Primary Variable Damping
Transducer Block, Detailed Setup, Device Info
Device Info
Low Flow Cutoff
Flange Type
Sensor Tag
DSP Software Rev
Construction Materials
Liner Material
Mode
Electrode Type
Electrode Material
Block Mode Normal
Block Mode Target
Block Mode Actual
Block Mode Permitted
Process Leak Protection Optional
Sensor Installation
Explosions could result in death or serious injury
Rosemount 8705 Sensor Support for Handling
Sensor Handling
Pipe Diameters
Sensor Mounting
Upstream/Downstream Piping
Sensor Orientation
Incline or Decline Orientation
Electrode Plane
Flow Direction
Grounding Ring
Installation Flanged Sensor
Gaskets
Flange Bolts
Class
PTFE/ETFE liner Polyurethane liner
Newton
PTFE/ETFE liner Size PN10 Code Line Size
Bolt
Gaskets Alignment and Bolting
Installation Wafer Sensor
Size Code Line Size
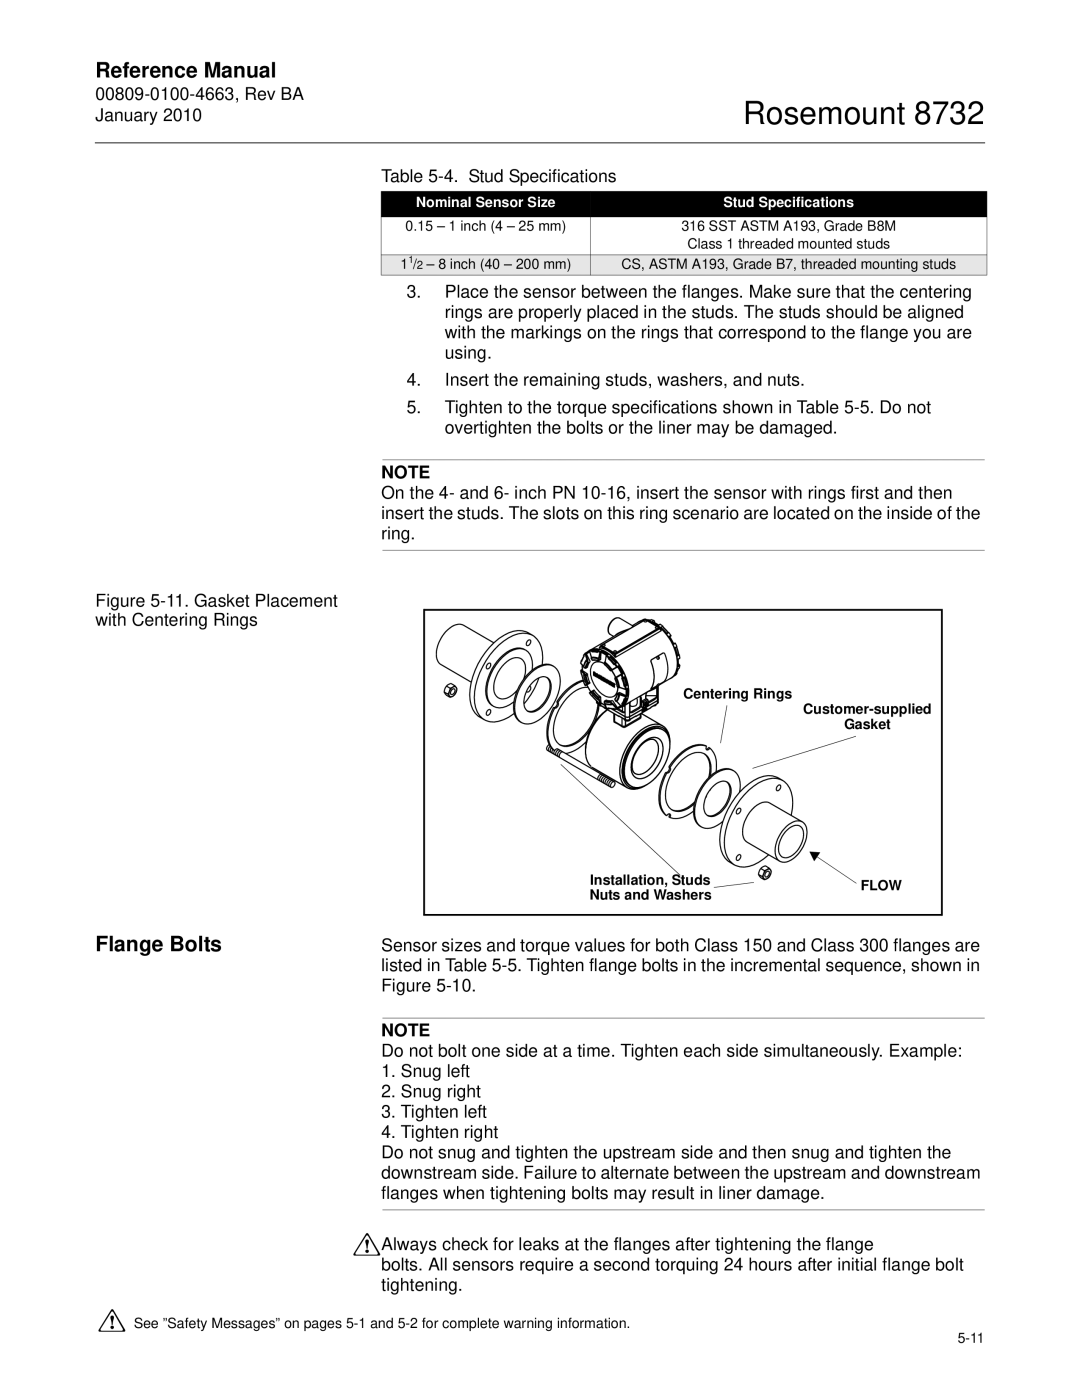
Centering Rings
Stud Specifications
Nominal Sensor Size Stud Specifications
Installation, Studs
Size Code Line Size Pound-feet Newton-meter
Installation Sanitary Sensor
See Figure Non-Conductive Pipe
14. Grounding with Grounding Rings or Lining Protectors
16. Grounding with Grounding Electrodes
Process Leak Protection Optional
Standard Housing Configuration
NPT Conduit Connection
Process Leak Containment
Relief Valves
Grounding Electrode Port
Safety Information
Maintenance Troubleshooting
Sensor
Installation Check and Guide
Wiring for Remote Configurations
Before You Begin Transmitter
Message Potential Cause Corrective Action
High Process Noise
Advanced Troubleshooting on next
Transmitter Troubleshooting
Advanced Troubleshooting-Rosemount
Symptom Potential Cause Corrective Action
Perform the auto zero function with full pipe and no flow
Wiring Errors Process Noise Installed Sensor Tests
Quick Troubleshooting
Location Equipment Connections
00809-0100-4663, Rev BA January Sensor Test
Sensor Circuit Diagram
Uninstalled Sensor Tests
Hazardous Location Certification
Uninstalled Rosemount 8711 Wafer Sensor Tests
Hazardous Location Certifications
Measuring at Connections N5, KD
Appendix a Reference Data
Functional Specifications
Ambient Temperature Limits Operating
Installation Coordination
Power Consumption
Switch-on current
Enclosure Rating
Output Signal
Foundation Fieldbus Specifications
Performance Specifications
Rosemount 8732E with Other Manufacturers’ Sensors
Rosemount 8732E with 8721 Sensor
Rosemount 8732E with Legacy 8705 Sensors
Rosemount 8732E with Legacy 8711 Sensors
Physical Specifications
Rosemount
European Directive Information
Appendix B Approval Information
Product Certifications
Approved Manufacturing Locations
All other Rosemount 8705/8707/8711/8721 Sensors
Electro Magnetic Compatibility EMC 2004/108/EC
Other Certifications Product Certification Code
Hazardous Locations Product Approvals Offering
Transmitter 8732E1 Sensor 8705 8707 8711 IECEx Category
Table B-4. IECEx Approvals Offering
Non-Hazardous
Equipment Category
Other Certifications Product Certification Code3
Hazardous Location Certifications
Transmitter Approval Information
Equipment Category 1 Dust Environment
E5 Explosion-Proof Approval 8732E
North American Certifications Factory Mutual FM
Canadian Standards Association CSA
N0 Division 2 Approval All transmitters
ND Atex Dust
European Certifications
E1 Atex Flameproof
ED Atex Flameproof
EF IECEx Flameproof
N1 Atex Type n
Remote Junction Box
E7 IECEx Flameproof
N7 IECEx Type n
Table B-6. Sensor Approval Information
E5 Explosion-Proof 8705 and 8711 Only
N0 Division 2 Approval for Non-Flammable Fluids All Sensors
N0 for 8721 Hygienic Sensor
N5 Division 2 Approval for Flammable Fluids All Sensors
Special Conditions for Safe USE
Rosemount 8732E Flow Transmitter
00809-0100-4663, Rev BA January Table B-7. Electrical Data
Rosemount 8732 Flow Transmitter
Rosemount 8705 and 8711 Sensors
In. sensor size
149F 65C 351F 177C 210F 99C
Figure B-1. Atex Installation
Figure B-2. Atex Installation
Figure B-3. Atex Installation
Figure B-4. Atex Installation
Figure B-5. Atex Installation
Figure B-6. Atex Installation 6
Figure B-7. FM Certified I.S. Output 1
Figure B-8. FM Certified I.S. Output 2
Figure B-9. FM Certified I.S. Output 3
Figure B-10. FM Certified I.S. Output 4
Figure B-11. CSA Certified I.S. Output 1
Figure B-12. CSA Certified I.S. Output 2
Figure B-13. CSA Installation
Figure B-14. Factory Mutual Hazardous Locations
Options for Accessing Diagnostics
Appendix C Diagnostics
Diagnostic Availability
Table C-1. Rosemount Magmeter Diagnostics
Tunable Empty Pipe Parameters
Licensing the 8732 Diagnostics
Licensing and Enabling
Tunable Empty Pipe Detection
Set the counts to
Optimizing Tunable Empty Pipe
Empty Pipe Trigger Level
Empty Pipe Counts
Turning Ground/Wiring Fault On/Off
Troubleshooting Empty Pipe
GROUND/WIRING Fault Detection
Ground/Wiring Fault Parameters
Turning High Process Noise On/Off
High Process Noise Detection
Hz Signal to Noise Ratio
White Noise
High Process Noise Functionality
Noise
Spike Noise
Establishing the baseline sensor signature
8714I Meter Verification
Sensor Signature Parameters
Initiating 8714i Meter Verification
8714i Meter Verification Test Parameters
8714i Meter Verification Test Scope
8714i Meter Verification Test Results Parameters
All
Viewing the 8714i Meter Verification Results
Electrode Circuit Verification
Transmitter Calibration Verification
Sensor Calibration Verification
Coil Circuit Verification
Optimizing the 8714i Meter Verification
Sensor Signature Values
8714i Meter Verification
Test
8714i Meter Verification Functionality
8714i Meter Verification Measurements
Electrode Circuit Resistance
Calibration Verification Report Parameters
Flowmeter Information and Configuration
Summary of Calibration Verification Results
Process leaks could result in death or serious injury
Appendix D Digital Signal Processing
Auto Zero
Procedures
Flow Rate
How Does It Really Work?
Time
When Should Signal Processing Be Used?
Appendix E Universal Sensor Wiring Diagrams
Rosemount Transmitter Sensor Manufacturer Number
Rosemount
Rosemount Sensors
8705/8707/8711/8721 Sensors to Rosemount Transmitter
To Rosemount 8732 Transmitter
Table E-3. Rosemount 8701 Sensor Wiring Connections
Rosemount Rosemount 8701 Sensors
Connecting Sensors of Other Manufacturers
Model 5000 Sensor to Rosemount 8732 Transmitter
Brooks Sensors
Rosemount Brooks Sensors Model
Model 7400 Sensor to Rosemount 8732 Transmitter
Electrodes
Table E-6. Endress and Hauser Sensor Wiring Connections
Endress and Hauser Sensors
Endress and Hauser Sensor to Rosemount 8732 Transmitter
Rosemount
Fischer and Porter Sensors
Model 10D1418 Sensor to Rosemount 8732 Transmitter
Coil Connections
Model 10D1419 Sensor to Rosemount 8732 Transmitter
Electrode Connections
Model 10D1430 Sensor Remote to Rosemount 8732 Transmitter
Model 10D1430 Sensor Integral to Rosemount 8732 Transmitter
Connections
Electrode
Rosemount Fischer and Porter Model 10D1465
Electrodes Coils Chassis Fuse
Fischer and Porter Sensor to Rosemount 8732 Transmitter
Rosemount Fischer and Porter Sensors
Rosemount Foxboro Series 1800 Sensors
Table E-13. Foxboro Generic Sensor Wiring Connections
Foxboro Sensors
Series 1800 Sensor to Rosemount 8732 Transmitter
Black
Series 1800 Version 2 Sensor to Rosemount 8732 Transmitter
8732
White
Rosemount Foxboro Series 2800 Sensors
Series 2800 Sensor to 8732 Transmitter
Ground Coils Fuse
White Electrodes Black
Rosemount Foxboro Sensors
Rosemount Kent Veriflux VTC Sensors
Kent Veriflux VTC Sensor
Veriflux VTC Sensor to 8732 Transmitter
+ 6 SCR
Rosemount Kent Sensors
Kent Sensors
Kent Sensor to Rosemount 8732 Transmitter
Coils Fuse
Rosemount Krohne Sensors
Krohne Sensors
Krohne Sensor to Rosemount 8732 Transmitter
Coil Shield Coils Fuse
Rosemount Taylor Series 1100 Sensors
Taylor Sensors
Series 1100 Sensor to Rosemount 8732 Transmitter
G 1 2 3 White Black Green Coil Connections
Rosemount Taylor Sensors
Taylor Sensor to Rosemount 8732 Transmitter
S1 and S2
Coils White Black Fuse
Electrodes Chassis Ground Coils Fuse
Table E-22. Yamatake Honeywell Sensor Wiring Connections
Yamatake Honeywell Sensors
Yamatake Honeywell Sensor to Rosemount 8732 Transmitter
Rosemount Yokogawa Sensors
Table E-23. Yokogawa Sensor Wiring Connections
Yokogawa Sensors
Yokogawa Sensor to Rosemount 8732 Transmitter
Identify coil and electrode terminals
Generic Manufacturer Sensors
Identify a chassis ground
Definition
Appendix F Resource Block
Parameters and Descriptions
Confirmtime
Itkver
Rsstate
Modes
Resource Block Errors
Status Handling
Alarm Detection
Refer to Table F-4to troubleshoot resource block problems
Table F-4. Troubleshooting
Appendix G Transducer Block
SignalRanging Conversion Units Diagnostics Damping Flow
Densityvalue
Parameter Index Number Definition
User-Defined Sensor Line Size
FLOW-SPECIFIC Block Configuration Values
Table G-2. Supported Line Sizes
Table G-3. Supported Engineering Units
Condition Name and Description
Transducer Block Errors
Value Name and Description Corrective Action
Transducer Block Diagnostics
Alarm Detection Status Handling
Descriptions and Corrective Actions
Table G-6. Troubleshooting
Refer to Table G-6to troubleshoot transducer block problems
Handheld Communicator
Appendix H 375 Field Communicator Operation
Irda Port Fieldbus Connection Ports Field Communicator Ports
Connections and Hardware
ON/OFF Key
Action Keys
Function Keys, and Alphanumeric and Shift Keys
Action Keys
Data Entry
Alphanumeric and Shift Keys
Menus and Functions
Function Key
Online Menu
Main Menu
Message Description
Diagnostic Messages
OFF KEY Disabled
Rosemount
Field Wiring Electrical
Installation -6,2-12
Wiring
Basic Setup -6,3-7
Flowtube
Safety
Troubleshooting . . . . . . . F-6
Mounting
Page
Flow Pacific Private Limited
Rosemount Divison
Emerson FZE