Version
3Com Telecommuting Module
Page
United States Government Legend
Page
Table of Contents
Page
Part I. Introduction to 3Com VCX IP Telecommuting Module
Page
Configuration alternatives
What is a Telecommuting Module?
Introduction to 3Com VCX IP Telecommuting Module
DMZ/LAN Configuration
DMZ Configuration
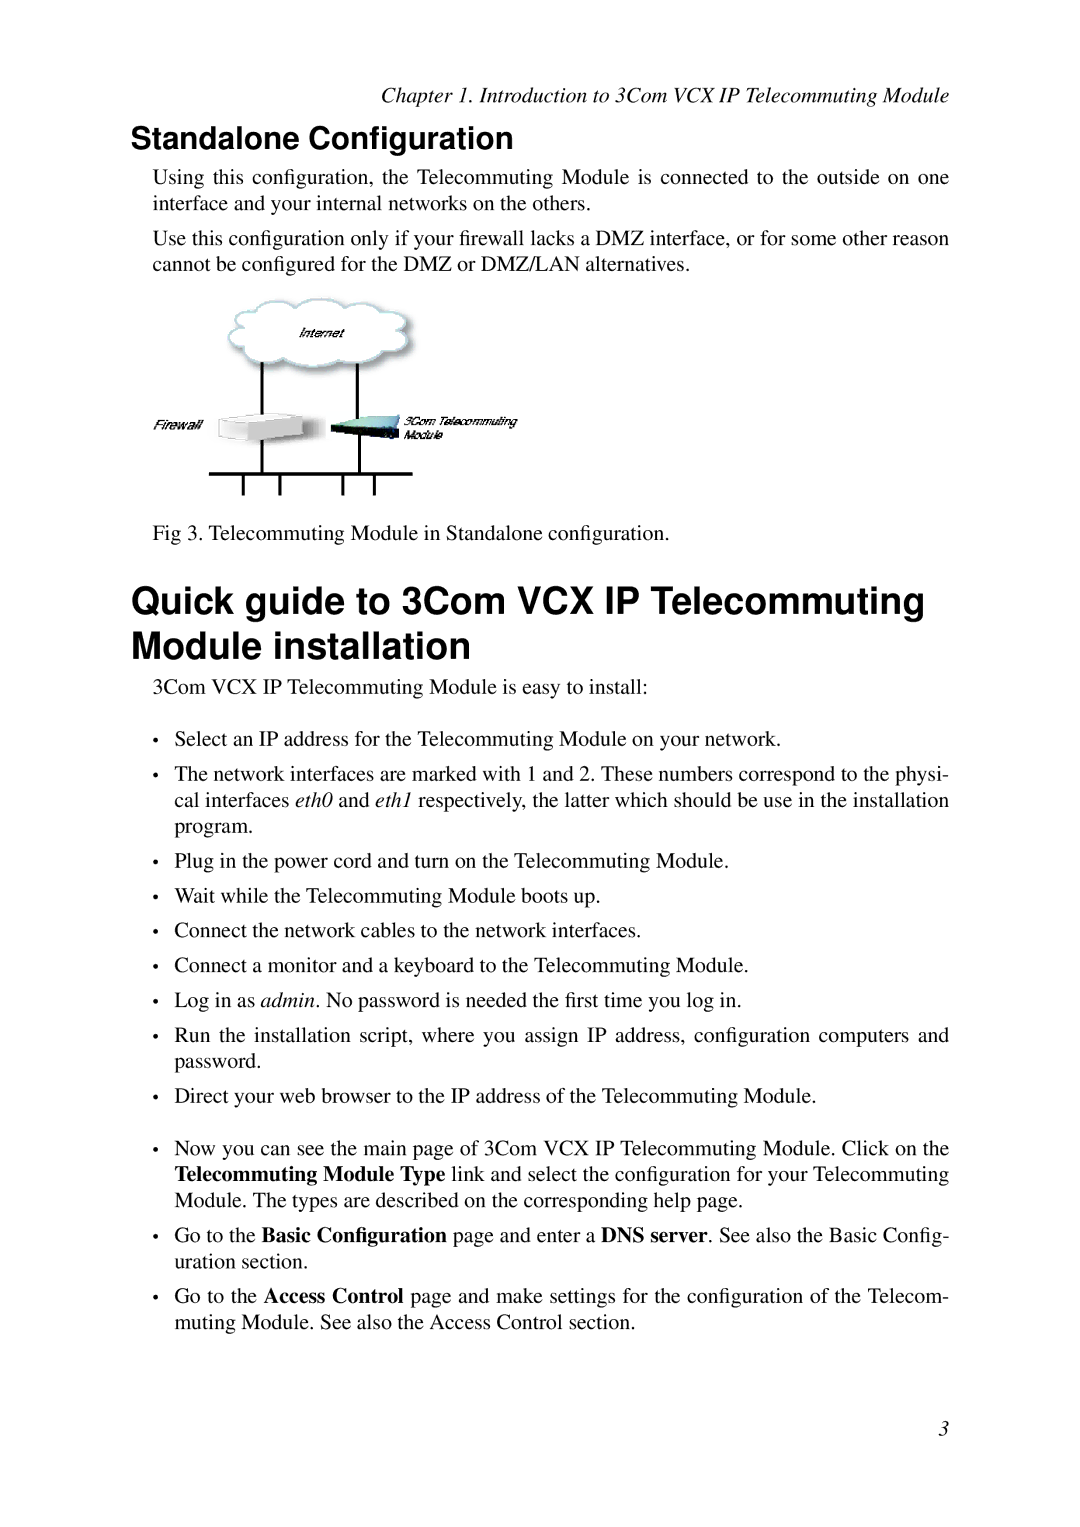
Standalone Configuration
Quick guide to 3Com VCX IP Telecommuting Module installation
Introduction to 3Com VCX IP Telecommuting Module
About settings in 3Com VCX IP Telecommuting Module
Introduction to 3Com VCX IP Telecommuting Module
Installation with a serial cable
Installing 3Com VCX IP Telecommuting Module
Installation
Installation with magic ping
Page
Page
Page
Page
Installation with a diskette
Page
Page
Remember to lock up the Telecommuting Module
Turning off a Telecommuting Module
Installing 3Com VCX IP Telecommuting Module
Log on again
Configuring 3Com VCX IP Telecommuting Module
Logging on
Site Map
Navigation
Log out
Network Configuration
Administration
SIP Services
Basic Configuration
Virtual Private Networks
Quality of Service
Overview of configuration
Failover
Preliminary and permanent configuration
Page
Mask/Bits
IP address
No. of computers Mask Bits
Name queries in 3Com VCX IP Telecommuting Module
Page
Configuring 3Com VCX IP Telecommuting Module
Part II. How To
Page
Networks and Computers
How To Configure SIP
DMZ Telecommuting Module, SIP server on the WAN
Surroundings
Interoperability
Basic Settings
Routing
Filtering
Save/Load Configuration
DMZ Telecommuting Module, SIP server on the LAN
Networks and Computers
Basic Settings
Routing
Standalone Telecommuting Module, SIP server on the WAN
Basic Settings
Filtering
Standalone Telecommuting Module, SIP server on the LAN
Client Settings
Basic Settings
Interoperability
DMZ/LAN Telecommuting Module, SIP server on the WAN
Basic Settings
Filtering
DMZ/LAN Telecommuting Module, SIP server on the LAN
Interoperability
Filtering
LAN Telecommuting Module
Surroundings
Filtering
Remote SIP Connectivity
Firewall
How To Configure SIP
Outgoing Calls
How To Configure Advanced SIP
Show One Number When Calling
Show Different Numbers When Calling
Incoming Calls
Page
Authentication by Accounts a.k.a SIP Trunk via SIP accounts
Page
Page
Page
Incoming Calls
Page
Multiple Operators Least Cost Routing
Page
Multiple PBXs
How To Configure Advanced SIP
How To Configure Advanced SIP
Page
Page
Page
Page
Name of this Telecommuting Module
Basic Configuration
Basic Configuration
General
Policy For Ping To Your 3Com VCX IP Telecommuting Module
Default domain IP Policy
DNS Servers
Look up all IP addresses again
Access Control
Cancel
Save
Configuration Transport
User Authentication For Web Interface Access
Configuration Allowed Via Interface
Configuration via Https
Configuration via Http
DNS Name Or Network Address
Configuration Computers
Configuration via SSH
Via IPsec Peer
Network address
Netmask/Bits
Range
Radius
Secret
Radius Servers
Radius server
Port
Status for Radius Servers
Identifier
Contact IP Address
Consecutive sends
Score
Sent requests
Received replies
Value
Configuration of a Radius server
Node location
Snmp v1 and v2c
Telecommuting Module IP address to respond to Snmp requests
Contact person
Community
Access via SNMPv1 and SNMPv2c
Access via SNMPv3
Snmp
User
Password
Authentication
Snmp Traps
Version
Resource Monitoring
Trap sending function
Trap receiver
CPU Load Trap Levels
Download the 3Com MIB
SIP Sessions Trap Levels
SIP User Registrations Trap Levels
Use DynDNS
Dynamic DNS update
DynDNS service
DynDNS General Configuration
Username
IP address for updates
User, Smtp Server
Wildcard hostnames Offline URL redirection
DNS Name
DNS Names to Update at DynDNS
Smtp server is backup
Smtp server
Certificate
Certificates
Private Certificates
Name
Create certificate or certificate request
CA Certificates
CA Certificate
Timeouts
Advanced
Timeout for Icmp connections
Timeout for one-way UDP connections
Timeout for two-way UDP connections
Timeout for established TCP connections
DMZ/LAN Configuration
Change Telecommuting Module Type to
Telecommuting Module Type configuration
Current Telecommuting Module Type
Change type
Test Preliminary Configuration
Administration
Duration of limited test mode
Save/Load Configuration
Apply configuration
Backup
Show Message About Unapplied Changes
Save/Load CLI Command File
Reload Factory Configuration
Show Configuration
Revert to Old Configurations
Abort All Edits
Old password
User Administration
Password For the ’admin’ Account
Account Type
New password, Confirm password
Change administration password
Other Accounts
Currently Logged In Administrators
Step
Upgrade
Upgrade
Log Out
Table Look
Try the upgrade
Accept upgrade
Abort upgrade
Edit Column
Change Time Zone
Date and Time
Set date and time manually
Change Date and Time Manually
Date
Time
Synchronize time with NTP
NTP Servers To Use If NTP Is Enabled
Change Date and Time With NTP
Automatic Restart of the SIP Module
Reboot Your 3Com VCX IP Telecommuting Module
Restart
Restart the SIP Module
Administration
Administration 118
Networks and Computers
Network Configuration
Lower Limit
Name
Subgroup
Create
Upper Limit
Interface/VLAN
Delete Row
Interface
Default Gateway
Main Default Gateways
Priority
Gateway Reference Hosts
Policy For Packets From Unused Gateways
Interface name
Interface Network Interface 1
Physical device
Obtain IP Address Dynamically
Directly Connected Networks
Vlan Name
Alias
Broadcast address
Vlan Id
Static Routing
Router
Routed network
Named VLANs
Vlan
Interface Status
Interface Status
PPPoE Client Status
Dhcp Client Status
Keep Alive
Authentication
PPPoE
Log class for PPPoE negotiations
Surroundings
LCP echo-request interval
Additional Negotiators
Data Interfaces
Network
Select a data interface here
Network Configuration 136
Display log
Logging
Display Log
Search the Log
Packet Selection
Support Report
All IP protocols
Packet Type Selection
IP Address Selection
Protocol/Port Selection
Icmp
IP addresses
SIP Packet Selection
Call-ID
SIP Methods
Time Limits
Show newest at top
Show This
Export the Log
Clear form
Log
RST
Display Load
Unit
Packet Load
Time Period
Direction
Value
View diagram
Diagram
Diagram Size
Diagram Heading
Log class for broadcast packets
Inbound Traffic
Log class for non-SIP packets
Log class for spoofed packets
Log class for Dhcp requests
Log class for email errors
Log class for Radius errors
Log class for Snmp errors
Log class for ESP packets
VPN Events
Log class for IPsec key negotiations
Log class for IPsec key negotiation debug messages
SIP Events
Other
Local Log
Log Classes
Email Address
Syslog
Log Sending
Syslog Servers
Smtp Server
Status for Outbound Email
Reverts the fields to the previous configuration 157
Logging 158
SIP Module
SIP Services
Administration of SIP
Basic Settings
Comment
Additional SIP Signaling Ports
Provisioning Relay
Transport
SIP Servers To Monitor
SIP Media Port Range
Public IP address for NATed Telecommuting Module
Server
SIP Logging
Log class for SIP signaling
Relaxed Refer-To
Interoperability
Loose Routing
Except this from translation
Remove Via Headers
Translation Exceptions
SIP Server
Always Translate This
Expires Header
Force Translation
URI Encoding
User Matching
Signaling Order of Re-INVITEs
Loose Username Check
Force Record-Route for All Requests
Accept RTP/AVP With sdescriptions
Transmit RTP/AVP With sdescriptions
Force Record-Route for Outbound Requests
Accept TCP Marked As TLS
Force Remote TLS Connection Reuse
Remove Headers in 180 Responses
Allow Large UDP Packets
Preserve RFC 2543 Hold
Forward Cancel Body
Use Cancel Body In ACK
Convert Escaped Whitespaces in URIs
Allow RFC 2069 Authentication
Open Port 6891 For File Transfer
Ports and the maddr Attribute
Keep User-Agent Header When Acting as B2BUA
Strip ICE Attributes
Session Configuration
Session timer
Timeout for SIP over TCP/TLS
Sessions and Media
Limitation of sender of media streams
Media Configuration
Allowed number of concurrent sessions
Limitation of RTP Codecs
This Codec Is Allowed
Codecs
Type
Name
Ring Tone for Local Ringback
Local Ringback
Music on Hold Redirection
Local Ringback Played at Call Transfer
SIP blacklist interval
Default timeout for Invite requests
Maximum timeout for Invite requests
Requests
Maximum number of retransmissions for non-INVITE requests
Base retransmission timeout for SIP requests
Remote SIP Connectivity
Maximum number of retransmissions for Invite requests
Stun ports
Stun Server
Stun server
Stun server IP addresses
IP Address for Remote Clients
Remote Clients Signaling Forwarding
Remote NAT Traversal
Remote NAT traversal
NAT keepalive method
NAT timeout for UDP
NAT timeout for TCP
Forward Signaling from IP Address
SIP Methods
SIP Traffic
Auth
Method
Traffic To
Allow
Action
Filtering
Sender IP Filter Rules
From Network
Allow
Content Types
Default Policy For SIP Requests
Content Type
Header Filter Rules
Local SIP Domains
Default Header Filter Policy
Local Registrar
Domain
Local SIP User Database
Register From
Authentication and Accounting
Authentication Name
SIP User Database
Authentication settings
Network
Asserted-Identity
Use P-Asserted-Identity
Trusted Domains
Emergency Number
Dial Plan
Radius Accounting
Use Dial Plan
Reg Expr
Matching From Header
Tail
Matching Request-URI
Prefix
Head
Min. Tail
Forward To
Subno
Replacement URI
Dial Plan
Enum Root
Request-URI
Forward To
Add Prefix
Register in Dial Plan
Methods in Dial Plan
Method
Enum Root
Routing
DNS Override For SIP Requests
Port
Weight
SIP Routing Order
Relay To
Routing Function
Class 3xx Message Processing
User
Static Registrations
Requests To User
Also Forward To
Sip/sips
Local Refer Handling
Always handle Refer locally
For clients not supporting Refer
From URIs For Which Refer is Handled Locally
For clients not supporting replaces
For dialogs with specified From URI
For dialogs with specified User-Agent header
Restrict Incoming Callers
User Routing
Alias
Action
Forward
Send To Voice Mail
Voice Mail Server
Domain or IP Address
Outbound Proxy
From Domain
Request-URI Domain
Gateway
Tel URIs
Monitored SIP Servers
Registrar and Session Status
Active Sessions
Registered from
Registered Users
Monitored SIP server
Monitored SIP server status
IP Address Selection
Tools
Packet Capture
Network Interface Selection
Tools Any
Icmp
Test Results
Check Network
Collect data
Check Network
Page
Tools 222
SIP over TCP/TLS
Firewall and Client Configuration
DMZ type
SIP over UDP
SIP clients
DMZ/LAN type
Standalone type
SIP clients
Part IV Com VCX IP Telecommuting Module Serial Console
Page
Main Menu
Basic Administration
Connecting to the serial console
Wipe email logs
Set password
Command line interface
Exit admin
Deactivate other interfaces
Physical device name
Configure from multiple computers
Configure from a single computer
Password
Wipe email logs
Exit admin
Set password
Basic Administration 236
Help and Troubleshooting
Command Line Reference
Command Reference
Modifying Tables
Revert-edits
List-tables
Load-factory
Modify-row
Table Definitions
Config.authlogclass
Config.allowconfig
Config.allowviainterface
Config.mgmtlogclass
Config.authentication
Config.httpservers
Config.httpsservers
Fentalwaysfentinterfaces
Failover.ifacerefhosts
Fent.alwaysfent
Fentalwaysfentexceptions
Fent.mediarelease
Fent.mapsignaladdress
Field Name Field Type Explanation Enabled OnOffToggle
Fent.fentkeepalive
firewall.dhcplogclass
firewall.defaultpolicy
firewall.blindroutepolicy
firewall.broadcastlogclass
firewall.pingpolicy
firewall.networkgroups
firewall.ownlogclass
firewall.timeclasses
firewall.services
firewall.policylogclass
firewall.spoofinglogclass
Idsips.predefinedipsrules
Idsips.active
Ipsec.espahlogclass
Idsips.ratelimitedips
Ipsec.cryptodef
Ipsec.espproposals
Ipsec.nattkeepalive
Ipsec.ikelogclass
Ipsec.ikeproposals
Ipsec.ipsecnets
Field Name Field Type
Ipsec.plutologclass
Ipsec.plutoverboselogclass
Ipsec.radiusauthserver
Ipsec.x509cacerts
Ipsec.tunnelednets
Ipsec.userauthlogclass
Misc.dyndns
Misc.conntracktimeouts
Ipsec.x509cert
Misc.dnsservers
Field Name Field Type Explanation DomainName
Misc.dyndnsname
Misc.fversion
Misc.ntpservers
Monitor.emailalertlogclass
Monitor.cpuloadlevelalarm
Misc.unitname
Misc.usentp
Monitor.logclasses
Monitor.memorylevelalarm
Monitor.radiuserrorslogclass
Monitor.hardwarelogclass
Monitor.snmpagentlogclass
Monitor.siplevelalarms
Monitor.snmpagentaddress
Monitor.snmppacketlogclass
Monitor.snmpcontactperson
Monitor.snmpmanagementstations
Monitor.snmpnodelocation
Monitor.snmpv1v2cauth
Monitor.snmpv1v2caccess
Monitor.snmpv3access
Monitor.snmptrapsending
Network.aliasaddresses
Network.extradefaultgateways
Monitor.syslogservers
Monitor.watchdogs
Network.pppoe
Network.interfaces
Network.localnets
Field Name Field Type Explanation Server DnsIpAddress
Network.routetestservers
Network.routes
Network.vlans
Pptp.pptplogclass
Password.adminusers
Pptp.pptpenable
Pptp.grelogclass
Field Name Field Type Explanation PPTPOwnIpReference
Pptp.pptpserverip
Pptp.pptpusers
Pptp.pptpneglogclass
Qos.classes
Qos.bandwidths
Qos.egressqueueing
Qos.egressdefaultqueueing
Qos.ingressdefaultqueueing
Qos.tagging
Qos.ingressqueueing
Qos.sipcac
Qos.status
Sip.allowedcodecs
Sip.acceleratedtls
Sip.active
Sip.addexpireheader
Sip.codecfiltering
Sip.defaultgateway
Sip.authmethods
Sip.b2buaofferfromtemplate
Field Name Field Type Explanation DnsIpAddress
Sip.emergency
Sip.externradiusdb
Sip.externalrelay
Sip.forwardtoheader
Sip.forwardcancelbody
Sip.fixfiletransferport
Sip.forcemodify
Field Name Field Type Explanation Action Sipfilteractionsel
Sip.headerfilterdefault
Sip.headerfilterrules
Sip.ignoreuriportwhenmaddr
Sip.localdomains
Sip.largeudp
Sip.lcscompanion
Sip.listen
Sip.mediaencryptionpolicy
Sip.loosereferto
Sip.looseusernamecheck
Sip.lrtrue
Field Name Field Type Explanation Portslower PortNumber
Sip.mediaencryptionsettings
Sip.mediaencryptionsuite
Sip.mediaports
Sip.mfull
Sip.mediatimeouts
Sip.mediarestriction
Sip.message
Sip.musiconhold
Sip.optiontimeout
Sip.mimetypes
Sip.monitorserver
Sip.preserve2543hold
Field Name Field Type Explanation Timeout OptionTimeout
Sip.outboundproxy
Sip.percent20towhitespace
Sip.relayrules
Sip.radiusacct
Sip.recurseon3xxinb2bua
Sip.registrarlimits
Sip.ringback
Sip.removevia
Sip.replyconfig
Sip.rewritetoforregisterindp
Sip.rrouteoutbound
Sip.routeusesport
Sip.routingorder
Sip.rroutealways
Sip.sipalias
Sip.signaladdressfordestination
Sip.siperrorslogclass
Sip.sessionlimits
Sip.sipmessagelogclass
Sip.sipsignalinglogclass
Sip.siplicenselogclass
Sip.sipmedialogclass
Sip.surroundings
Sip.tcptimeout
Sip.sttype
Sip.stripiceattributes
Sip.tlsservercfg
Sip.tlssettings
Sip.tlscacerts
Sip.tlsclientcfg
Field Name Field Type Explanation Uriencodingsel
Sip.transactionconfig
Sip.trusteddomain
Sip.uriencoding
Sip.uaregister
Sip.usecancelbodyinack
Sipswitch.accounts
Sipswitch.b2buatransferenable
Field Name Field Type Explanation User AliasAlias
Sipswitch.b2buatransferfromuser
Sipswitch.dialplan
Sipswitch.dialplanenable
Field Name Field Type Explanation Enabled Fallbacksel
Sipswitch.dialplanmethods
Sipswitch.enumroot
Sipswitch.forwardto
Field Name Field Type Explanation Url SipWildcardUrl
Sipswitch.incomingunauth
Sipswitch.requestfrom
Sipswitch.requestto
Sipswitch.users
Sipswitch.userrouting
Voipsm.voipsm
Sipswitch.voicemail
Userdb.radiuslocalendpoint
Userdb.radiusservers
Voipsm.voipsmdomains
AdminPassword
AdminTypeSel
Field Types
AuthData
AdminUser
AliasAlias
AliasIpReference AliasUser
DnsDynIpNetworkInterface DnsDynIpOtherHost
CaReference
CertReference
CryptoDefReference DepUsableVlanInterface DnsDynIpAddress
EspCryptoReference FirewallLogclassReference
DyndnsPassword
DyndnsServiceSel
EnumReference
IpsecAuthSel
InterfaceSel
InviteRetransmitCount
IpsRuleName
MaxReg
IsakmpSALife
LogclassReference
MaxMessageSizeInteger
OnOffToggleOn
NonemptyString
OnOffButton
OnOffToggle
OptDepOwnIpReference
OptDnsAutoRuntimeReachableHost OptDnsIpAddress
OptComment
OptDSCPInteger
OptIpsecPeerReference
OptForwardToReference
OptIcmpRangeList
OptIpsecNetReference
OptPercentFloat
OptPassword
OptServicesReference
OptPercent
OptTimeclassReference
OptionTimeout
OptSipUserDomain
OptString
Percent
PptpPassword
RegTimeout
PPTPOwnIpReference
SIPRadiusSel
SessionTimeout
SipUserDomainDefaultAll
SipUserPassword
SubGroup
SnmpPassword
TimerAFloat
SipWildcardUrl
Accountvoicemailsel
Accounttypesel
Bypasstransportsel
Addexpireheadersel
Autonegsel
Blindsel
Fentkeepalivesel
Configauthsel
Dpactionsel
Fallbacksel
Mediaencryptionsuitesel
Functionsel
Fwtypesel
Hitsnumber
Qostypesel
Pingpolicysel
Policysel
Pqueuesel
Rfc2782priority
Rfc2782weight
RegexpwithAt
Restfuncsel
Sipsel
Sipauthdirsel
Sipfilteractionsel
Sipfunctionsel
Sttypesel
Snmptrapversionsel
Snmpv3authsel
Snmpv3privacysel
Tlsservermethods
Sysloglevelsel
Tlsclientmethods
Voipsmmethodsel
Tlsconfsel
Trusteddomaintransportsel
Uriencodingsel
Windownumber
CLI command examples
Add and change firewall rules
Apply a configuration
Part V. Appendices
Page
SIP Protocol
Why use SIP?
Appendix A. More About SIP
Configuring the 3Com VCX IP Telecommuting Module
Managing Your Own SIP Domain
SIP and Firewalls
Page
Configuring the SIP Clients
Configuring the PBX
Configuring the DNS Server
Establishing a SIP session
SIP Sessions
SIP in 3Com VCX IP Telecommuting Module
Contact
SIP Packet Headers
Route
Content-Type
Via
Record-Route
Appendix A. More About SIP 328
Traffic discarded as spoofed
Appendix B. Troubleshooting
Network troubleshooting
No traffic shown in the log
SIP Trunking calls via SIP operator
SIP troubleshooting
SIP users can’t register on the Telecommuting Module
SIP users can’t register through the Telecommuting Module
Call is established, but there is no voice
Administration troubleshooting
Destination IP addressport is known bad. Skipping
SIP errors
Log Messages
SIP send failure -1 on socket -1 event number
Stopped SIP TCP server
IPsec key negotiations
Starting SIP TCP server at port
Starting SIP UDP server at port
Configuration server logins
Name Port/protocol Description
List of the most important reserved ports
WWW
Cmip
Krcmd Kerberos encrypted remote shell -kfall
Type Name
List of Icmp types
Icmp type Name Code Description
Icmp codes
Type Name Reference
Unreachable for Type
Protocol number Keyword
Internet protocols and their numbers
IP intervals
Set bits Mask IP address class
Class IP in- tervals
Reserved IP addresses
Page
ARP
Appendix D. Definitions of terms
DMZ
349
Https
NAT
Nntp
353
PPP
SIP
Uucp
357
Appendix D. Definitions of terms 358
Terms
Appendix E. License Conditions
Software developed by Peter Åstrand
BSD derived licenses
Software developed by Carnegie Mellon University
Software developed by Cisco Systems
Software developed by Gregory M Christy
Software developed by Digital Equipment Corporation
Software developed by Jason Downs
Dhcp license
Software developed by Brian Gladman
Preamble
Software developed by Google, Inc
GNU General Public License GPL
Version 2, June
GNU General Public License
367
368
No Warranty
IBM Public License
Software developed in the GIE Dyade cooperation
Software developed by Ingate Systems
Software developed by Tommi Komulainen
USA
GNU Library General Public License Lgpl v
374
GNU Library General Public License
376
377
Page
379
380
Version 2.1, February
GNU Lesser General Public License Lgpl v
382
GNU Lesser General Public License
384
385
386
Page
Glibc Tzdata 2006a 388
Software in the GNU C distribution
Appendix E. License Conditions
Appendix E. License Conditions
392
More software in the GNU C distribution
394
License exceptions for gcc/libgcc2.c
Disclaimer
License exceptions for libstdc++
License for lilo
License
Software developed by Paul Mackerras
Software developed at M I T
Software developed by Pedro Roque Marques
Part 1 CMU/UCD copyright notice BSD like
License for Net-SNMP
Part 4 Sun Microsystems, Inc. copyright notice BSD
Part 5 Sparta, Inc copyright notice BSD
Part 6 Cisco/BUPTNIC copyright notice BSD
License for OpenSSH
License for NTP
404
Appendix E. License Conditions
406
407
Snprintf replacement Copyright Patrick Powell
409
License for OpenSSL
License for OpenSWAN
Release Derived Year Owner GPL- compatible? From
Python license
Terms and Conditions for Accessing or Otherwise Using Python
Beopen Python Open Source License Agreement Version
Cnri License Agreement for Python
CWI License Agreement for Python 0.9.0 Through
License for Python Imaging Library
License for Rdisc
More software developed by RSA Data Security, Inc
Software developed by RSA Data Security, Inc
License for SSL
Software developed by Sun Microsystems, Inc
License for stunnel
License for Sun RPC
More software developed by Sun Microsystems, Inc
Software developed by Trusted Information Systems, Inc
License for termcap
Software developed by Paul Vixie
Software developed by Andrew Tridgell
Vovida Software License, Version
Vovida Software License v
Software developed by Rayan S Zachariassen
Software developed at University of California
License for zlib
Openswan-kernel
427
Appendix E. License Conditions
Appendix E. License Conditions Readlink
Appendix E. License Conditions 430
Appendix F. Obtaining Support for Your 3Com Products
Register Your Product to Gain Service Benefits
Solve Problems Online
Purchase Extended Warranty Professional Services
Asia, Pacific Rim Telephone Technical Support and Repair
Access Software Downloads
Contact Us
Telephone Technical Support and Repair
Country Telephone Number
Latin America Telephone Technical Support and Repair
US and Canada Telephone Technical Support and Repair
Index
For administration
Configuration logins
From the Telecommuting Module
MIBs