Before operating the unit, please read
Attentivement ce mode d’emploi et le
SCD180
This instruction book thoroughly,
Contents Sommaire
Advanced Recording Enregistrement avancé
WHT. Balance White Balance
Digital Still Camera mode Mode appareil photo numériques
Ieee 1394 Data Transfer Transfert de données Ieee
USB interface Interface USB
Maintenance Entretien
Troubleshooting Dépannage
Garantie pour le Canada
Remarques concernant la rotation de l’écran LCD
Remarques concernant la condensation
Remarques concernant le caméscope
Avertissements concernant le bloc-batterie
Remarques concernant le nettoyage des têtes vidéo
Remarque concernant I’Objectif
Remarques concernant le viseur électronique
Remarques concernant la dragonne
Precautions regarding the Lithium battery
Remote control
Précautions concernant la batterie au lithium intégrée
Features Propriétés
Photo
Basic Accessories
Accessoires fournis avec le caméscope
Accessories Supplied with camcorder
Accessoires de base
Front & Left View Vues de face et du côté gauche
Right & Top View Vues du côté droit et du dessus
Speaker
SELECT/VOLUME
Rear & Bottom View Vues de derrière et de dessous
Menu Dial Menu
Télécommande
Remote control
OSD On Screen Display in CAM and VCR modes
OSD in CAM mode
OSD in VCR mode
USB
OSD in M.PLAY mode
OSD Affichage à l’écran en mode M.REC/M.PLAY
OSD in M.REC mode
OSD On Screen Display in M.REC/M.PLAY modes
When you use the Self Timer function on
You need to insert or replace the lithium battery when
Self Record using the Remote Control
Enregistrement automatique à laide de la télécommande
Réglage de la dragonne
Adjusting the Hand Strap
Préparation
Hand strap
Connecting a Power Source
Play
Charging the Lithium Ion Lithium-ion Battery Pack
Preparation Préparation
Chargement du bloc-batterie
Les durées denregistrement en continu indiquées dans
Battery type Modèle et le type de batterie
Used in temperatures below 32F 0C or left in temperatures
Between 32F 0C and 104F 40C Comprise entre 0 C et 40 C
Battery level display
Preparation
Inserting and Ejecting a Cassette
Insertion et éjection dune cassette
Basic Recording Enregistrement de base
START/STOP
Edit Search Recherche d’un enregistrement Edit Search
While recording, it is very important to hold the camcorder
Hold the camcorder firmly using the hand strap
Hints for Stable Image Recording
Be sure not to touch the built-in microphone
Adjusting the LCD Réglage de l’écran LCD
CAM
Mode
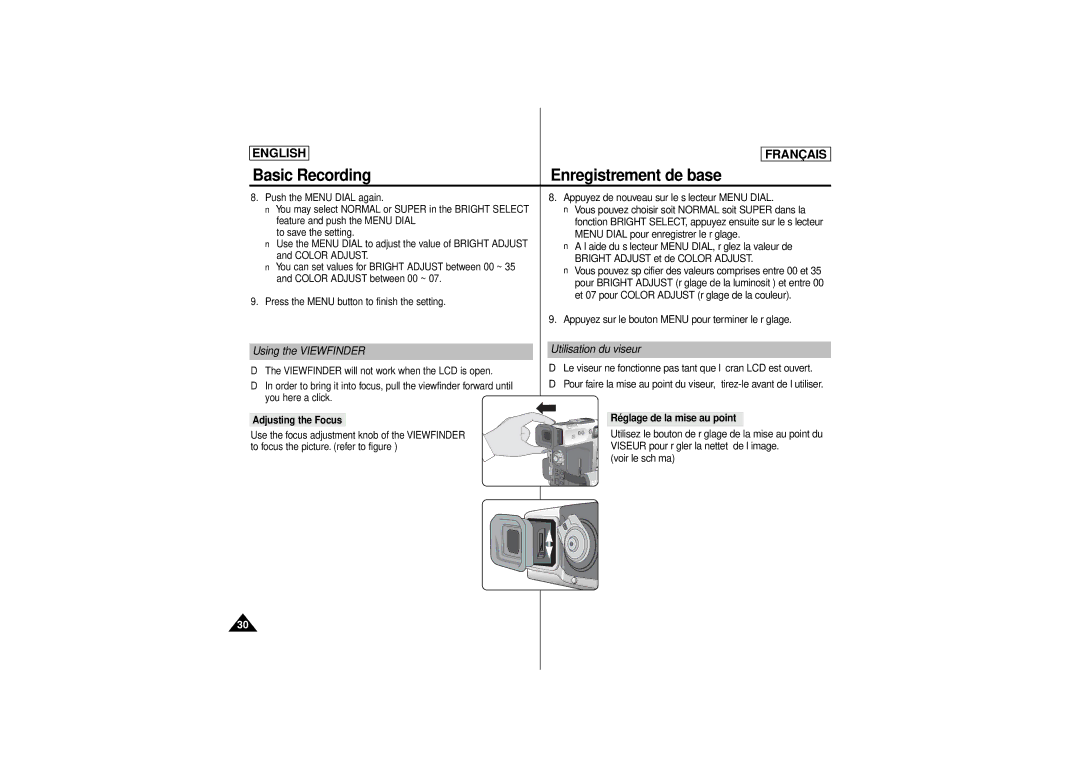
Using the Viewfinder Utilisation du viseur
Adjusting the Focus Réglage de la mise au point
Stop
Le haut-parleur ne fonctionne qu’en mode VCR
CAM mode. see Utilisée en mode CAM
Speaker works in VCR mode only
Magnétoscope When you use the LCD screen for playback, you
Use of various Functions Utilisation de fonctions variées
Play mode
Advanced Recording Enregistrement avancé
Play
Si vous appuyez sur le bouton Reset de
Disponibilité des fonctions dans chaque mode
Reset
Remise à zéro
Clock SET
Setting switches between
Push the Menu Dial to enable or
Disable the remote control
La télécommande. Le réglage
Dial
REC
You can hear Shutter Sound only when the Photo
Réglez le caméscope en mode
Press the Menu button Menu list will appear
Demonstration
CAM
Initial
Sports mode
Auto mode
Mode Auto
Mode Sports
Setting the Program AE
Program AE
Auto
Hold
Indoor
Zooming In and Out Zoom Avant et zoom Arrière
Digital Zoom
Sub menu list will appear La liste de sous-menu apparaît
Turn the Menu Dial highlight to Camera
Surligner Camera et appuyez sur le bouton
Fonction EIS, et appuyez sur le bouton Menu
Mosaic mode
DSE function works in CAM and M.REC mode only
Mode ART
Red, green, blue or yellow colors Mode Make UP
Selecting an effect Sélection d’un effet
Push the Menu Dial Surligner Camera et appuyez sur le bouton
Program AE, WHT.BALANCE, D.ZOOM, EIS, DSE
Select
VCR mode
La fonction REC Mode est utilisable dans les modes CAM
LP lecture longue durée Ce mode permet 90 minutes
Caméscope et VCR magnétoscope
SUB SOUND2
Wind CUT
DATE/TIME
TIME, DATE/TIME
Date & Time
TV Display Affichage sur un téléviseur
CAM, VCR. M.REC, M.PLAY
Using Quick Menu
Utilisation du Menu Rapide
EIS
Advanced Recording
Shutter Speed & Exposure
You can set Shutter Speed and Exposure only
CAM/M.REC mode
Placez l’interrupteur d’alimentation en mode CAM
Quick Menu
Mode Easy Mode débutants
Easy Mode for Beginners
MENU, BLC, MF/AF
Custom Mode Mode Custom Mode utilisateur
Custom
MF/AF Manual Focus/Auto Focus
MF/AF Mise au point manuelle ou automatique
BLC Back Light Compensation BLC Compensation de contre-jour
BLC off BLC on
Easy
Fondu
Audio dubbing
Enregistrez un nouveau son à laide du doublage micro
Dubbing sound
Sub-menu
Push the Menu Dial to enter Appuyez sur le bouton Menu
Dial pour entrer dans le
Utilisez le sélecteur Menu Dial
Searching for a Photo picture Recherche d’une image Photo
Prise de vue vers le bas
General recording Downward recording
Prise de vue générale
Upward recording
Playback on the LCD
Tape Playback Lecture d’une cassette
Lecture sur l’écran LCD
Playback on a TV monitor Lecture sur un téléviseur
Connecting to a VCR
Playback
Lecture
Playback pause
Fonctions variées en mode VCR magnétoscope
Various Functions while in VCR mode
FWD
ADV button on the remote control
Mode Arrêt sur image Still
Trame par trame, placez la cassette en mode
ADV de la télécommande
Zero Memory Mémoire zéro compteur
VCR
REW button
Ieee 1394 Data Transfer
Connecting to a DV device
Connecting to a PC Connexion sur un PC
Transfert de données numériques par Ieee 1394 i.LINK
System requirements Configuration du système
Pause
CPU Intel Pentium II TM processor
USB interface Interface USB
You can easily transfer a still image from a camera, tape
Compatible or better Supérieurs Operating system Windows
Installation du programme
Installation du programme DVC Media
Do not connect the camcorder to PC before installing
De CD-ROM
Sur le bouton Next
When the dialogue box appears
Pour installer le logiciel dans un autre
Défaut, cliquez sur Next
Connecting to a PC Connexion à un PC
Branchez l’autre bout du câble USB à la prise USB du
On the camcorder. USB jack Caméscope Remarques
Digital Still Camera mode Mode appareil photo numériques
Memory Stick
Show
Inserting Memory Stick Insertion du Memory Stick
Retrait du Memory Stick Removing the Memory Stick
REV
Image Format
Format d’image
Qualite
Quality 8MB
16MB
8Mo
Recording Still images to a Memory Stick in M.REC Mode
Recording images to a Memory Stick
Enregistrement dimages fixes sur un Memory Stick
’une cassette sur un Memory Stick, utilisez la fonction
You can record still image from a cassette onto a Memory
Qu’image fixe
Copy
Viewing Still images
To view a slide show
Previous image and upwards to go to
Press the Photo button to view 6 images on Single screen
Turn the Menu Dial downwards to go Sous l’image
Next image
La cassette sont copiées sur le Memory
All still images that recorded on a cassette will
Be copied to a Memory Stick
Pour localiser des images fixes et la copie démarre
Marquage des images à imprimer
Le Menu Dial
No Stored IMAGE! et Apparaissent à l’écran Using FWD
Push the Menu Dial Appuyez sur le Menu Dial
This File protège le fichier actuellement sélectionné
Execute deletes the selected images Supprimer l’lesimages
Vous pouvez effacer des images fixes enregistrées sur le
Memory Stick Image protection
Execute supprime l’les images sélectionnées
Fichiers Seront Supprimes ! ETES-VOUS SUR DE
Maintenance Entretien
OFF
Nettoyage des têtes vidéo
Soft cotton swab Coton doux Once the cleaning is completed
Cleaning the Video Heads
Que les têtes vidéo soient sales
Source d’alimentation
Color system Normes couleur
Self Diagnosis Display Affichage de l’Auto-diagnostic
Troubleshooting Dépannage
Troubleshooting
Dépannage
Lent Il n’y a pas de Insérez un Memory
Plus proche
Modèle SCD180
Specifications Spécifications techniques
Model name SCD180
System
Index
Samsung Limitée
Warranty Canada users only Garantie pour le Canada
Garantie
Exceptions Responsabilités NON Couvertes
English This Camcorder is Manufactured by
Samsung Electronics’ Internet Home