Jun
Trademarks
Copyright Notice
Jun
Preface
Overview
About this Manual
Scope
Printer Orientation
Safety Notes
Organization
Special Features of This Printer
Table of Contents
Determining Values Entering Values
Front Side of the Printer is Heavier Than the Rear
Front view Control panel Rear view Internal view
Error Messages
Dealing With Problems
When Long Paper Jams
Replacing the Fuser Unit
Replacing the Retard Roll
LCD Display LED Indicators Pushbuttons
Understanding and Navigating the Control Panel Menus
Resolution
Power-on Files Defined
Printer Setup Job Accounting
Safety Notes
Safety Notes
Graphic Symbols Used
For Installation & Relocation
600 mm/111.6 100 mm 100 mm/3.9 350 mm
Safety Notes
For Power & Earth Connection
Class D is the regulation for Japan only
Safety Notes
For Machine Operation
Safety Notes
Safety Notes
Illegal Copies and Printouts
Chapter
This Chapter
About this Chapter
Installation Location
Connect the Printer to Its Own AC Outlet
Unsuitable locations
Safety Precautions
When Using an Ultrasonic Water Vaporizer
Handling the Printer
Printer Weight and Dimensions
Minimum Installation Clearances
Printer Location Requirements
Accessories
Refer to
Carrying the Printer
Front Side of the Printer is Heavier Than the Rear
Installing the Drum Cartridge
Installation Procedure
Installing the Optional Accessories
Removing the Tape
Installation Procedure
Installation Procedure
Preparing the Toner Cartridges
Installation Procedure
Loading Paper
Loading Paper in the Multipurpose Feeder
Do not force the print media
Be careful not to bend the print media
Loading Envelopes in the Multipurpose Feeder
Loading Paper in the Paper Tray
Loading Paper
Insert the tray into the printer, and push until it stops
Connecting the Power Cord
Switching Off the Power
Turning the Printer On
Adjusting Colour Alignment
Adjustments
Print out an Alignment
Set the K-V Adjustment
Set the K-H Adjustment
Alignment K-H Adjust
Determining Values
Adjusting Colour Registration
Entering Values
Adjusting Colour Registration
Selecting a Display Language
Display Language English
Printing PCL and PostScript Font Lists
Daily Care
Front view
Main Components and Their Function
Name Description
Control panel
Rear view
Internal view
Standard Paper
Paper Handling
Suitable Paper Types Plain Paper
Paper feed
Special Media
Paper size Paper type
Paper type Maximum capacity
Paper Trays and Types
Paper type Maximum capacity Sheet tray module
Paper size Multipurpose feeder Paper tray 550 sheets
Available Paper Sizes
Duplex Printing Paper Types and Sizes
Paper type Paper size
Unsuitable Paper types
Storing Paper
Loading Paper
Loading Envelopes in the Multipurpose Feeder
Loading Paper in Paper Tray
Loading Paper
Insert the tray into the printer, and push until it stops
Cleaning the exterior
Cleaning the Printer
Cleaning the interior
Cleaning the Density Sensor
Cleaning the Printer
Cleaning the Printer
Cleaning the Drum Cartridge
Cleaning the Printer
Cleaning the Printer
Close the output tray cover Close the front cover
Moving the Printer
Moving the Printer
Close the output tray cover and the front cover
Moving the Printer
Troubleshooting
Power Problems
Dealing With Problems
Description Cause Action
Cannot Print
Status Items to check Action
Print Quality Problems
Transfer Roll Cartridge on
Fuser Unit on
Black half-tone Environment
Adjusting Colour Alignment on
Blotted printing
Loading Paper in Paper Tray on
Printing Is Not Clear
Special Media on
Paper Transport Problems
Clearing Paper Jams on
Other Problems
Safety Notes
Possible Cause Action Line 2 of display
Error Messages
Error Message Possible Cause Action
Crum ID PHD
Envelope sensor faulty
Clearing Paper Jams
Clearing Paper Jams
Paper Jams in the Multipurpose Feeder
Paper Jams in the Standard Tray
Paper Jams in the Standard Tray
Paper Jams between Drum Cartridge and Fuser Unit
Fuser is hot. Do not touch, doing so may cause burns
Paper Jams at the Fuser Unit
Paper Jams at the Fuser Unit
Paper Jams at the Fuser Unit
Paper Jams at the Fuser Unit
When Long Paper Jams
Paper Jams at the Paper Inverter
Paper Jams in the Optional Tray Module
Paper Jams in the Optional Tray Module
About Consumables
Consumables Overview
Toner Cartridges
Drum Cartridge
Fuser Unit
Transfer Roll Cartridge
Retard Roll
Storage Precautions
Toner Cartridge Handling Precautions
Handling Precautions
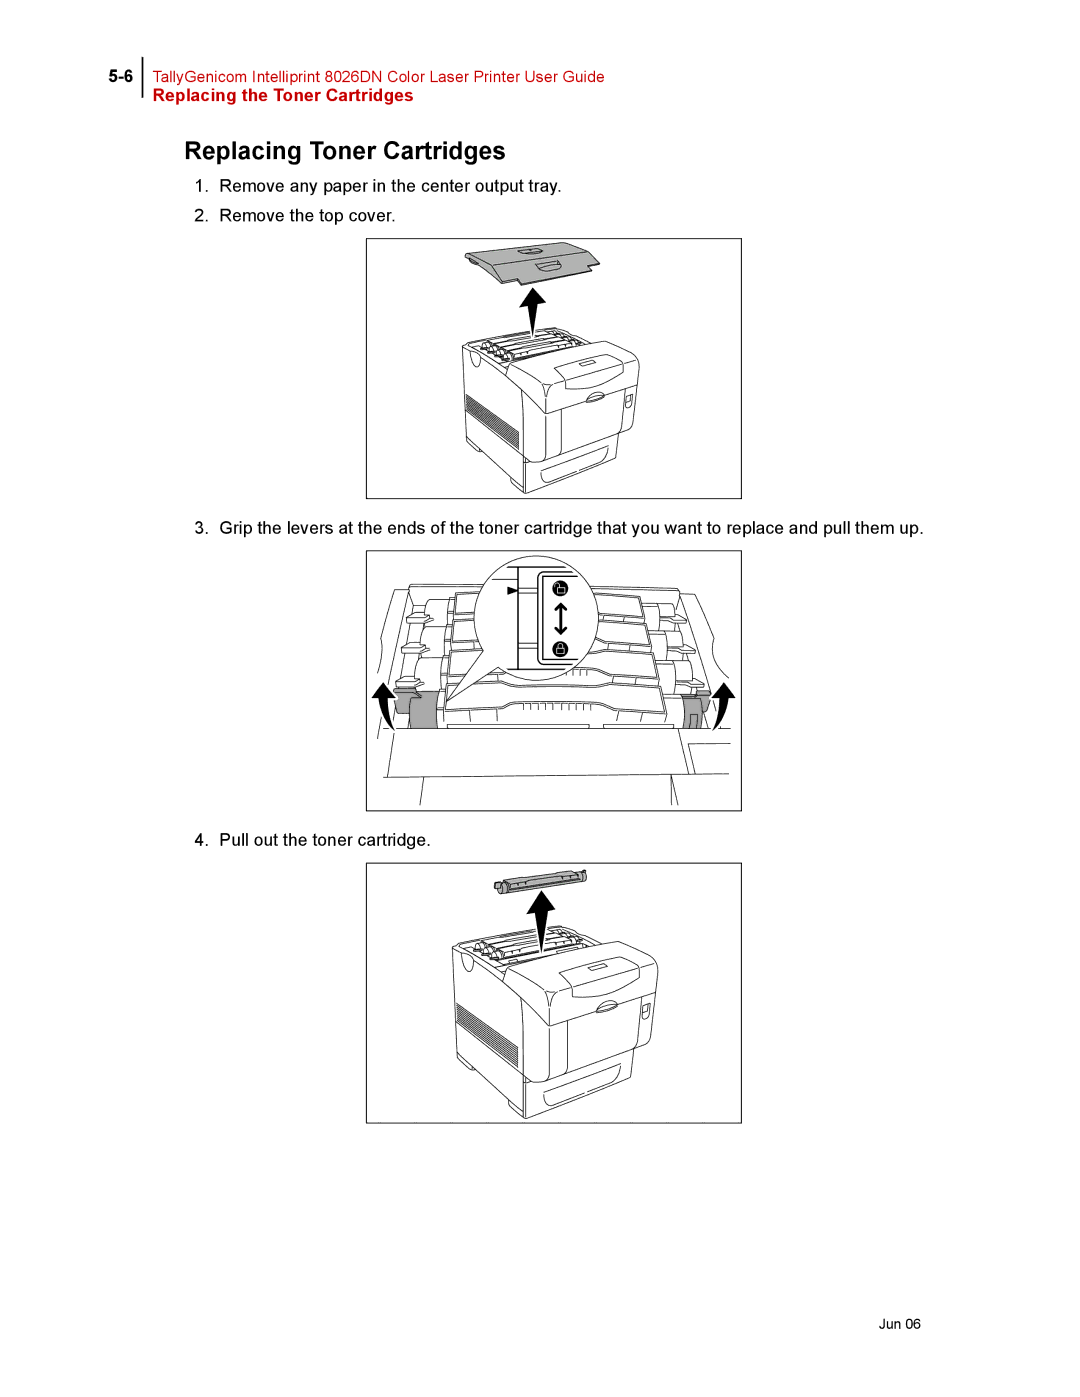
Replacing the Toner Cartridges
Replacing Toner Cartridges
Replacing the Toner Cartridges
Replacing the Toner Cartridges
Drum Cartridge
Replacing the Drum Cartridge
Drum Cartridge
Drum Cartridge
Storage Precautions
Transfer Roll Cartridge
Transfer Roller Cartridge Handling Precautions
Replacing the Transfer Roll Cartridge
Transfer Roll Cartridge
Transfer Roll Cartridge
Fuser Unit
Replacing the Fuser Unit
Fuser Unit
Close the front cover
Retard Roll
Replacing the Retard Roll
Retard Roll
Optional Accessories
Options Overview
Options
Sheet Tray Module
Installing the Optional 550 Sheet Tray Module
Tray Module
Tray Module
Tray Module
Installing the Optional 1100 Sheet Tray Module
Tray Module
Tray Module
Tray Module
Installing the Optional 550 Sheet and 1100 Sheet Tray Module
Tray Module
Tray Module
Tray Module
Tray Module
Removing the Tray Module
Refer to
Understanding Navigating the Control Panel Menus
LCD Display
Control Panel Features
LCD Display
Pushbuttons
LED Indicators
LED Color When OFF When on When Blinking
Pushbutton Function
Control Panel Features
Navigating the Control Panel Menus
Menu Job Library
Navigating the Paper Menu
Menu Structure
PCL Menu
Status Menu
Status Menu
Job Library
Procedure PCL
At the Computer
Job Library
Procedure TallyGenicom PS
Job Library
Operation on the control panel for both PCL and PS
Print & Delete
Output print data stored for both PCL and PS
DIR
Print secure jobs
Procedure PCL
Job Library
Procedure TallyGenicom PS
Job Library
Number1 PIN
Job Library Errors
Job Accounting
Duplex Bind
Paper Menu
Duplex
Source
Blank Pages
Type
Tray Linking
Tray 1 First
Custom Size
Separator
Unit
Parallel Setup
Interface Menu
Dhcp
USB Setup
PS Menu
Manual Feed to
Font Number
PCL Menu
Font Source
Point Size
Macro Filter
CR Mode
LF Mode
Lines PER
Parameter
Print Area
Values
System Menu
Power Saver
Wait Timeout
Display Language
Developer Reset
JAM Recovery
Power on Files
HEX Print
Quality Menu
Toner Saver
Color Menu
Rendering Intent
Alignment
Refresh Toner
Print Demo
Functions Procedure for Executing Function Reset Printer
Functions Menu
Print Summary
Delete
Submenus Procedure for Changing Setting Print
Flash Menu
Format USR Flash
Format Disk
Disk Menu
Disk Summary
Date/Time Menu
Optional Extended Features
Installing Dram Memory Dimms
Installing Dram Memory Dimms
Installing the Hard Disk/Compact Flash Option
Dram
Installing the Flash Option in the Printer
Installing the Flash Option in the Printer
Connector Compact Flash
Installing the Flash Option in the Printer
Operator Panel Menu Structure
Using the Disk Menu
Using the Flash Menu
PostScript Operators
Format Usr Flash
Device Parameter Sets
Warmstart.ps and Sys/Start Files
Using the Power-On Files Feature
Power-on Files Defined
Collating Feature
Collating, Saved Jobs, and Job Accounting
Click on the Printing Preferences button
Collating, Saved Jobs, and Job Accounting
Collating, Saved Jobs, and Job Accounting
Collating, Saved Jobs, and Job Accounting
Saved Jobs Feature
Saved
Collating, Saved Jobs, and Job Accounting
Collating, Saved Jobs, and Job Accounting
Collating, Saved Jobs, and Job Accounting
Collating, Saved Jobs, and Job Accounting
Check the Enable Advanced Features check box
Collating, Saved Jobs, and Job Accounting
Collating, Saved Jobs, and Job Accounting
Working with Saved Jobs
Incorrect PIN
Job Name Press Select to Delete the job
Reset Info
Job Accounting Feature
Enabled
Print Info
Using the Custom Paper Size Feature
Operator Panel Access
Printer Driver Access
Click on the Paper Size button
Collating, Saved Jobs, and Job Accounting
On the File menu, click Server Properties
Resolution
Custom Page size and Microsoft Word, Word 2000, and Word
Click Save Form or OK
Custom Page size and Microsoft Word, Word 2000, and Word
Accessing the Printer Web
Printer Setup
Paper Source
Printer Status
File Management
Printer Setup
Click on Printer Setup
Accessing the Printer Web
Accessing the Printer Web
Accessing the Printer Web
Email Server Settings
Email Address Settings/Email Alert Conditions
Email Signature Settings
Job Accounting
Click on Job Accounting
Accessing the Printer Web
Accessing the Printer Web
Click on Job Library
Accessing the Printer Web
Accessing the Printer Web
Appendix a
Specifications
Printer Specifications
Printable area
Expected life of Consumables
Specifications
Page
United Kingdom Austria