TallyGenicom Intelliprint 8026DN Color Laser Printer User Guide
System Menu
System Menu
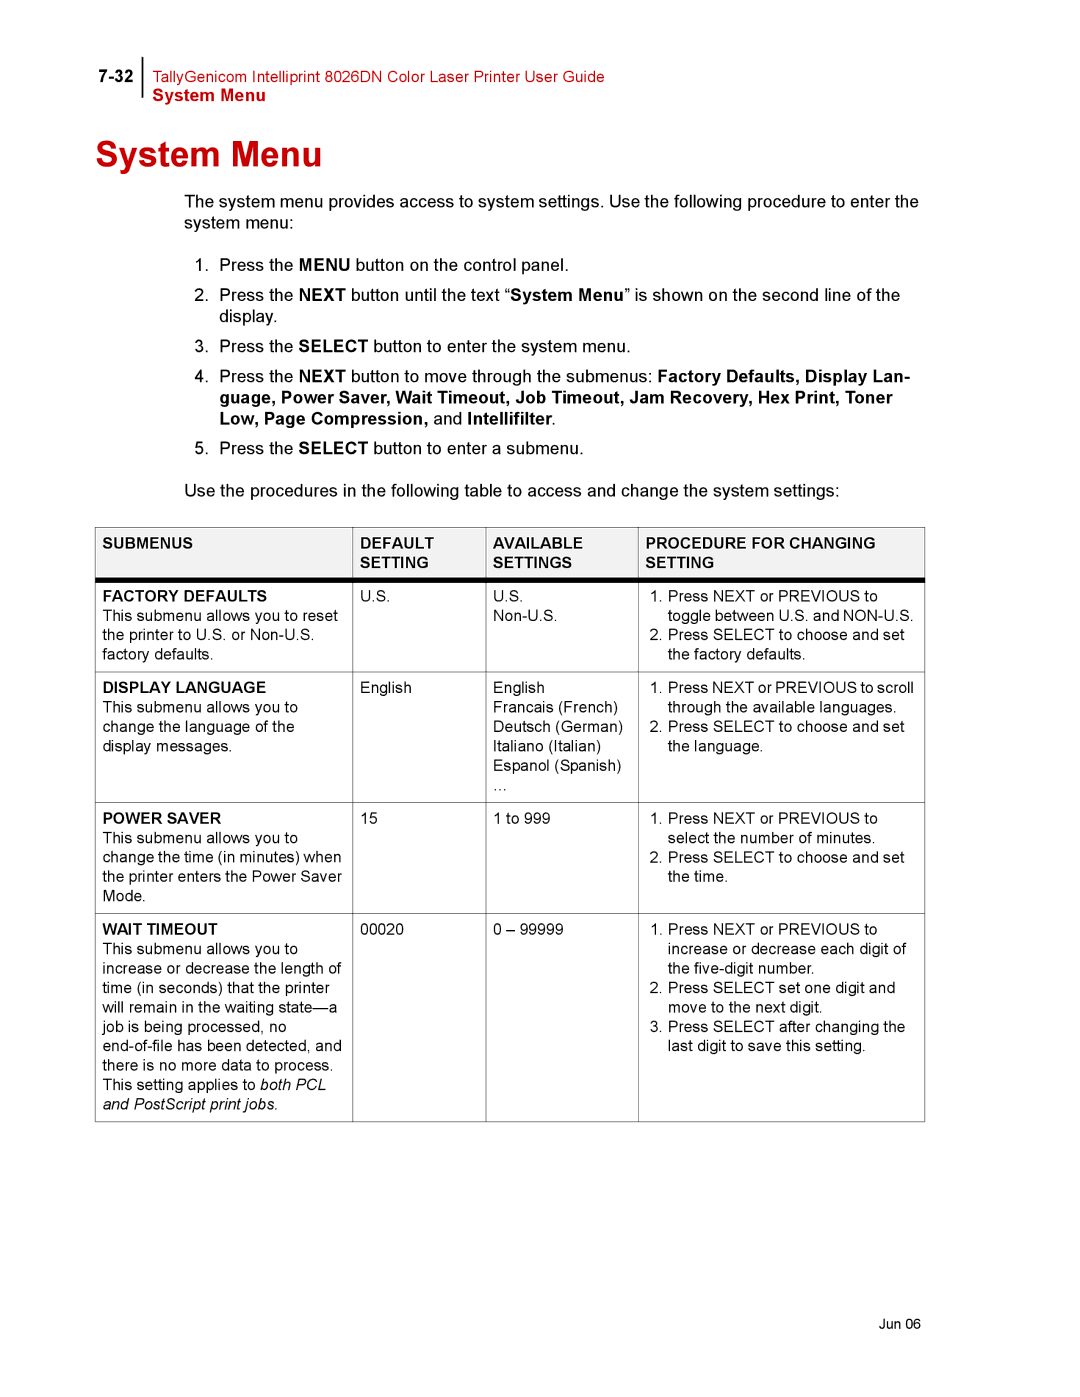
The system menu provides access to system settings. Use the following procedure to enter the system menu:
1.Press the MENU button on the control panel.
2.Press the NEXT button until the text “System Menu” is shown on the second line of the display.
3.Press the SELECT button to enter the system menu.
4.Press the NEXT button to move through the submenus: Factory Defaults, Display Lan- guage, Power Saver, Wait Timeout, Job Timeout, Jam Recovery, Hex Print, Toner Low, Page Compression, and Intellifilter.
5.Press the SELECT button to enter a submenu.
Use the procedures in the following table to access and change the system settings:
SUBMENUS | DEFAULT | AVAILABLE | PROCEDURE FOR CHANGING | |
| SETTING | SETTINGS | SETTING | |
FACTORY DEFAULTS | U.S. | U.S. | 1. | Press NEXT or PREVIOUS to |
This submenu allows you to reset |
|
| toggle between U.S. and | |
the printer to U.S. or |
|
| 2. | Press SELECT to choose and set |
factory defaults. |
|
|
| the factory defaults. |
|
|
|
|
|
DISPLAY LANGUAGE | English | English | 1. | Press NEXT or PREVIOUS to scroll |
This submenu allows you to |
| Francais (French) |
| through the available languages. |
change the language of the |
| Deutsch (German) | 2. | Press SELECT to choose and set |
display messages. |
| Italiano (Italian) |
| the language. |
|
| Espanol (Spanish) |
|
|
|
| … |
|
|
|
|
|
|
|
POWER SAVER | 15 | 1 to 999 | 1. | Press NEXT or PREVIOUS to |
This submenu allows you to |
|
|
| select the number of minutes. |
change the time (in minutes) when |
|
| 2. | Press SELECT to choose and set |
the printer enters the Power Saver |
|
|
| the time. |
Mode. |
|
|
|
|
|
|
|
| |
WAIT TIMEOUT | 00020 | 0 – 99999 | 1. Press NEXT or PREVIOUS to | |
This submenu allows you to |
|
|
| increase or decrease each digit of |
increase or decrease the length of |
|
|
| the |
time (in seconds) that the printer |
|
| 2. | Press SELECT set one digit and |
will remain in the waiting |
|
|
| move to the next digit. |
job is being processed, no |
|
| 3. | Press SELECT after changing the |
|
|
| last digit to save this setting. | |
there is no more data to process. |
|
|
|
|
This setting applies to both PCL |
|
|
|
|
and PostScript print jobs. |
|
|
|
|
|
|
|
|
|