Manuals
/
Samsung
/
Computer Equipment
/
All in One Printer
Samsung
CLX-6250, CLX-6220
manual
China only
Models:
CLX-6220
CLX-6250
1
16
155
155
Download
155 pages
32.17 Kb
13
14
15
16
17
18
19
20
Troubleshooting
Specs
Install
ITU-T No chart
Wlan Signal
Changing the default mode
Delaying a fax transmission
Important safety symbols
Wireless Guidance
Maintenance
Page 16
Image 16
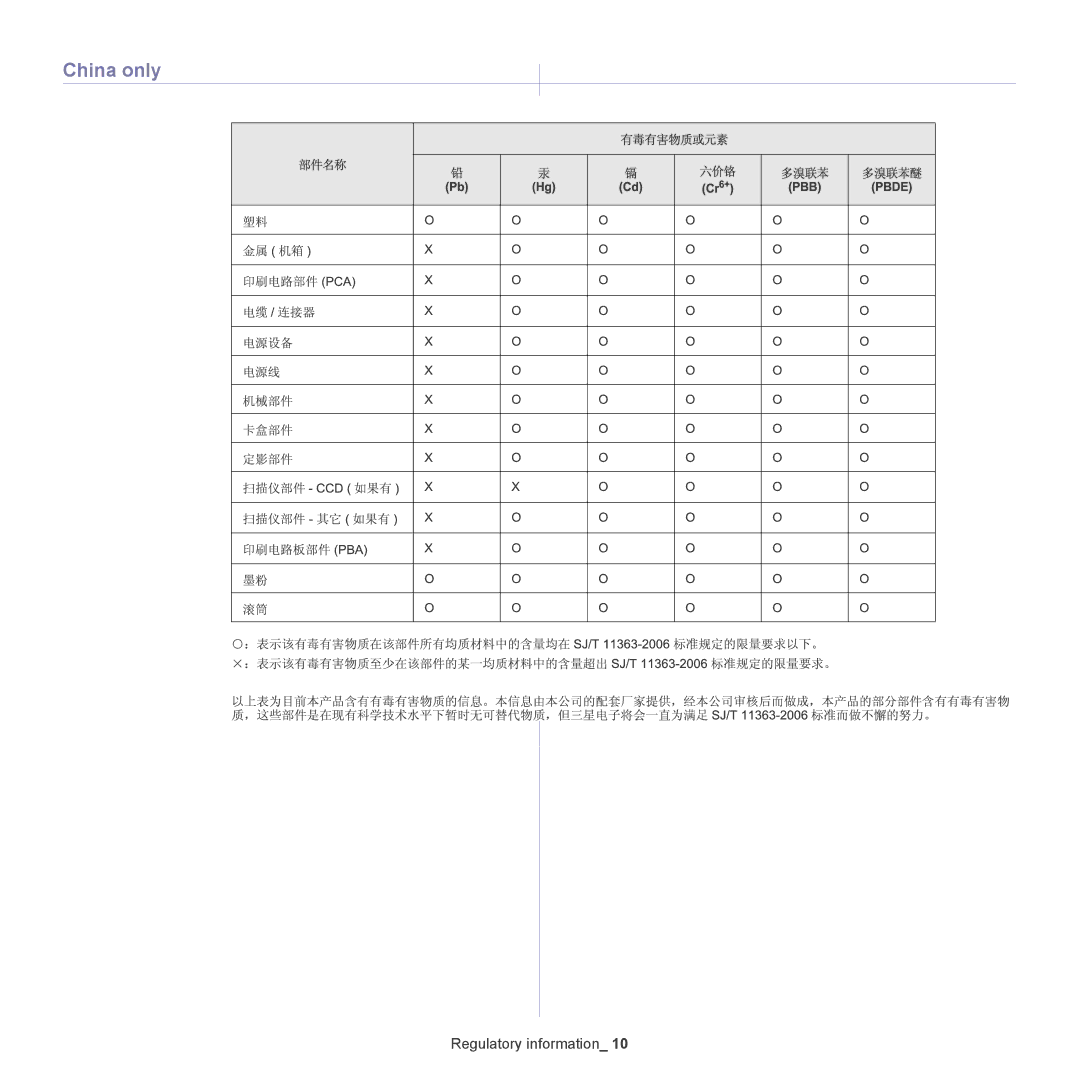
China only
Regulatory information
_ 10
Page 15
Page 17
Page 16
Image 16
Page 15
Page 17
Contents
Multi-Functional Printer
Copyright
Copyright
Safety information
Important safety symbols
Safety information
Operating environment
Operating method
Installation / Moving
Maintenance / Checking
Supply usage
Laser Safety Statement
Regulatory information
Taiwan only
Regulatory information
Ozone Safety
Mercury Safety
Power Saver
Recycling
Correct disposal of batteries in this product
Radio Frequency Emissions
FCC Information to the User
Canadian Radio Interference Regulations
Taiwan only Turkey only
FCC Statement for Wireless LAN use
Federal Communications Commission FCC
Russia only Fax Branding
Ringer Equivalence Number
Replacing the Fitted Plug for UK Only
You should also know that
Important warning
Green and Yellow Earth
Approvals and Certifications
Declaration of Conformity European Countries
EC Certification
Wireless Guidance
OpenSSL License
Original SSLeay License
China only
About this user’s guide
Convention
About this user’s guide
Convention Description Example
Finding more information
Material name Description
Special Features
Features of your new product
Features of your new product
Features by Models
IPv6
CLX-6220 Series CLX-6250 Series
Optional Tray
Introduction
Machine overview
Front view
Introduction
Rear view
EXT
Control panel overview
Starts a job in black or color mode
Power Saver button
Understanding the Status LED
Introducing the useful buttons
Menu button
Setting up the hardware
Getting started
Printing a demo
Supplied software
System requirements
Microsoft Windows
Installing USB connected machine’s driver
Macintosh
Linux
Windows
Direct Input
Search again
Help
Installing the SmartPanel
Installing the Linux Unified Driver
Installing the Printer Setting Utility
Setting up a client computer
Setting up a host computer
Sharing your machine locally
Network setup
Using a wired network
Network environment
Introducing useful network programs
Setting IPv4 address
IPv4 setting using control panel
IPv4 setting using SetIP Program Windows
IPv4 setting using SetIP Program Macintosh
Installing network connected machine’s driver
Network parameter setting
IPv4 setting using SetIP Program Linux
Open the /opt/Samsung/mfp/share/utils
Select Install now
Install Linux Driver
HSelect Uninstall and click Uninstall
Add network Printer
Select Socket/HP Jet Direct in Printer Type
IPv6 Configuration
Installing the Unix printer driver package
Uninstalling the printer driver package
Setting up the printer
Setting IPv6 addresses
Installing printer driver
Connecting SyncThru Web Service
DHCPv6 address configuration Stateful
Basic setup
Altitude adjustment
Setting the date and time
Changing the display language
Changing the clock mode
Changing the default mode
Setting sounds
Entering characters using the number keypad
Using the power saving mode
Setting job timeout
Setting the color report
Setting the default tray and paper
Changing the font setting
Media and tray
Preparing originals
Loading originals
On the scanner glass
Media sizes supported in each mode
Mode Size Source
Selecting print media
Document feeder
Loading paper in the tray
Changing the tray size
Tray 1/optional tray
Multi-purpose tray
Tips on using the multi-purpose tray
Full Empty
Envelope
Printing on special media
Types Tray Optional tray Multi-purpose
Labels
Card stock/Custom-sized paper
Letterhead/Preprinted paper
Used paper
Setting the paper size and type
Selecting an output location
For Letter-sized paper
For A4- or Legal-sized paper
Printing
Printer driver features
Introducing useful software programs
Basic printing
Canceling a print job
Opening printing preferences
Using help
Using special print features
Using a favorite setting
Printing multiple pages on one sheet of paper
Printing booklets
Printing on both sides of paper
Change percentage of your document
Fitting your document to a selected paper size
Using watermarks
Using overlay PCL driver only
Job Setting CLX-6250 Series only
Adjusting color
Graphics tab options
Deleting a page overlay
Using direct printing utility CLX-6250 Series only
What is Direct Printing Utility?
Postscript options
Enhancing glossiness Windows only
Changing the default print settings
Setting your machine as a default machine
Using the job accounting option
Printing to a file PRN
Macintosh printing
Changing printer settings
Printing a document
Job Setting CLX-6250 Series only
Printer Features
Linux printing
Printing from applications
Configuring Printer Properties
Open the Unified Driver Configurator
Printing files
Printer Properties window opens
Unix printing
Changing the printer settings
Proceeding the print job
Copying
Changing the settings for each copy
Basic copy
Changing the default copy settings
Using special copy features
Reducing or enlarging copies
ID card copying
Up or 4-up copying N-up
Poster copying
Clone copying
Book copying
Adjusting background images
Margin shift copying
Edge erase copying
Gray enhance copying
Setting copy timeout
Copying both sides of the originals
Setting up an email account
Scanning
Basic scanning method
Scanning originals and sending through email Scan to Email
Storing on your local machine
Storing email addresses
Searching Address Book for an entry
Scanning originals and sending to your computer Scan to PC
For USB connected machine
For network connected machine
Printing Address Book
Setting authentication for authorized user
Scanning originals and sending via SMB/FTP Scan to server
Using Samsung Scan and Fax Manager
Set Scan Button tab
Change Port tab
Scan Assistant
Changing the scan feature settings
Changing the default scan settings
Scanning with TWAIN-enabled software
Scanning using the WIA driver
Setting scan information in Scan Manager
Macintosh scanning
Windows Vista
Scanning with USB
Adding Job Type Settings
To save a new Job Type setting
To save a Job Type setting for the next scan job
Linux scanning
To delete a Job Type setting
Using the Image Manager
Tools Name Function
Using a fax in your computer
Faxing
Preparing to fax
Sending a fax
Setting the fax header
Sending a fax
Sending a fax manually
Set Fax Receiving tab
Delaying a fax transmission
Confirming a transmission
Automatic redialing
Redialing the last number
Receiving a fax
Receiving faxes manually using an extension telephone
Receiving faxes using Drpd mode
Receiving in secure receiving mode
Activating secure receiving mode
Adjusting the document settings
Forwarding a fax to another destination
Setting up address book
Group dial numbers
Speed dial numbers
Searching address book for an entry
Printing sent fax report automatically
Deleting a Address Book for entry
Using usb memory device
Using USB memory device
About USB memory device
Scanning to an USB memory device
Backing up data
Printing from a USB memory device
Managing USB memory
Formatting a USB memory device
Viewing the USB memory status
Machine status and advanced feature
Fax setup
Changing the fax setup options
Sending
Copy setup
Change default
Changing the copy setup options
Auto Report
Changing the scan setup options
Scan setup
Printing a report
Network
Clearing memory
Document management
Menu overview
Job management
Items Option
Machine status and advanced feature
DHCPv6 Config
Wirelessd
Wlan Settings
Wlan Default
Using SyncThru Web Service
To access SyncThru Web Service
SyncThru Web Service overview
Management tools
Using the Smart Panel program
Mail notification setup
Setting the system administrator information
Understanding Smart Panel
Changing the Smart Panel Program Settings
Using SmarThru Office
Smarthru Office
Scanning
Using the Unified Linux Driver Configurator
Opening the Unified Driver Configurator
Printing
Sending a file via fax
Printers configuration
Scanners configuration
Printers tab
Classes tab
Switches to Ports configuration
Ports configuration
Sharing Ports Between Printers and Scanners
Maintenance
Adjusting the color contrast
Printing a machine report
Monitoring the supplies life
Using Toner Low Alert
Cleaning a machine
Cleaning the outside
Cleaning the inside
Cleaning the scan unit
Storing the toner cartridge
Tips for moving & storing your machine
Handling instructions
Use of non-Samsung and refilled toner cartridge
Troubleshooting
Troubleshooting
Redistributing toner
Clearing original document jams
Input misfeed
Exit misfeed
Roller misfeed
Tips for avoiding paper jams
Clearing paper jams
Tray
Optional tray
Inside the machine
Exit area
Troubleshooting
Duplex unit area
Understanding display messages
Message Meaning Suggested solutions
Checking display messages
Installed
Is not installed
Install it
Reinstall Group
Junk Fax Error
Cancelled
Line Error
Problem
Continue or Cancel. If
Continue Cancel
Bootp problem
Bootp has a
Solving other problems
Power problems
Paper feeding problems
Condition Suggested solutions
Printing problems
Condition Possible cause Suggested solutions
Machine
Does not print
Selects print
Materials from Printing
Wrong paper Preferences may
Source
Printing quality problems
Condition
Copying problems
Condition Suggested solution
Scanning problems
Fax problems
Samsung Scan and Fax Manager Problem
Common PostScript problems
Common Windows problems
Problem Possible cause Solution
Common Linux problems
Common Macintosh problems
Configuration, then press Drivers. Make
Not appear on
Scanners list
Supplies and accessories
How to purchase
Supplies and accessories
Available supplies
Available accessories
Maintenance parts
Accessory Function Part name
Replacing the toner cartridge
Replacing the paper transfer belt
Activating the added accessories in printer properties
Necessary precautions to take when installing accessories
Upgrading a memory module
Installing a memory module
Job Settings
Printing with the optional memory CLX-6250 Series only
Controlling the active job queue
Installing a wireless network interface card
Installing a wireless network interface card
File Policy
Using the control panel
Configuring the machine’s wireless network
Connector Wireless Interface card
Installing a hard disk
Installing a hard disk
Printing with the optional hard disk
Form file
Creating new form files
Checking replaceable’s lifespan
Deleting residual image data
Specifications
Hardware specifications
Environmental specifications
Electrical specifications
Specifications
Print media specifications
Specifications
Administrator’s guide windows only
Remote installation
Domain remote installation
Administrator’s Guide Windows only
Workgroup Remote Installation
Error log messages
Create Customized Installer
Creating a setup package
Modifying a setup script file
Creating a setup script file
Set Printer Drivers window appears. Click Next
Command-line Parameters
Silent installation Mode
Command Definition Description Line
Language code
Opens Printers and Faxes
Printers and Faxes folder
Code Language
Remote Installation related questions
Create Customized Installer related questions
Frequently Asked Question
Question Answer
Contact Samsung worldwide
Contact samsung worldwide
Country/Regio Customer Care Center Web Site
Portugal
Glossary
Dot Matrix Printer
Duplex
Duty Cycle
Emulation
ITU-T No chart
Intranet
IP address
MAC address
Resolution
NetWare
Originals
PostScript
Subnet Mask
Toner Cartridge
UNC Path
Watermark
Top
Page
Image
Contents